
Tubular Herringbone Stitch For Beginners
In this blog post, I’m going to be showing you how to work in tubular herringbone stitch. I’m assuming that this is a new technique for you. So, I will be sharing a few tips as well as the written instructions and diagrams. If you learn better from video tutorial, then you can also learn this technique in an online class. Just follow this link to get started with the class at any time.

Starting Tubular Herringbone Stitch
I have covered the starting techniques in a separate blog post. You have a couple of options to use. So, if you are a complete beginner, please follow this link and complete the instructions in that blog. Then come back here.
I want you to use your favourite starting technique to set up a little tube that is six stacks long and each stack is two beads high. Naturally, you will also follow the instructions to join your strip into a tube. So, you are then all ready to return here and begin.
The Thread Path
Once you have your starting tube, you are simply going to follow the same thread path for every single row.
The thread path is very simple. But you do need to remember that tubular Herringbone has a step up. So, that means at the end of each row, you will be passing through extra beads to complete your existing row and then get into position before beginning your new row.
So, let’s take a look at how that works.
Make sure that your working thread is exiting from a bead in the top of your tube.
Pick up two beads, pass down through the top bead in the adjacent stack and then up through the top bead from the next stack.
This is shown in the diagram below, where the red arrows show the direction of the thread path and your new beads are in light blue.
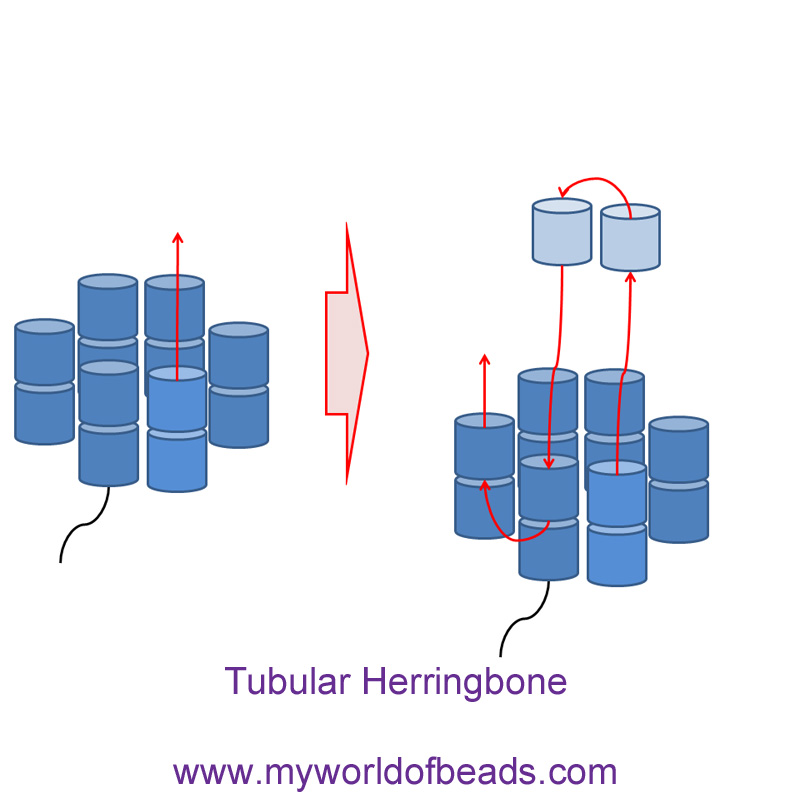
Repeat this action to add two new beads. This is shown on the left in the diagram below.
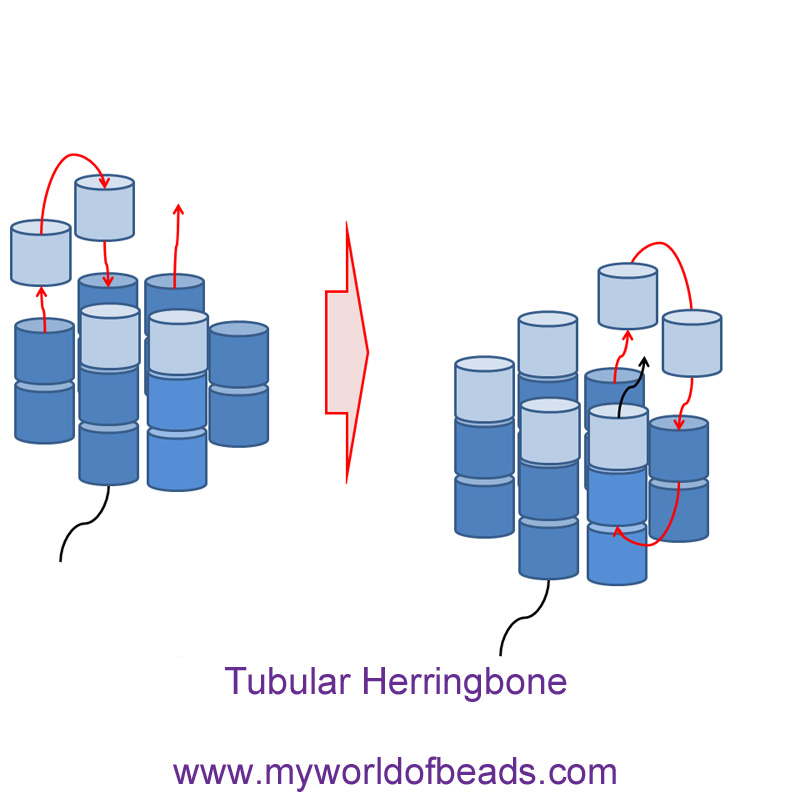
Now you come to your final stitch. This will complete your first row, so you will need to ‘step up’. This means when you have added your two new beads, you will go down through one bead, as normal and then up through the top two beads in the adjacent stack to complete the row and step up. See the right hand diagram, below. The red arrows show your thread path. The black arrow indicates where you will be exiting to start the next row.
So, that is all there is to the stitch. You can just complete this technique as many times as you want, until your tubular rope is the length you need.
Helpful Tips for Tubular Herringbone
Now, you can certainly just grab your seed beads and try using these instructions to make a rope.
Tubular herringbone will work with any size and type of seed beads. If you are just starting, then I suggest you use bigger beads – perhaps size 8. You might also find it easiest to use a different colour for each pair of stacks. That will help you to see how the beads align. It will also help you to remember when to step up. Just note the colour of your final pair, and remember that you will need to step up each time you add that colour.
As you proceed, it’s helpful to repeat the following meme to yourself:
- pick up 2, pass down through 1, up through 1
- pick up 2, pass down through 1, up through 1
- last stitch: pick up 2, pass down through 1, up through 2
Naturally, you can make your tube as wide as you wish. Simply add more – or fewer – stacks to your starting strip. Just remember that you will always need an even number of stacks.
And of course, if you have a different number of beads per row, you can just alter the meme above to reflect that and remember your step up.
If you would like to see this demonstrated on video, then follow this link to the online class.

Projects to try
If you want a lovely beginner-level project to try as you learn this technique, just follow this link. That will take you to the lariat style necklace you see above.
I have designed the project to allow you to try this with different sized seed beads. You can also add an embellishment to give your rope a neat finish. And, the project has the flexibility to work in any colours, or style. So, you can easily adapt it to make it your own.


Thank you!