
Learn odd count Peyote
Before you begin to learn odd count Peyote, you need to be familiar with even count Peyote. So, if you are an absolute novice here, please make sure you follow this even count lesson first. Then come back to start learning odd count.

Start by gathering together your bead weaving tools, thread and some beads. If you’re not sure what these are, then also go back and follow that link to the even count lesson. It explains everything you need to get started.
The difference between odd and even count
As we start to learn odd count Peyote, let me explain, there are just two ways in which it differs from even count.
First, when you pick up your initial string of beads, you need to pick up an odd number.
Second, because you have done this, you will find that you have a problem at the end of each odd-numbered row. That problem is how to turn around. And that is the only reason that you need a separate lesson for odd count Peyote.
Now, off the top of my head, I can think of at least 5 solutions to this problem.
I’m going to explain each one to you. Then, leave you to experiment on your own and work out which you find easiest.
Let’s get started…
So, I invite you to secure your stop bead, pick up an odd number of beads. Then start working row 3 in Peyote, just as you would for even count.
Now, look what happens when you reach the end of row 3…
Just before you pick up your final bead, you would be exiting at the red arrow. You can pick up the bead ok, but what are you going to stitch it into?
The obvious answer at the end of row 3 is to just stitch into bead number 1, underneath it.
So, you can go ahead and do that to make your first turn around. Then you would end up adding your row 4 beads along the bottom, working from left to right, as normal. Then, your row 5 beads would come back from right to left, again, on the bottom.
The problem is, at the end of row 5, you are back to that original issue. How can you fix your final bead? That is the first reason you need to learn odd count Peyote turn around techniques.
A word of warning…
Just be careful if you use this method for your first turn around. If you are following a pattern, then by doing this, your rows will end up out of sync. (If you don’t understand, then try it and see what I mean).
So, you would need to compensate for that. Instead of stringing the beads for rows 1 and 2 to start, you would need to string the beads for rows 3 and 4 in the pattern, then add row 5, then come back down and add rows 2 and then 1. Confused?
Yes, you should be. That’s second reason you are better off learning one of the methods I’m about to show you. Then you don’t have to worry, but just follow a pattern chart as normal.
Learn odd count peyote by cheating!
Yes, that’s right… my own favourite method of odd count is actually a complete cheat.
Take a look at the pattern chart below…
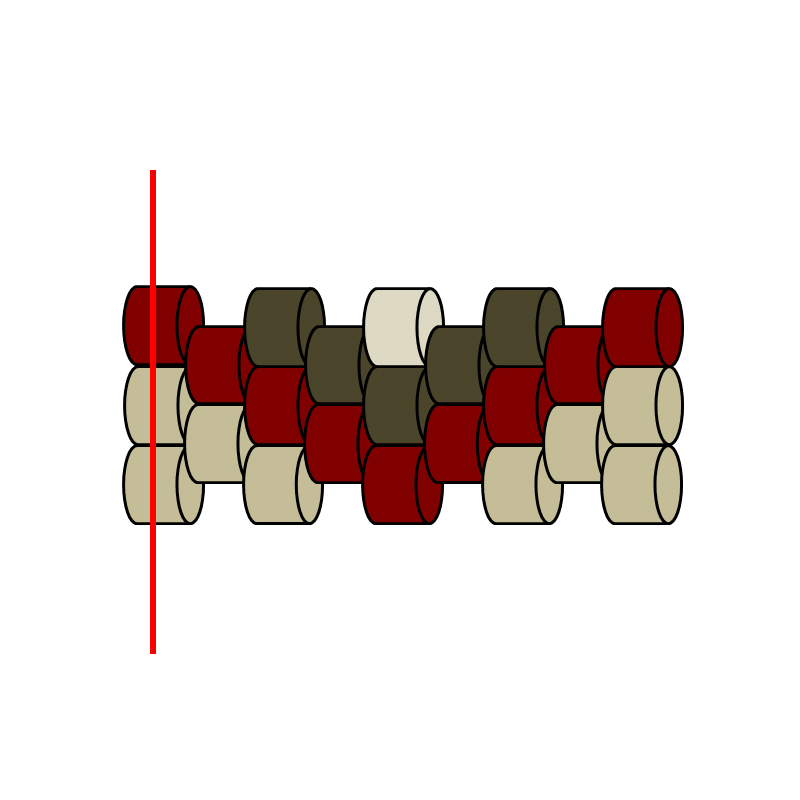
If you ignore the column of beads on the left-hand side (the ones with the red line through), then the remaining beads are actually an even count Peyote pattern.
So, you can bead the even count section. Then, come back and add that first column of beads using basic brick stitch.
Naturally, if you haven’t yet learned brick stitch, this is not going to be a great solution for you. So, let’s explore other options…
Option 1: using your tail thread
This is a really neat, simple option and it also gets rid of your tail thread at the same time.
When you start this method, you need to know how long (roughly) your odd count Peyote strip is going to end up. So, if you are making a bracelet, the answer would be: the length of the finished bracelet. If you are making a pen cover, then the strip will end up long enough to wrap around a pen. And so on. If in doubt, just leave a really long tail!
Now, start by adding your first three rows. Then, if you are using a stop bead, you need to slide it off the tail.
You want to hold your tail so that it is sitting up the left-hand side of your work. Clamp it between your fingers to keep it in place.
Then, as you add your final bead, you are going to wrap your working thread around the tail thread and pass back through that final bead. You need to pull on both the threads to get a good position for your bead.
Keep the tail thread anchored as you work back adding beads along your next row.
You can use this all the way up your strip. Then, when you reach the end, just stitch the remainder of the tail thread in securely to finish off your work.
A word of warning…
When you first begin to learn odd count Peyote, you might feel all ‘fingers and thumbs’. So trying to keep the beads in place can be a challenge. If this is a struggle for you, then you might want to try one of the other turn around methods below.
Option 2 – Square count turn around
This option involves a bit of weaving through beads to fiddle yourself into place. It might sound confusing at first, but once you get into the rhythm, it’s very easy.
Many of the people I have taught use this method to learn odd count Peyote.
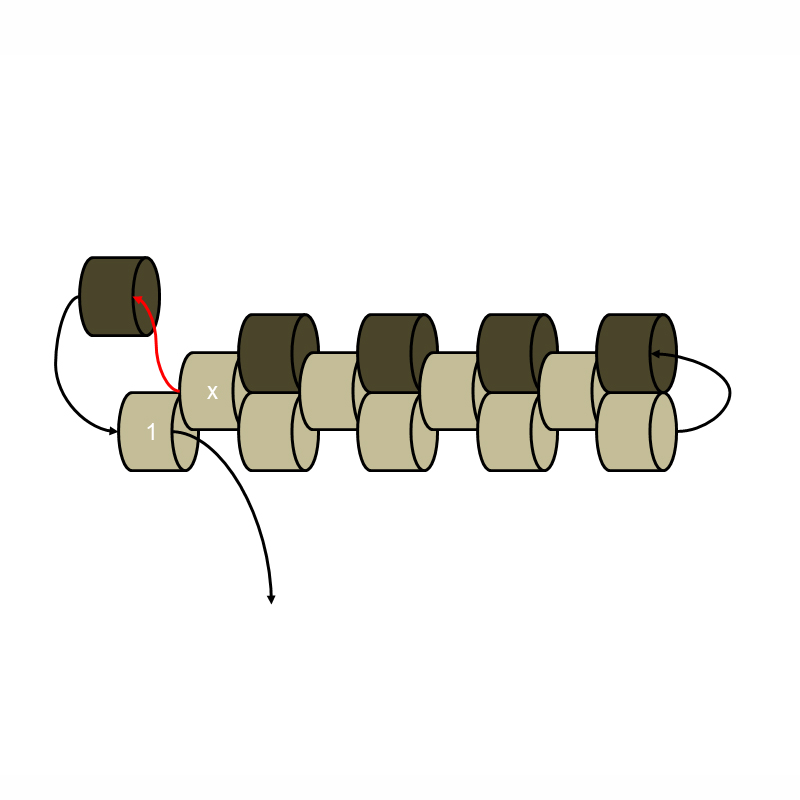
Take a look at the diagram below. When you get to the final bead at the end of your row, your thread will be exiting from bead ‘x’ (red arrow).
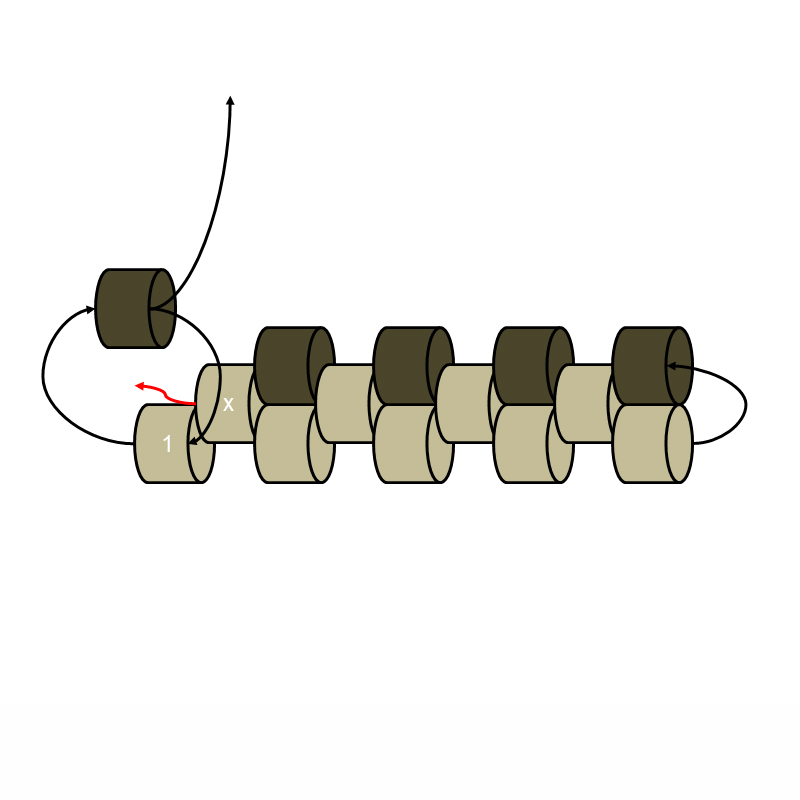
BEFORE you pick up your final bead, pass on down through bead 1, so you will now be exiting from the edge of your work.
Pick up your new bead, then pass into bead 1 again, entering it from the opposite side. So, you will once again be exiting at the edge of your work.
Finally, pass in through your new bead and you’re ready to continue with your next row.
Option 3: Fiddly Peyote!
This is another alternative way of fiddling a thread path through to get into position. With the square stitch, a lot of people who are trying to learn odd count Peyote, forget to pass through bead 1 before they pick up their new bead. So, they then get confused.
This option is an alternative. So, you will pick up your final bead for the row. Then, pass into the bead underneath – bead 1. That’s the black arrow, then the left-hand red arrow.
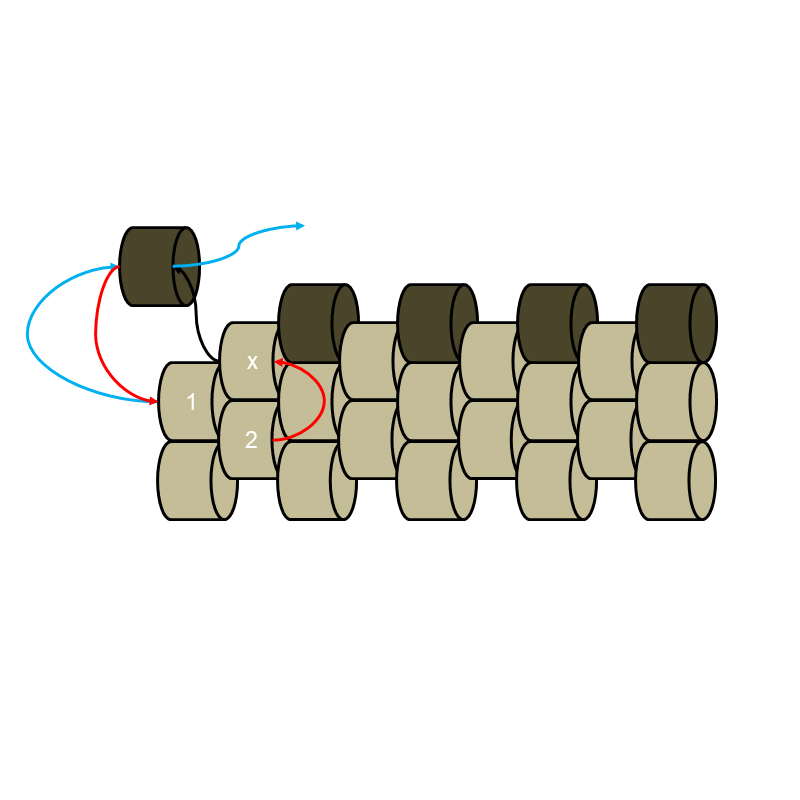
Now, continue on through the bead marked 2. Pass up and out of the bead marked x – red arrow. Now, pass down through bead 1 again. So, you will be exiting from the edge – the blue arrow.
Finally, pass in through your new bead and you’re ready to go.
All of these weaving options are going to feel strange – maybe even complicated – when you first start to learn odd count Peyote. But persevere. Even if you have to keep following the diagram every time to begin with, you will end up getting into a flow.
Option 4: hooking under thread
This is another option that is very simple to grasp when you start to learn odd count Peyote.
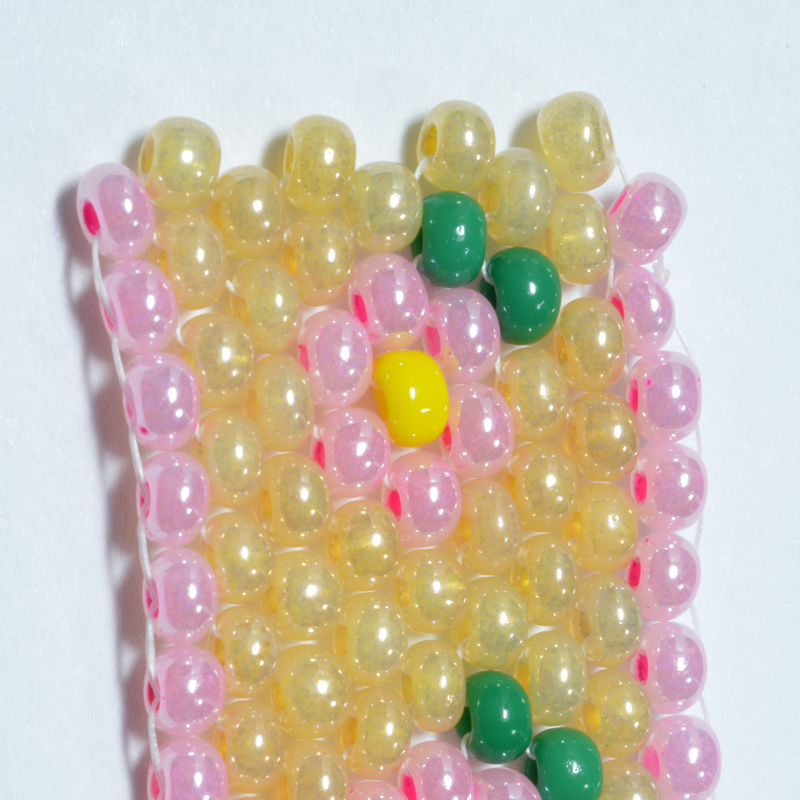
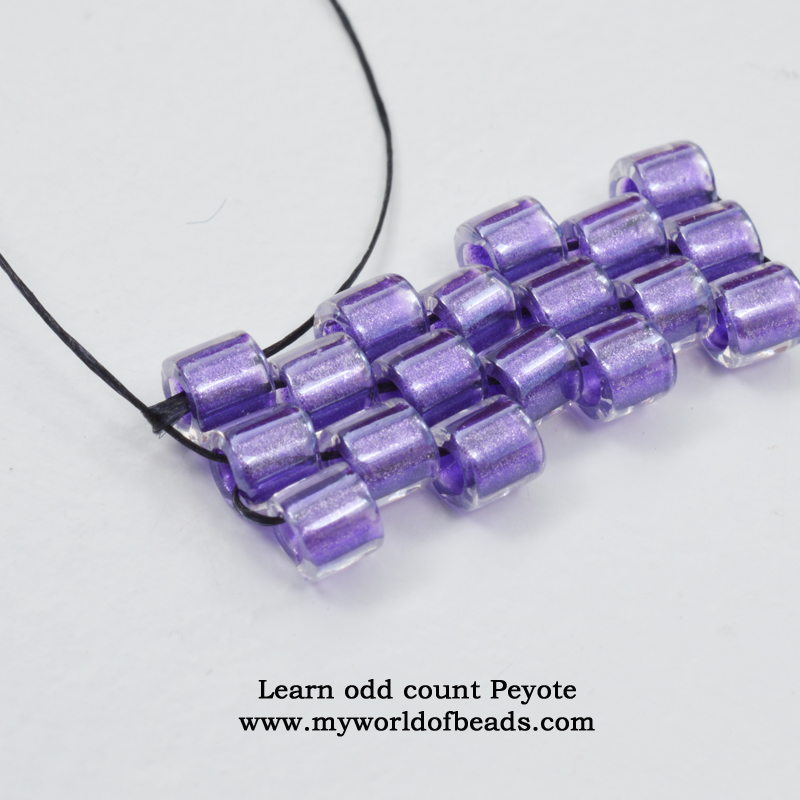
Take a look at that photo of the actual beads again…
Notice how you have a thread linking the beads along the edge. Imagine you have just picked up your final bead. You can hook your needle under the piece of thread that links the two beads below, then pass back through the new bead.
This is similar to the idea of hooking around the tail thread, but you are hooking under a thread that is already anchored in place. So, you might find this easier.
A word of warning…
I tend to find that this technique causes my beads to pull slightly out of alignment. So, that column of beads on the end pulls a little upwards. It doesn’t notice at first, but can become more obvious over the course of a lot of rows. So, that’s just some food for thought…
Over to you…
I suggest that you try some practice pieces and try out the different options for turning around. Find what works well for you. So, you want something that feels comfortable and looks good.
You can download this free PDF to keep. It covers some of the techniques I’ve spoken about here, and also includes some simple project ideas.
Also, bookmark this page so you can keep coming back to it any time you need a reminder.
Patterns to try
Once you learn odd count Peyote, you can move straight on to try a project. This technique is great for making flat bracelets, like this (click on the image to get the tutorial). Don’t be put off by the design. This tutorial takes you through in easy steps, so it is a great project for growing your skills and confidence as you learn odd count Peyote.

You can also use odd count peyote to make pen wraps. This floral design is a nice easy one to start with. Although it has a pattern, it is so regular that it will be simple to follow. Again, click on the image to get your tutorial.


I wish I’d seen this post two days ago when I started an ornament pattern that has three layers of odd-count peyote so I wouldn’t have fought the turns all that time. I’m switching to your cheat method immediately! Thanks so much for another great idea.
You’re very welcome! I’m glad that helps and hope the rest of the project goes well now. Thank you for taking the time to write!
Holy cow! That “ cheat” method for odd count peyote is awesome! I can’t believe I never thought of that. I’ve made it my mission to ignore any pattern with odd count because that odd turn row always got much tighter than the rest of the piece. Thank you so much for sharing this idea.
You are very welcome! I hope you can now enjoy all those beautiful odd count Peyote patterns 🙂
Your ‘just ignore it’ approach is genius! I started something and the instructions given in the pattern for turning left me with an end row that was closer to aligning than being a nice peyote offset. So I ripped it all back, and started again without the last column. I then added that final column later, using what I later realised was basically a 2-bead wide even count peyote. So so so much neater!
Very happy to hear that 🙂
Yes, this is definitely my preferred way of working in odd count – it gives the neatest finish, for sure!
Your “cheat” method is genius! I think it makes for a neater and more finished look to our bead work!
Thank you.
You’re welcome! I agree with you: I love this method because of the neatness it creates. Have fun using it!