Peyote stitch in the ditch technique
Did I just make that up? You might be forgiven for thinking I did. After all, what on earth is peyote stitch in the ditch?

Well, you’ve come to the right place to find out. After I’ve explained the term, I’ll show you how to do this technique. Then, talk about the most common mistakes and how to avoid them.
What is Peyote stitch in the ditch technique?
This is basically adding a new row ON TOP of an existing piece of Peyote. So, your new row will stick out (or up – depending on your perspective).
The reason for the name probably comes from the Peyote stitch structure. When we are talking about adding new rows to grow a Peyote strip or tube, we add new beads on top of the ‘down’ beads – or, in the spaces.
If you’re looking at a piece of Peyote, you have a flat surface. So, to avoid confusion, maybe think of the ‘down’ beads as ‘ditches’. At least, that’s what I always think about…
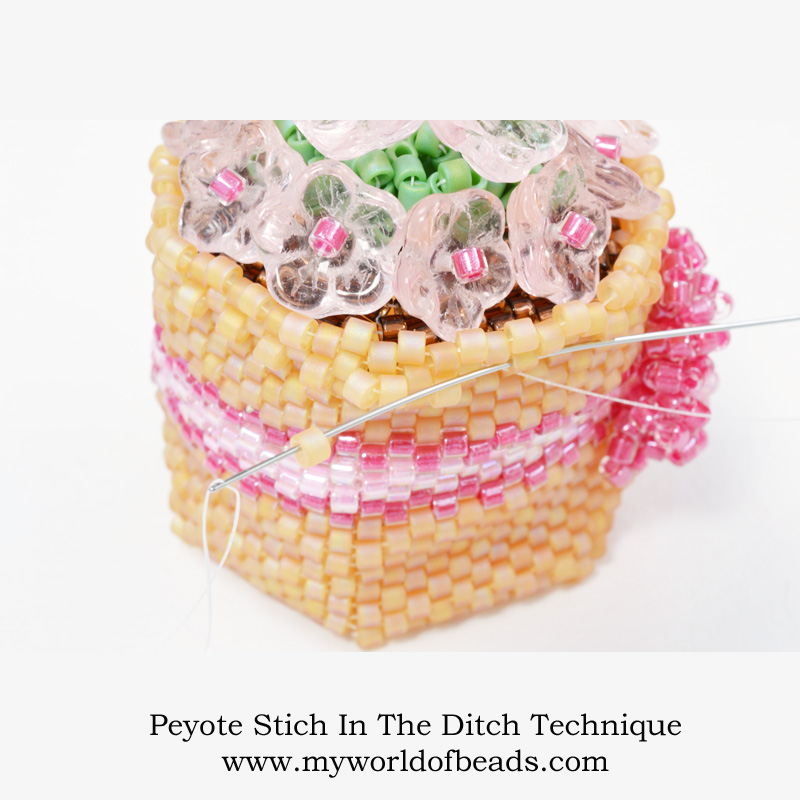
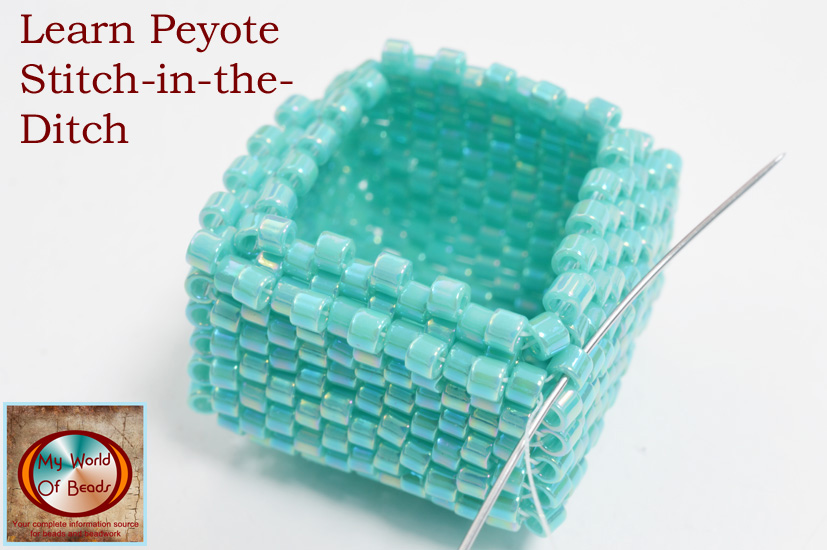
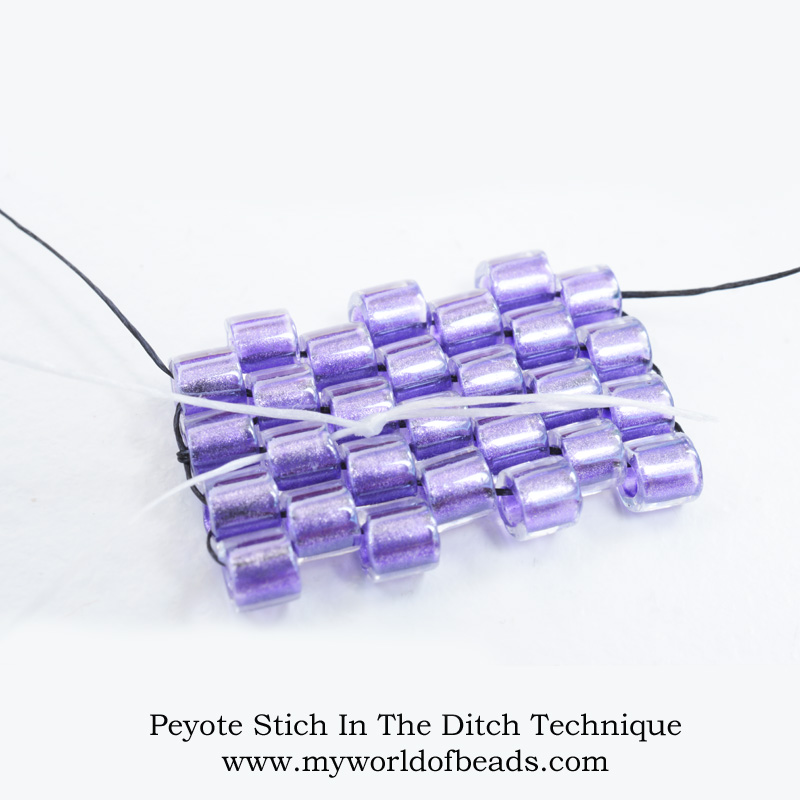
In the photo above, I’ve shown you a sample of actual beadwork with a Peyote stitch in the ditch row being added.

Why use Peyote stitch in the ditch?
To my mind, there are two reasons for using Peyote stitch in the ditch technique.
The first would be to add embellishment to a flat strip, or tube. So, once you have your stitch in the ditch row in place, you will have beads sticking up. You can use these to add new beads that will sit on top of your basic strip/tube.
So, you might continue to work more Peyote rows using your seed beads. Or, you might use this foundation as a way to add in some shaped seed beads.
The second reason for using Peyote stitch in the ditch is to help with structure. So, you may use the technique in a beaded box, to add the lip that stiffens the edge of the box.
I have also used the technique to create a structure for adding a slide clasp.

The stitch in the ditch row enabled me to create a flap at the end of my bracelet. I then slipped the rings on the clasp inside this flap, sealed the ends, and I had a really neat finish for my clasp.
If you want to find out more about how I did that, grab a copy of the Pumpkin jewellery pattern here. I used the technique for the bracelet in that.

How to do Peyote stitch in the ditch
You’ve probably already worked that out. But let me go through the technique in a little more detail in case you need it.
So, grab a piece of even count Peyote. Or, if you need to make one, stitch a little strip with 8 beads per row, and a total of eight rows. Refer to this blog for instructions on how to work in even count Peyote, if you need to.
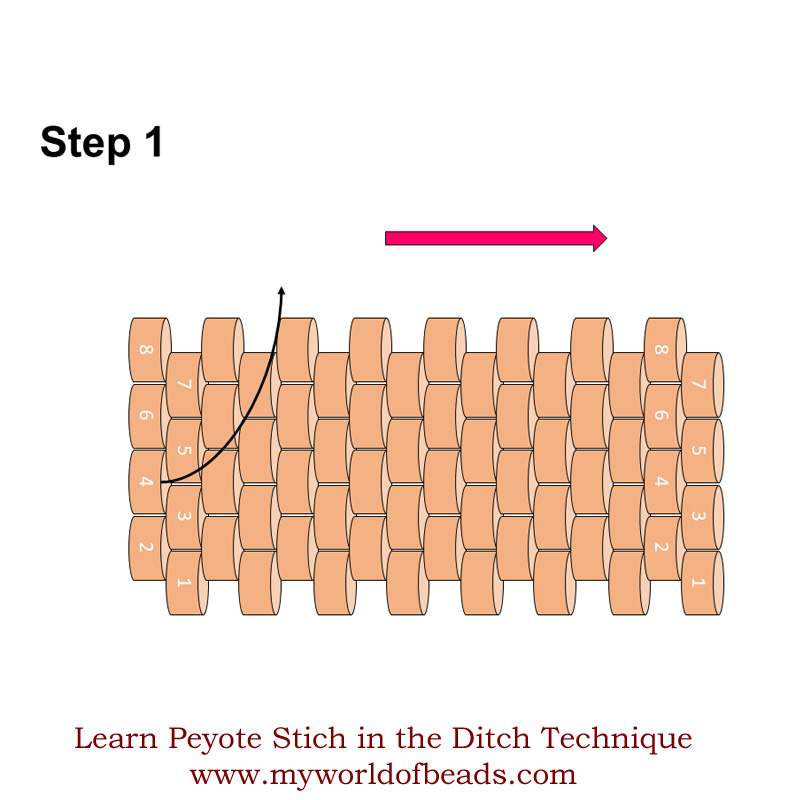
Step 1
Identify the row that you are going to add to. So, for example, your pattern might tell you: ‘Add a stitch in the ditch row to row 4 of your work’.
So, you need to identify row 4 and make sure your thread is exiting from the first bead in that row.
To do this, you can count your rows. If you’re not sure how to do that, then check out this blog which explains how to count rows in Peyote.
Now, if you’re not very good at counting rows, I have a brilliant tip for you. When you read through your pattern before you start beading, make a little note of any rows where you are going to need to add a Peyote stitch in the ditch.
Then, keep an eye on those notes as you bead. Each time you complete a row which will later need a stitch in the ditch added, tie a small piece of cotton around the first bead in the row. Just tie the thread loosely so you can cut it off again later. But it will give you a marker to identify your row. In the sample below, I used some white thread as it contrasts with my beads and my working thread. So, it should be easy to spot later on.
Step 2
Now you’ve identified your row (in this case, row 4) and got your thread into position, exiting from the bead at the start of that row. You just need to pick up 1 bead and pass through the next bead from row 4. Pull the thread tight so that the bead snuggles into place on top of your work.
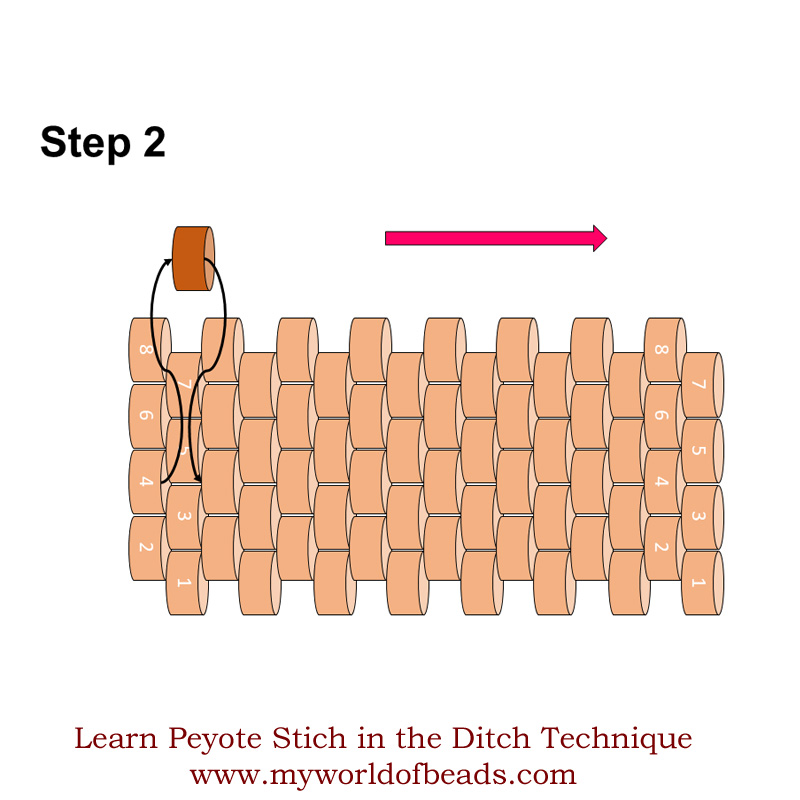
Pick up another bead and pass through the next bead from row 4. Just keep on doing this all the way along the row.
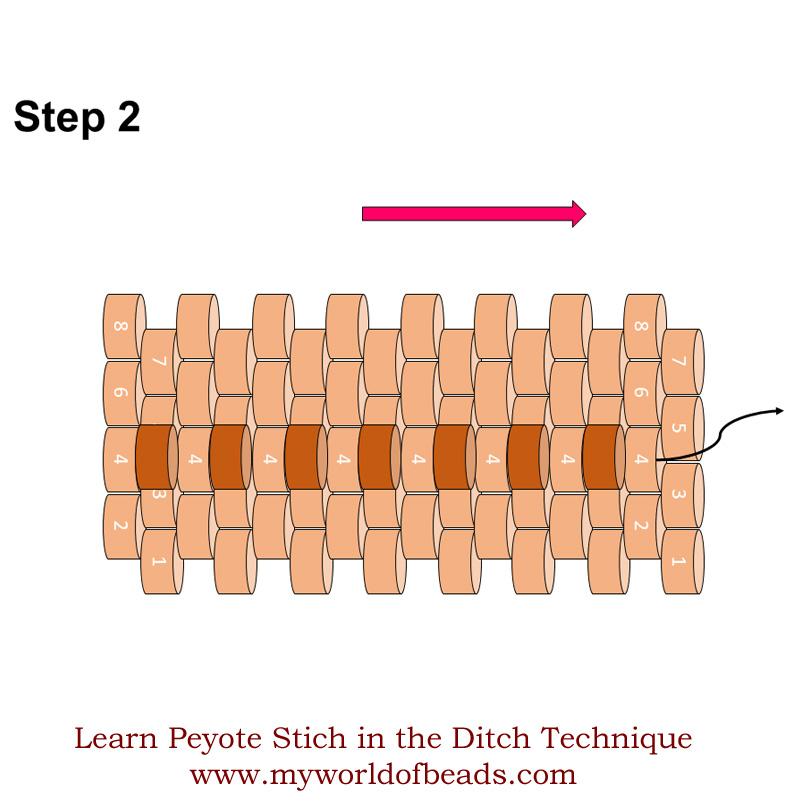
If you know how many beads you have in a row, you can count out the beads to help you avoid mistakenly adding too many or too few.
You may find that your new row pushes existing beads from the ‘ditch’ slightly back. In some projects, this is exactly what you want to happen. So, if you have been advised to do that, then make sure you pull your thread extra tight to help the beads snuggle into place.
After completing your stitch in the ditch row, you can continue to follow the pattern. You might be asked to continue adding Peyote rows on top of it. Or, you might be asked to leave it and return later to add more rows or some other kind of embellishment.
Common mistakes with Peyote stitch in the ditch
I see two common mistakes with this technique:
- Adding beads to the wrong row
- Getting out of alignment within the row
In order to avoid the first mistake, you need to count your rows carefully, or use the tip I gave you at the end of step 1.
The second mistake is more about how you work. Think back to the Peyote structure that you already know. In each stitch you are going to miss a bead after the one you are exiting and pass through the following bead.

Well, the same is true of the Peyote stitch in the ditch. So, watch your work carefully. See which bead your thread is exiting, miss out just one bead and pass through the next bead. The beads through which you pass will all be in a horizontal line.
So, keep checking: is your stitch in the ditch row forming a straight horizontal line? If you can detect a wiggle in it, or see it start to move diagonally up or down, then the chances are you’ve started passing through beads in the wrong row. So, check carefully and un-do back to the point where the mistake occurred, then correct it.
The diagrams above both show mistakes in the stitch in the ditch row. Can you spot them?
More things you might need to know
I’ve given you this exercise using one bead for your Peyote stitch in the ditch. Well, the technique is about the beads through which you pass, not the beads you pick up.
So, you might be asked to pick up two or three beads, but as long as you are passing through beads in a Peyote row, this is still Stitch in the Ditch technique. A greater quantity of beads would just form picots or maybe allow you to make an increase to shape your work.

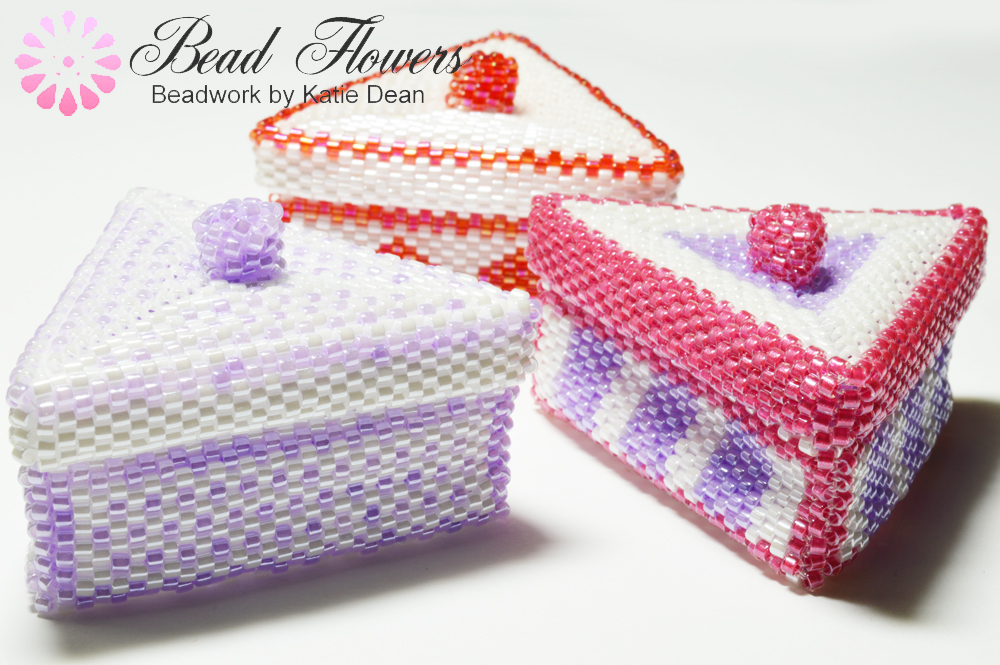
I used that idea to build on for the texture on my cupcake beaded box. Which brings me nicely to…
Projects for trying Peyote stitch in the ditch
Now you’ve learned the theory, how about trying this out in some actual projects?
I have already linked to the Pumpkin jewellery pattern, above. So, that is a good one to try if you are quite new to Peyote stitch.
If you have a little bit of basic Peyote experience and you want to try making a beaded box, you now have the skills to try the boxes shown above. Click on the image to get your copy of the pattern. This will give you a taster of basic Peyote stitch in the ditch in tubular form. I have used special colouring to help you as you learn.
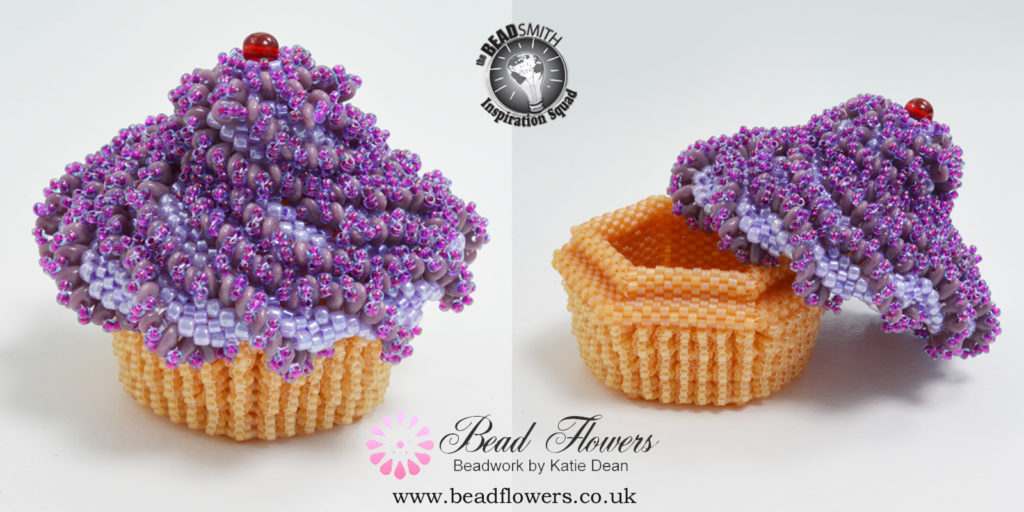
If you are a little more experienced, then why not try the cupcake beaded box? You will use both the basic one-bead stitch in the ditch and an embellishment variation in this project. Again, just click on the image to get your copy of the pattern.
What next?
You can bookmark this page to come back to any time you need a reminder of how to do Peyote stitch in the ditch technique.
You can also share this with your beading friends.
And you can use this link to learn about more variations of Peyote stitch. Happy beading!