What is a bail in beading or jewelry-making?
I’m here today to answer one of your questions: what is a bail? Now, this is a beading website, so we’ll be talking about the kind of bail you would come across in beading and jewellery making. I’m going to explain what this item is, and how to use it.

What is a bail?
This is basically the little attachment that is joined to a pendant to allow you to thread a chain on which to hang the pendant.
So, in technical terms, this would be a type of ‘finding’. You could buy a ready-made, metallic bail. Or, as with many findings, you can make your own.
Your bail can be very simple and functional. Or, it might be a more decorative element that adds to your over-all design. So, let’s take a look at some of your options.
Options for creating a bail
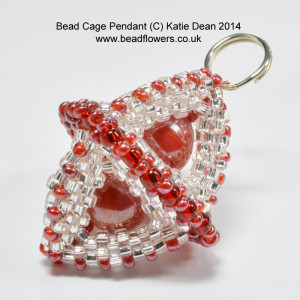
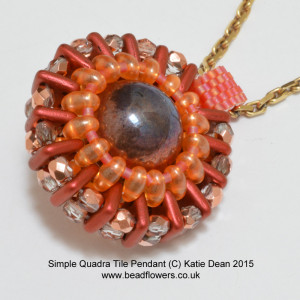
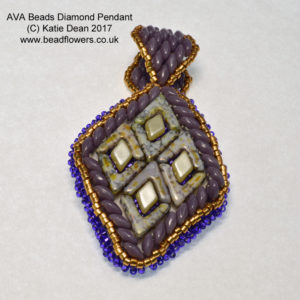
In the photos above, I’ve shown you three pendants, each with a different style of bail.
Option 1: simple ring
The photo on the left, the ‘Bead Cage Pendant‘ has a metal bail. In actual fact, this is not even a specialist bail. I have simply attached a split ring to the top of the pendant to be used as a bail through which I can thread my necklace.
So, this is your simplest option and will work on every sort of design. To attach it more professionally and securely, you might want to use some French wire. You can find out more about that in this blog post.
I suggest using a split ring or a closed ring because these are both sealed. If you try and use a jump ring, you risk it being able to pull open. So, it’s not secure enough to reliably suspend a chain. And, that is the job of the bail.
Option 2: simple beaded bail
If we now move along to the middle photo, the ‘Simple Quadra Tile Pendant‘, I have stitched a little strip of Peyote, and folded it back to attach onto the pendant. So, this creates a very simple beaded bail.
It also has the benefit of being very secure. Plus, you can use beads that have already featured in your project. So, that can be helpful in terms of being able to use items from your stash. Also, it fits well with the design.
Your little strip is basically like a short rope. So, you could use any beading technique to make this – even just a string of beads.
Option 3: decorative beaded bail
Now, moving along to the photo on the right, the ‘AVA beads diamond pendant‘, I’ve used shaped seed beads and created a shaped bail to complement the pendant design.
So, the idea is the same. You are creating a little strip of beadwork that you can fold over and attach on both ends. So, you’ve created something through which a chain can pass. But, this uses beads from within the pendant, and adds some shaping to work with the basic design.
Another very simple, but effective option of this type, is to just use a warped square folded in half. You can see that in action in the project below…
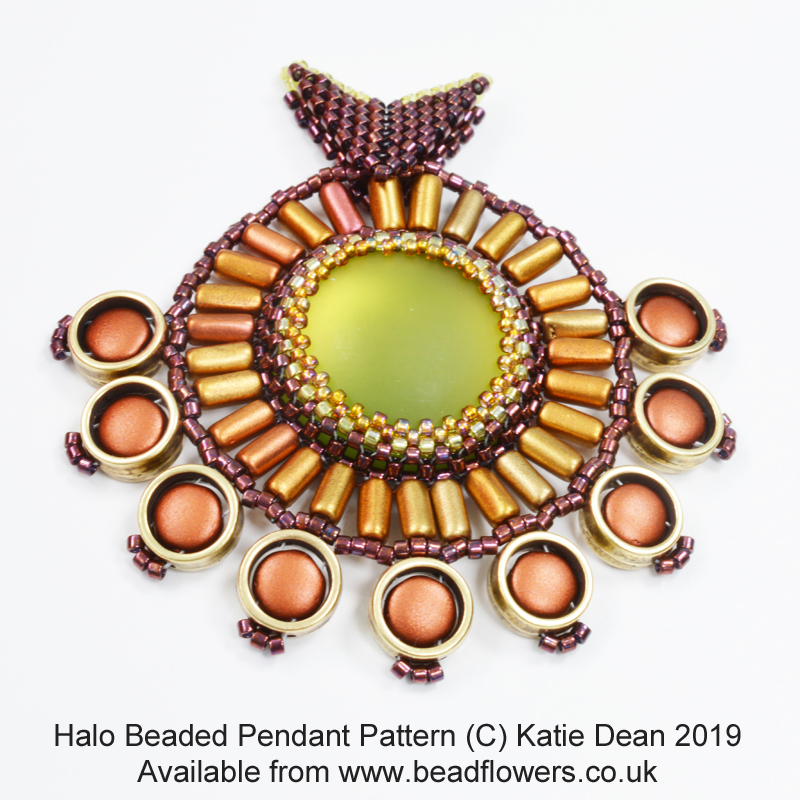
Click here to get the Halo Beaded Pendant Pattern
How do you know what is best to use?
Two factors will determine the best type of bail for your project:
- practicality: what is going to hold your pendant/rope most securely?
- design: what will look best?
Practicality
So, when you’re thinking about practicality, you need to be thinking about the weight and size of your pendant. If you have created something large and heavy, then you want a bail that is strong enough to hold it. So, a beaded bail, that you can attach across a wider area of the pendant might be a good option. Also, by using a bead-weaving technique, you should be able to create a nice strong fabric.
Design
If your size and weight are light, then that leaves you with a full range of options. So, your choice will be determined more by design. What style of bail, type of beads, etc., will best showcase your pendant?
Also, take into account the type of rope or chain you plan to use. You might suspend your pendant from a basic metal chain. Or, you might be using a beaded rope. Typically, a beaded rope will be wider. So, that might mean you are forced to make a beaded bail in order to accommodate your rope.
So, there is a lot to think about!
Another tip
One other factor to remember is the direction in which you attach your bail. You need to be sure you attach it in the direction that will allow your rope to pass through and sit correctly. For example, if you attach your bail with the hole running from front to back of your pendant, then your rope is not going to sit properly when you’re wearing your jewellery.
Well, that should answer all your basic questions around what is a bail. If you want to learn more about beading materials, techniques, design and so on, make sure you subscribe to my free weekly e-zine, ‘Beading with Katie’. Click here to subscribe now.