
Starting Herringbone Stitch: 2 Different Options
Did you know there is more than one way for starting Herringbone stitch? I am going to talk about two of my favourite options here. I’ll be talking you through the thread paths, with the help of diagrams. But this can seem a little complicated. So, if this isn’t your best style of learning, don’t worry – I’ve got you covered! Just use this link to access my online class where I demonstrate everything on video. It’s perfect for those who like to learn in a more visual or practical way.

Just before we get started here, let’s just check whether you know what Herringbone stitch is? If you don’t know, or aren’t sure, then you can use this blog post to find out the basics.
Starting Herringbone Stitch Using Ladder Stitch
To my mind, the easiest method for starting herringbone stitch is to make a ladder stitch strip. If you’ve ever done any brick stitch, you may already have tried this.
Alternatively, you may have come across ladder stitch in another context. It is almost a stitch in its own right. It just doesn’t have the flexibility of most other bead-weaving techniques. So, it tends to be used alongside other stitches. For example, in order to create a starting row, as we’re about to do here.
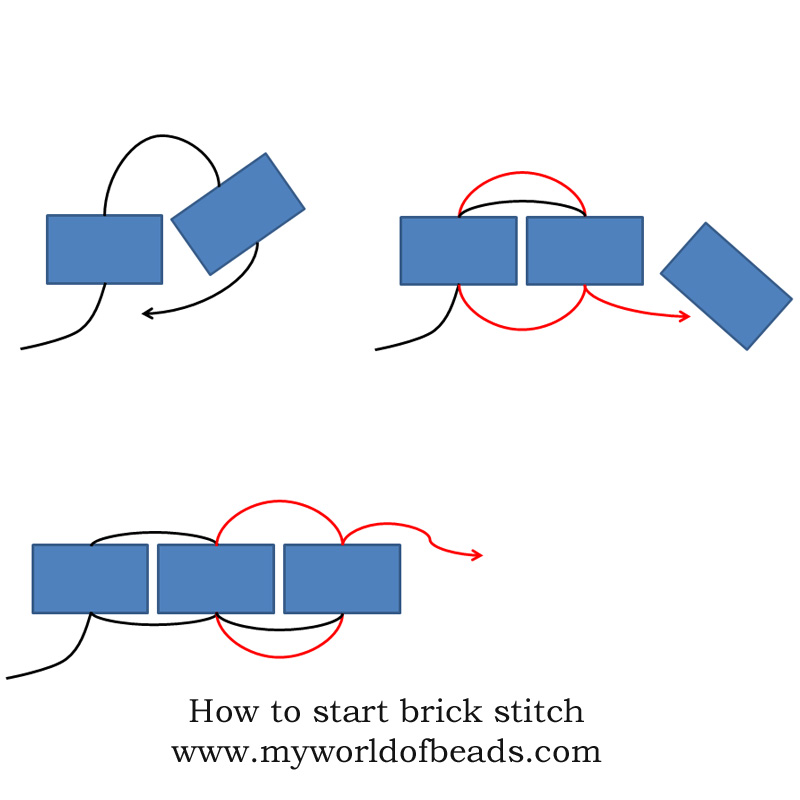
Traditionally, with ladder stitch, you will begin by picking up two beads and passing through them again. Arrange them so that they sit side-by-side. Then, add a new bead, pass through the previous bead and on through the new bead to bring that into the same horizontal alignment. Just keep doing this until you have a strip of the length you need.
So, your thread path is always moving in a circular, almost figure-of-eight pattern. In diagram form, it would look like this…
As I said, this is a common method for starting brick stitch. So, don’t worry – it can also be used for herringbone. But, when I am using it for starting herringbone stitch, I like to make a small alteration. So, let’s take a look at that…
Ladder Stitch for starting Herringbone
My trick is to build multiple-bead stacks when I begin Herringbone in this way. I like to do this for two reasons:
- I feel it helps to establish the Herringbone stitch structure
- It gives more to hold onto which makes it a little easier to work
So, instead of adding one bead at a time, you are going to add two, perhaps even three, beads to each stack. But you will still be maintaining the same thread path. That means your work will look like this…
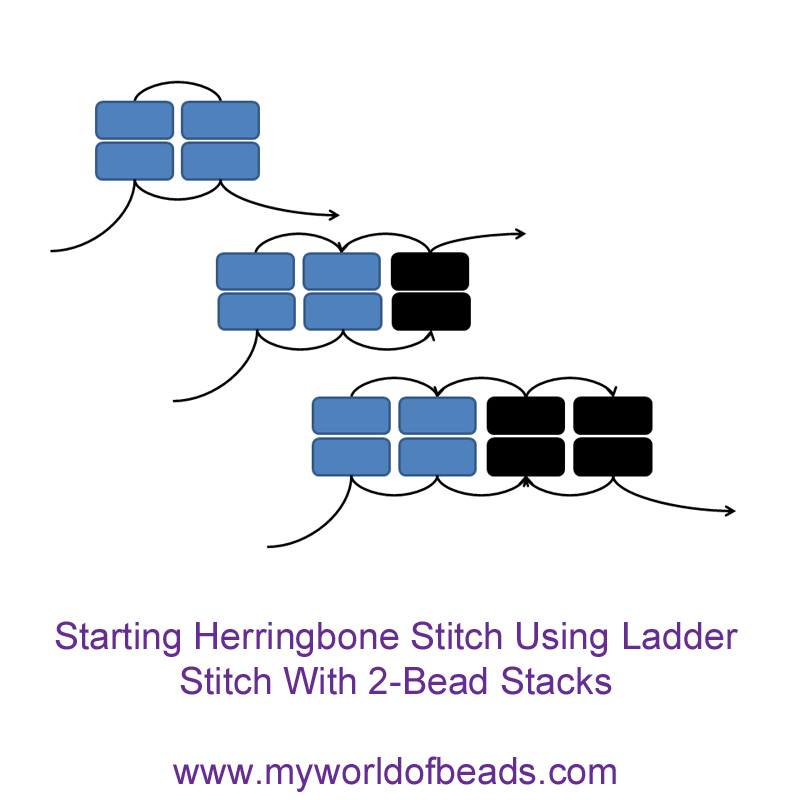
Again, you can use this technique to add as many columns, or stacks, of beads as you need. Just remember, you will need an even number for Herringbone. If you remember the thread path, you are always adding beads in pairs to create the Herringbone look. So, in the diagram, I have coloured my beads accordingly to help you see how this could end up shaping into Herringbone.
Remember, if you’re finding this confusing, just pop over to this online class where I teach these techniques in more depth, using video demonstrations.
Using a circular thread path to start Herringbone
The ladder stitch start is perfectly fine. But it does ‘seal’ both ends of your stack. So, when you finish your Herringbone piece, you will find you have ‘open’ stacks at the other end. You can of course seal these by repeating the ladder stitch thread path on that end. But for some projects, it’s much better to have that ‘open’ end.
So, this second method of starting herringbone stitch will give you that ‘open’ end at the start as well. It might feel a little more complicated than ladder stitch to begin with. But keep persevering. The trick is to make sure you hold your work so that you ease the stacks into place every time. It’s very easy for the beads to get out of control unless you make sure you are forming clear stacks in every stitch. So, that might require you to take a little more time, and to use your fingers to push the beads into place.
But let’s take a look at the thread path for this option. Again, you will be adding multiple beads to create stacks, rather than a single line. So, in effect, you are setting up two – or three – rows of Herringbone with this starting method.
Thread path for the second starting method
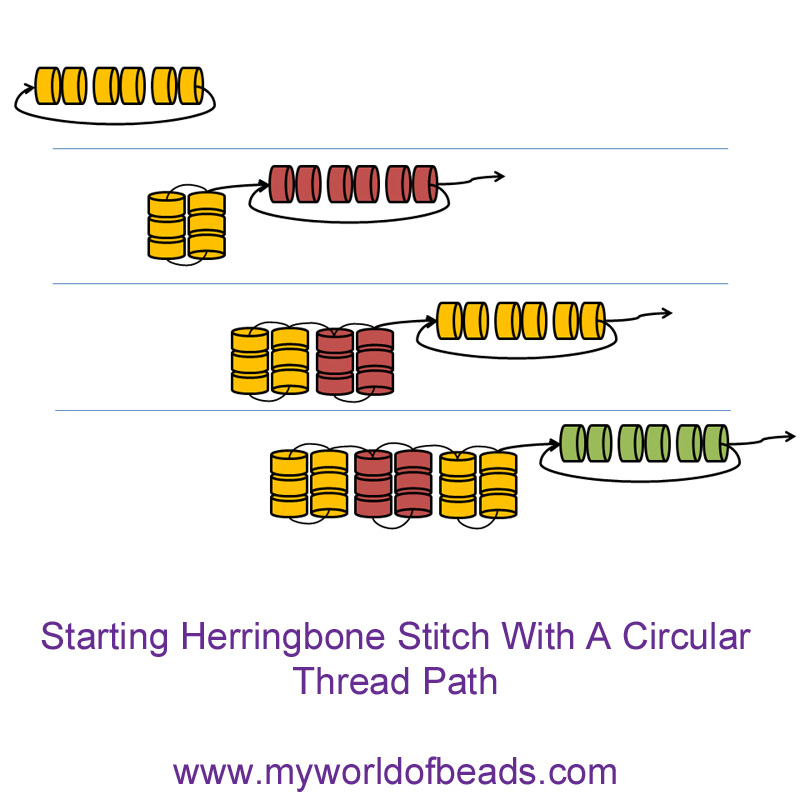
I am using beads in three colours here, so you will get an interesting pattern along the strip. The colouring will also help you to see where you are going as you continue with the Herringbone.
Pick up 6(A) and pass through them all again to form them into a circle. Use your fingers to ‘squash’ the circle so that your beads are sitting in two stacks of 3.
Pick up 6(B) and pass through these again so you have a second circle sitting next to your first circle. Again, squash these into two stacks.
Repeat with another 6(A). Then repeat with 6(C). This is all shown in the diagram, below.
Again, you can continue to add as many stacks as your project requires. And, if you’re finding this a little confusing, just take a look at the video demonstration in this online class.
Remember, with both of these techniques, you are putting in place the first two or three rows of your Herringbone project. So, if your project has specific colouring that forms a pattern, you will need to take that into account as you build these starting rows.
Using These Techniques For Starting Tubular Herringbone Stitch
Once you have your basic strip in place, you have two options.
- simply begin adding Herringbone rows to work in flat Herringbone stitch
- if you need to work in tubular Herringbone, you are simply going to join the two ends of your strip to form a little tube, on which you can continue to build your tubular rows
So, as this post is all about starting Herringbone stitch, let’s just take a look at the thread path you would use to join your strips into a tube.
Joining The Ladder Stitch Strip
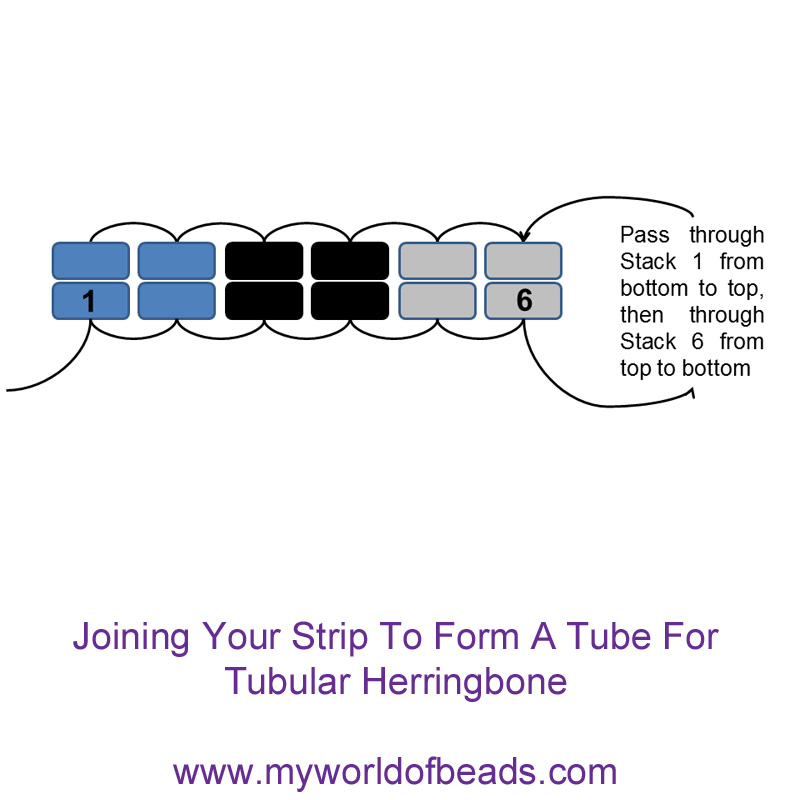
For this, simply fold your strip over so that the first stack and final stack are meeting. Then, use your normal ladder stitch thread path to join these two stacks.
The diagram below shows the thread path for the sample we’ve been building above.
Once you have joined your strip into the tube, you are positioned ready to begin adding your tubular Herringbone rows. But I will deal with that technique in a separate blog post.
Thread path for joining the ‘circular’ starting strip into a tube
Fold your length so that the final stack meets the first stack. Pass DOWN through the top (A) in the first stack – see the diagram to see the thread path and correct bead. Then, you can pass UP either through the top (A) in your next stack (red arrows), or through the (C) that you just left (blue arrows).
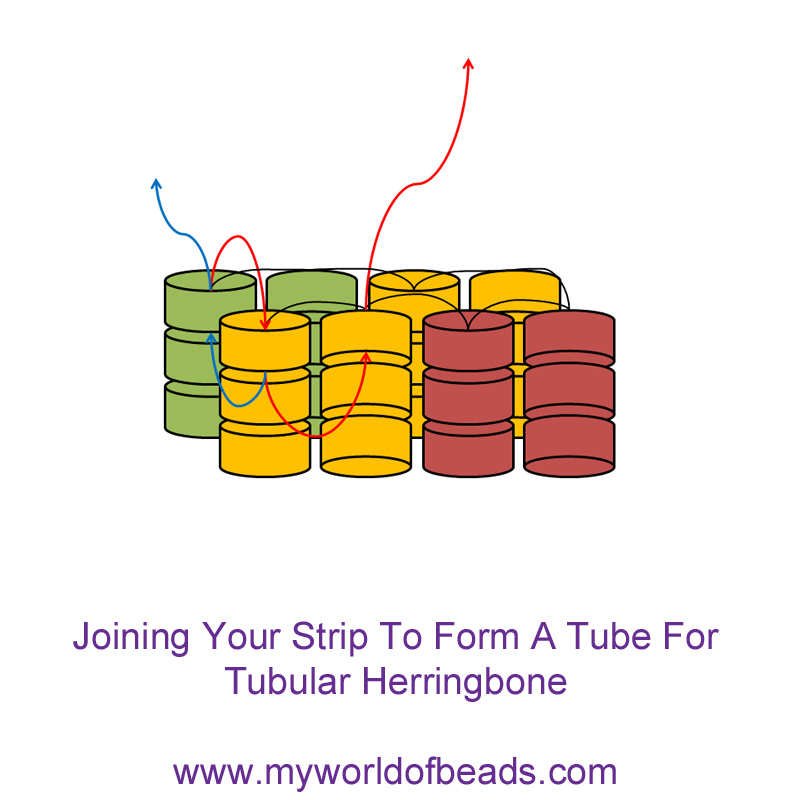
This will give you four stacks of pairs, each 3 beads high, just like the stacks that form tubular Herringbone.
Again, if any of this is confusing, please watch the video that shows you how to start herringbone.
So, that gives you two methods for starting Herringbone stitch. From there, you can continue with the flat Herringbone, or begin working in tubular Herringbone.
I will deal with both those techniques in separate blog posts on here. So, you will be able to find all the blogs in this section. If you are anxious to continue sooner, then you will find more lessons in the online class, again, all demonstrated on video for ease of learning.
If you want to get started with a project right away, then use this link to find some beading tutorials.


