Triangle Peyote stitch
Did you know there are two types of triangle Peyote stitch?
Well, there are. One is based on circular Peyote and one is based on odd count Peyote. So, let me explain…
The two types of Triangle Peyote stitch
First, take a look at the photo below. Both are Peyote triangles, but they have been made differently. Can you spot the differences?
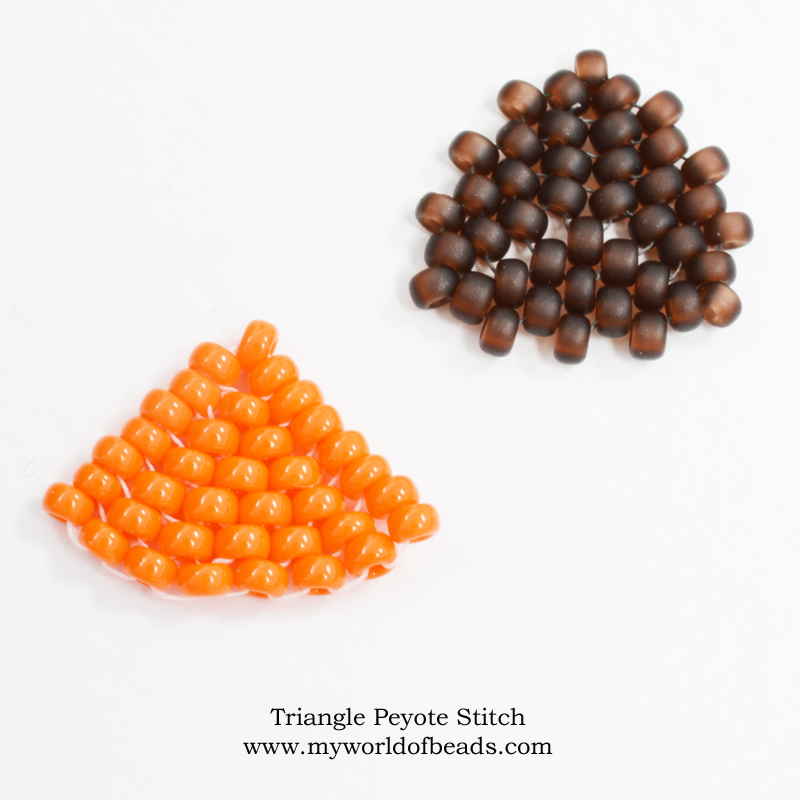
The brown triangle (top right) is made using the circular Peyote technique. I actually covered that technique in this blog. So, if you want to learn how to make that type of triangle, follow the link (it includes some patterns you can try).
The orange triangle is made using a version of odd count Peyote. So, that is the variation I want to teach you here.
But before we get onto that, how did you get on with spotting the differences?
The triangle made with circular Peyote is an equilateral triangle (all three sides are equal in length). You have the familiar Peyote edge (up beads and down beads), all around this triangle. So, it is perfect for using in 3D work. You can join it to other shapes. Or, build the flat base into a tube to create a box.
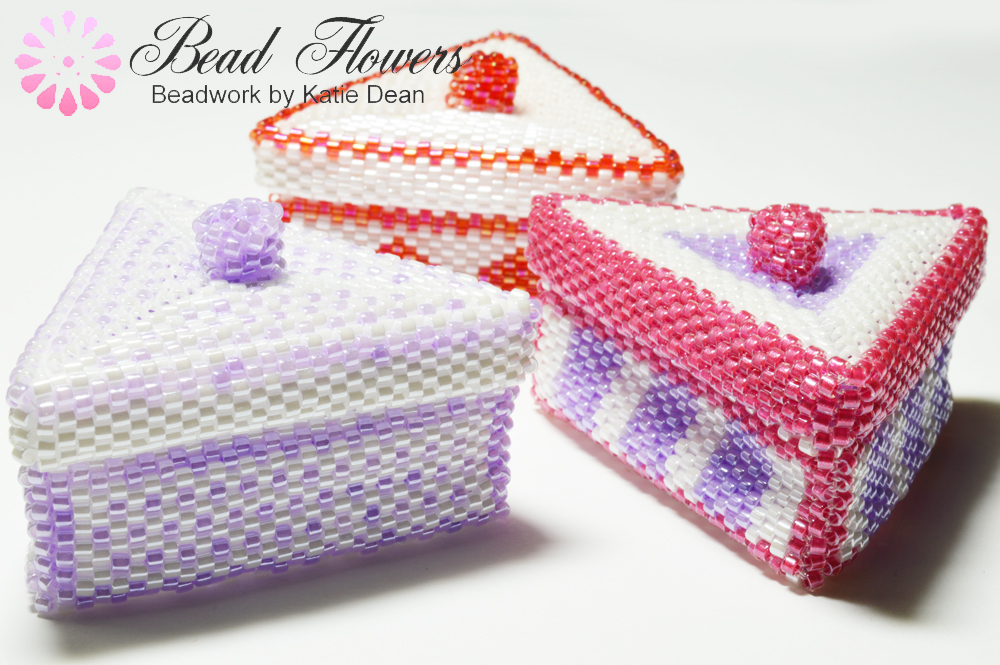
The variation made with odd count is an isosceles triangle (2 sides of equal length). It also has ‘smooth’ edges all the way around. So, although you could join it to other shapes, you would need to use a square stitch, or herringbone, or brick stitch thread path.
This little triangle is great for creating flat shapes. Maybe you make several and join them into a necklace to look like little pennant flags?
But you would struggle to create 3D shapes with these.

How to do Triangle Peyote stitch
This odd count variation of Triangle Peyote stitch is quite similar to Diamond Peyote stitch. You will be working around the outside of a strip, building your shape.
If you are completely new to Peyote stitch, then pop over and follow the even count instructions first.
From there, you should move on to learn odd count Peyote because you will need the turnaround from that technique for this Triangle Peyote stitch.
Step 1
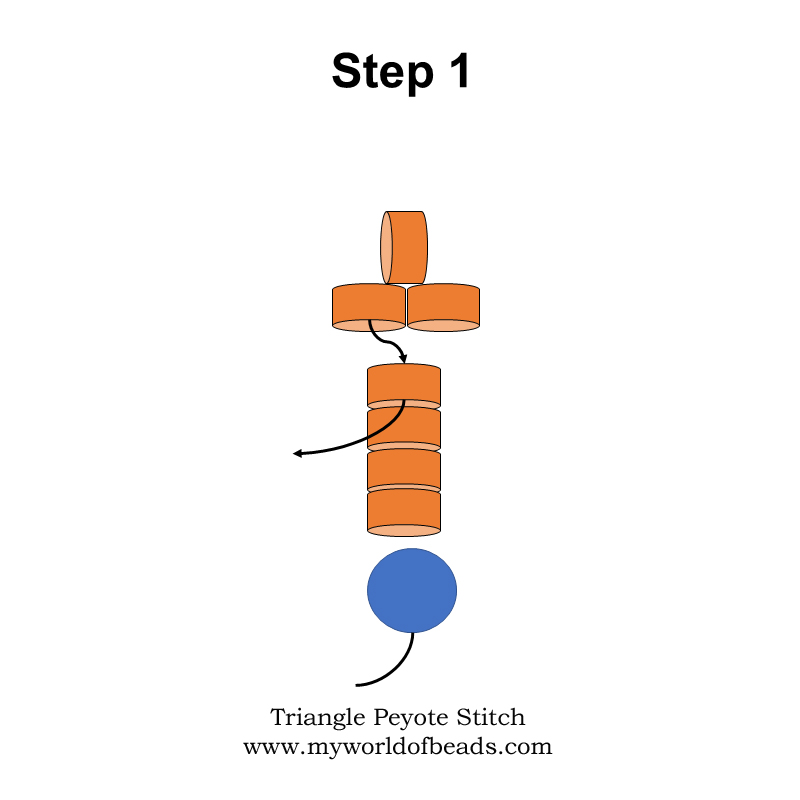
Use a stop bead, or bead stopper, and pick up an odd number of beads. For this sample, use 7 beads.
Pass back through the fourth bead from the end, so you form a little picot, as you see in the diagram.
Step 2
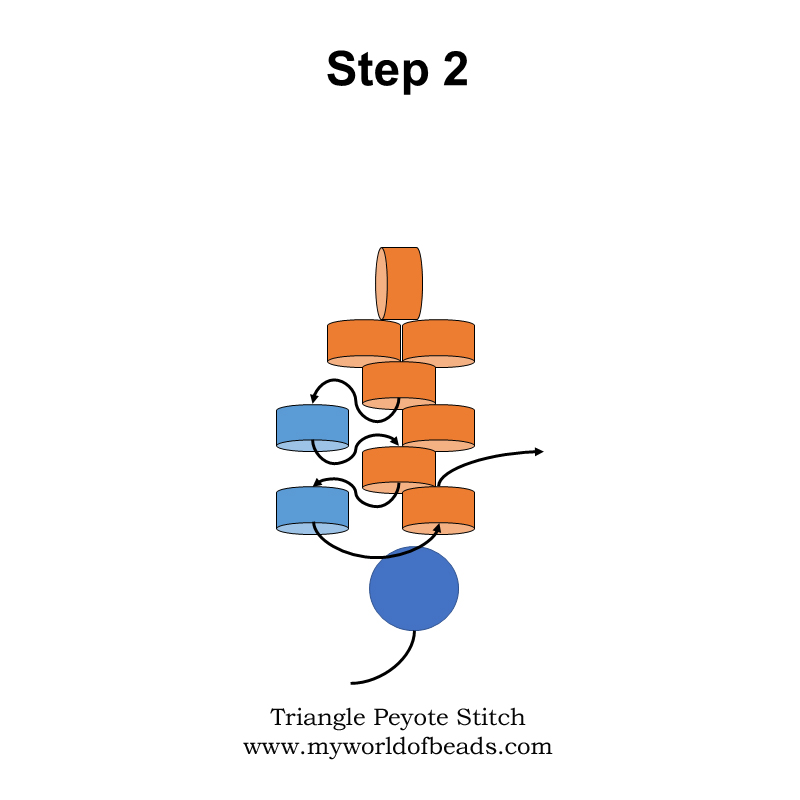
Continue to work in normal Peyote, to add two beads. For the second bead, you can just pass up through bead number one from your strip, as shown in the diagram below.
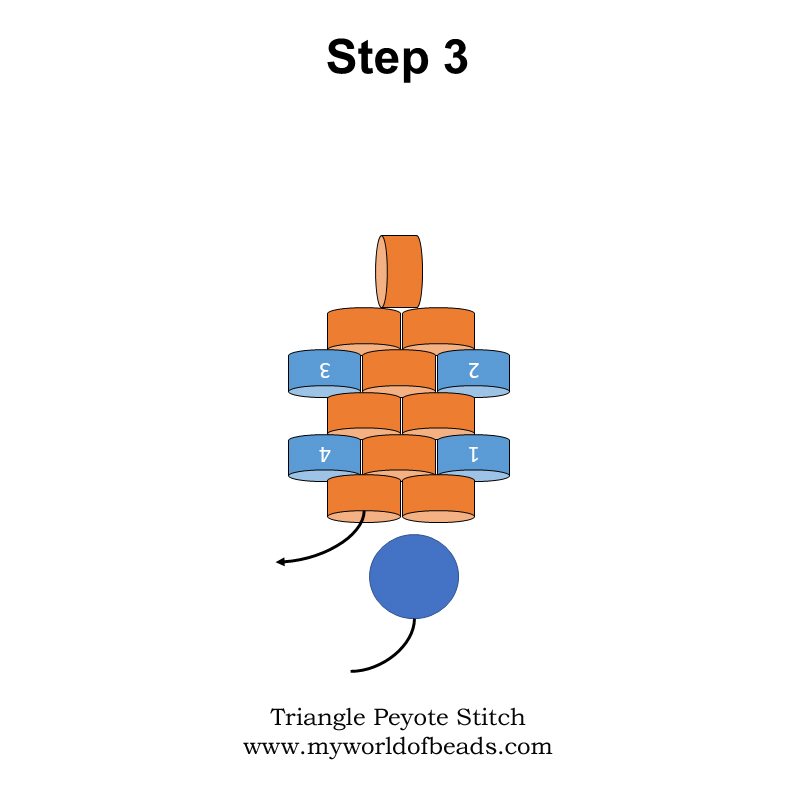
Step 3
Now, you are going to work in Peyote all the way around the outer edge of your shape. Start by adding two beads up the right-hand side.
Then, weave around the beads at the top point, and come back down adding two more beads down the left-hand side.
In the diagram, I have numbered the beads in the order that you will add them.
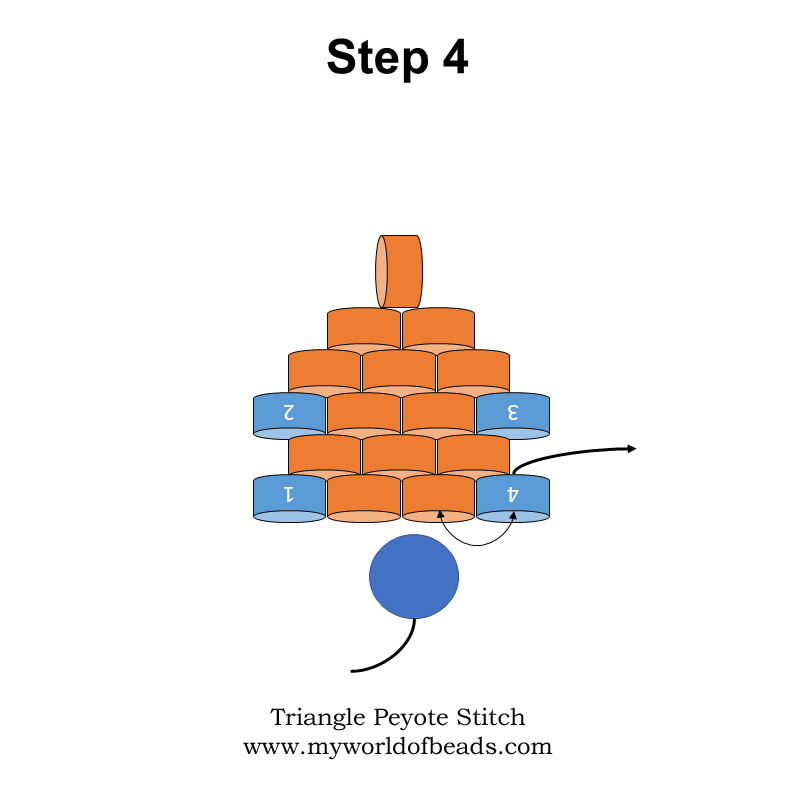
Step 4
Now, you can work your way back around the outer edge. This time, you have a simple even count turn around, just as you would for the right-hand edge of flat odd count Peyote.
So, add your beads up the left-hand side, weave around the top and add the beads down the right-hand side.
However, when you get to the final bead, you will need to use your favourite odd count turnaround method to add it.
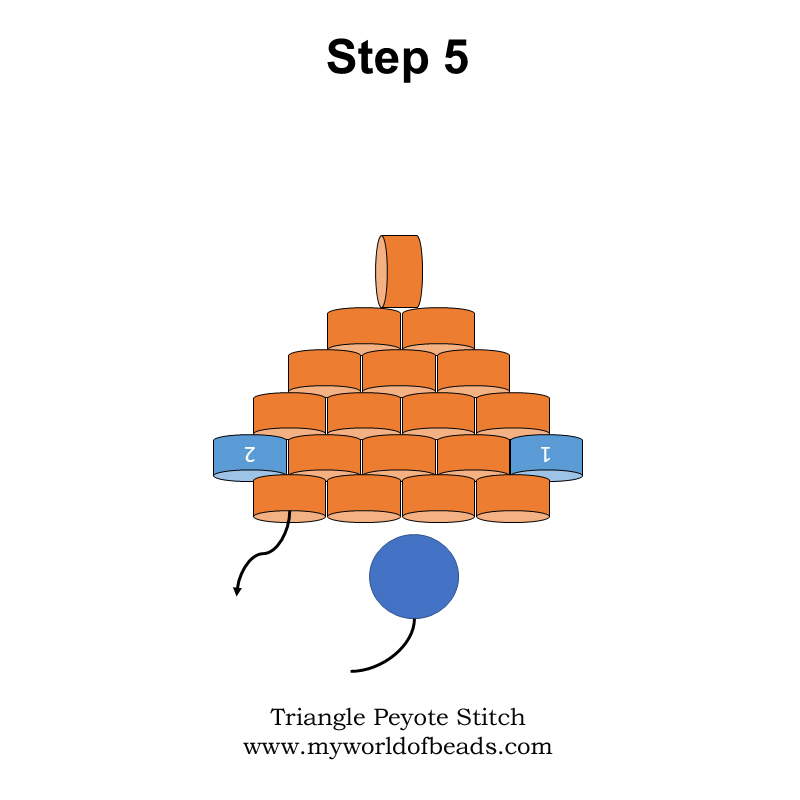
Step 5
Make sure you are exiting from the correct side of your final bead (see the diagram above).
Then, add your next row, working up the right, through the top and down the left.
Step 6
For the purpose of this little sample, this is going to be your final row. You have just one bead on each side to complete your triangle. Again, the second bead (right-hand side) will need to use an odd count turnaround.
Although, as this is your final bead, you can just weave it securely into the work using a comfortable thread path.
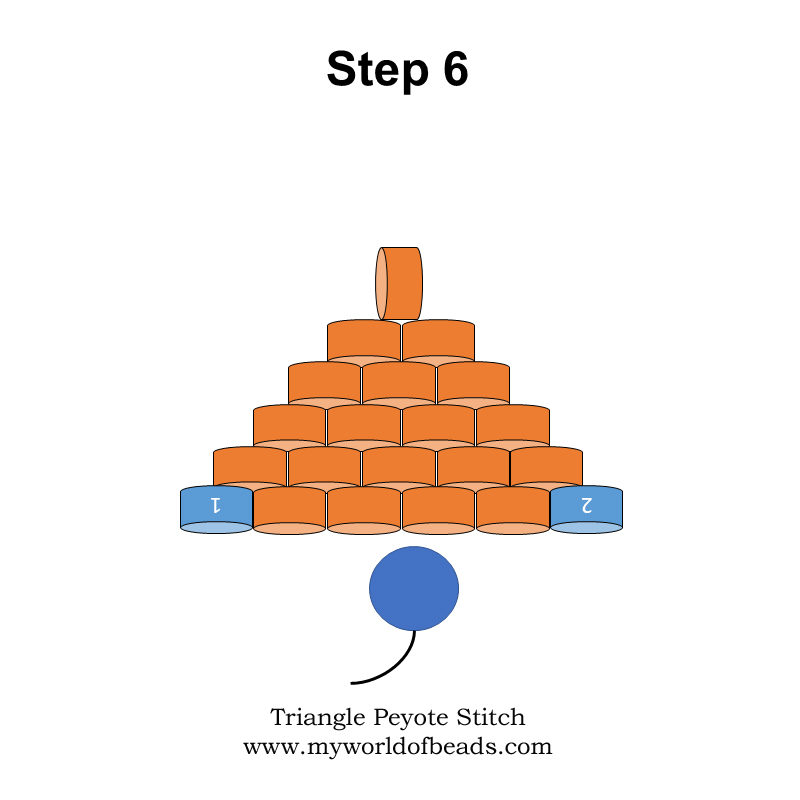
If you need a larger, or smaller, triangle, just alter the number of beads in your starting strip. But you must always use an odd number.
An alternative method for Triangle Peyote stitch
There is another way you can do this Triangle peyote stitch.
Still start with your central string of beads – an odd number. Follow step 1 and step 2.
Then, you can work back and forth along just one side of your triangle. So, in step 3, you would add the two beads on the right-hand side. Use the technique for decreasing at the end of a row and work back down the right-hand side.
You then have an odd count turnaround to take you back up the right-hand side.
Keep repeating this technique sequence to complete the right hand side.
Then, weave through your work and repeat the same process on the left-hand side.
What next…?
Well, you can practise both these variations to create some little triangles. Then, think about how you would link them to create a necklace or bracelet.
Or maybe you come up with a more fancy way of using your little triangle peyote stitch samples…
Don’t forget, you can bookmark this page to refer back to any time. And follow this link to learn more variations of Peyote stitch.


Thank you so much. I really love peyote and this will open up my choices.
You’re very welcome Jeanne! Yes, it certainly does send the ‘beady brain’ into lots of new territory. So, I hope you have fun making new discoveries!
Katie