
Silky Beads
What are Silky Beads?
Silky beads are one of the many varieties of two-ho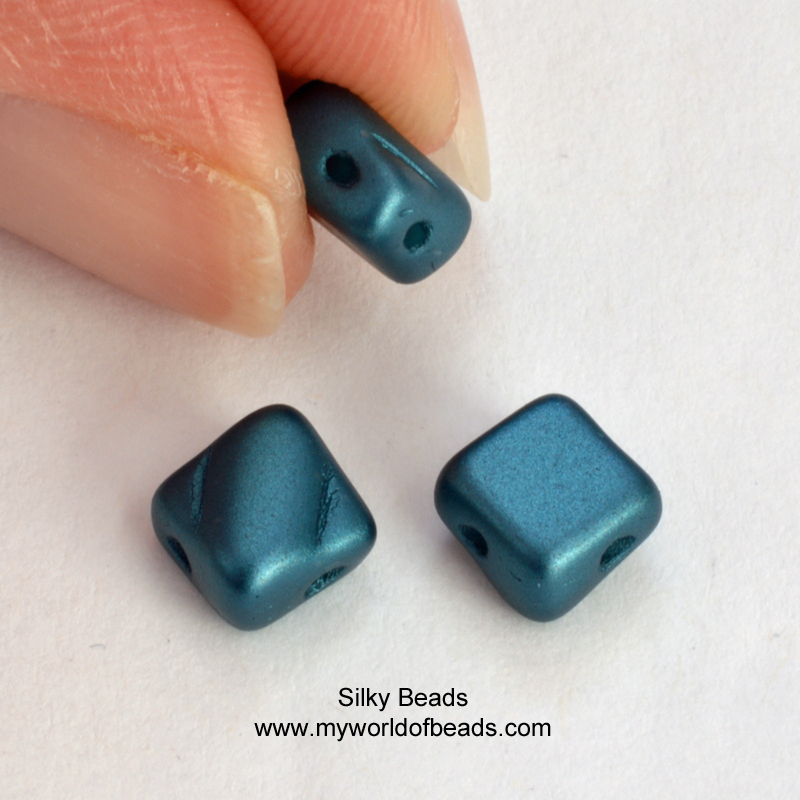 led seed bead. They look like small diamonds, or squares (depending on how you are looking at them!) and they measure about 5mm in diameter. They are also quite deep beads – about 3mm, so they feel very strong to use. The two holes are arranged through the two sides of the bead, but on the diagonal alignment, rather than straight across like Tila beads. Take a close look at the photo and you will see what I mean! These beads also have a ‘front’, which has a slightly raised texture, and a ‘back’ that is flat. Both sides are attractive to look at, but you need to take care that you are consistent as you use them.

How do you use Silky Beads?
Silky beads offer so many design possibilities. Their shape and texture makes them very attractive to use on their own. They sit bea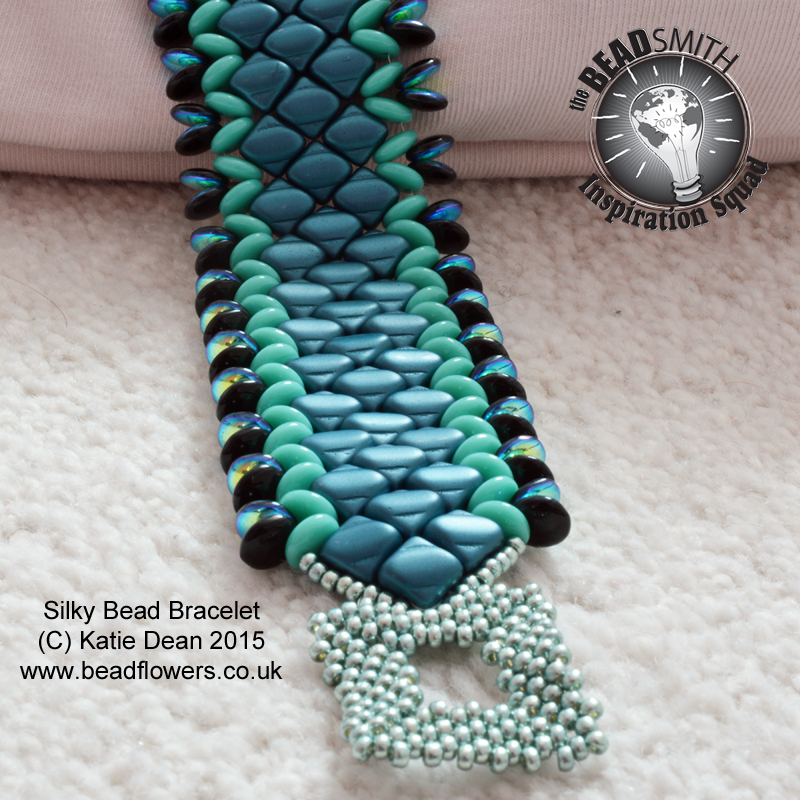 utifully in a Peyote stitch thread path for example. This is the idea that I used when creating the cuff bracelet shown in the photo. You can find the tutorial for the project here.
You can also use them in smaller quantities – they create great square or diamond shapes and their natural texture immediately adds interest to a project. This is the idea that lay behind the earrings shown to the right. The Silky beads provided a great, but very simple, focal area to attach the earring finding. You can find the project tutorial here.
The two-holed system and the fact that it is sitting on the diagonal alignment also allows some fabulous possibilities for embellishing around individual Silky beads. In the cabochon pendant shown to the left, I used a selection of Silky beads to create a raised texture and offer some interest on the front of the cabochon. However, the thickness of the beads meant that I needed to add something around them. I created a thread path using basic netting, working through the two holes and around the beads, with size 15 seed beads. This is an idea that I plan to develop further. If it is also an idea that interests you, then you can find the tutorial for the pendant here.
I am working on more design ideas, so I will be adding more links to tutorials as they are ready.
Silky Beads: What to Watch out for!
Let me begin by saying that I find Silky beads are fabulous to use. They feel sturdy and I love that their natural texture gives immediate interest to your design, so you can create stunning effects without having to do anything too complicated.
As with many of the new seed beads coming on to the market, Silky beads will feel very different when you start to use them – even if you are already used to working with other two-holed beads. If you are already used to working with multi-holed beads, then my first piece of advice will come as no surprise to you…check both holes before you use the bead! Whilst I haven’t so far found any blocked holes in my Silky beads, it is always a possibility. Tiny pieces of glass can get jammed inside the holes on any beads when they are being manufactured. Quite often, a bit of wriggling around with the needle will get the blockage to pop out, but not always. So remember to check both the holes before you use the bead…there is nothing more frustrating than stitching through one hole, completing a lot of other steps, then returning to stitch through the other hole and finding it is blocked. If you can’t unblock it, then you are going to be looking at a lot of unpicking!
The second very obvious pitfall with Silky beads is also the thing that makes them so much fun to design with. As I mentioned above, these beads have a textured front and a flat back, so you need to take great care as you add them to make sure that the front of your bead is going to end up sitting on the right side of your work. I have found that if I pick the bead up in my fingers and hold it roughly in place against my beadwork, then weave through it, it will end up sitting correctly. If you are trying to scoop through the right hole as you have the bead sitting on the mat, things can go wrong!
Thirdly, my first attempts at stitching with Silky beads left me feeling a bit disorientated. Looking at the bead, I found I expected the hole to go through along the alignment of the raised section – take a look at the photo and you can see that it looks as though this raised centre section on the front of the bead might be the natural effect of creating the two holes through the bead. In actual fact, the hole runs at a ninety-degree angle to the raised section, so looking at the bottom beads in the photo, the needle would pass horizontally through so it enters the left hand hole you see and emerges from the right hand hole you can see, it doesn’t pass from bottom to top. I may be alone in this, but I found this a little bit confusing when I first started using the beads – yet another reason for picking up each bead as you thread it on!
However, I absolutely love the look and feel of the Silky beads and all the different colour finishes open up so many wonderful design possibilities, so you can expect to see more tutorials from me and I encourage you to give these beads a try, if you haven’t already done so.


Very helpful tips! Thank you! Yes, silky beads have a bit of a deceiving look, yet I look forward to playing with them.
Thank you Svetlana – I’m glad you found the tips helpful. I love the Silky beads, so I hope you have fun playing with them…send some photos over when you have made something!
Some of my silky beads finish/color came off while wearing. What can I do?
I’m sorry to hear that! Unfortunately, some bead finishes don’t react well with some skin types (and there isn’t a ‘rule book’ or list of finishes or skin types – it varies from person to person). Once the colour has come off, I don’t know of a way to replace it. But you can try protecting the colours before you work with the beads. This article from Interweave may be helpful: https://www.interweave.com/article/beading/how-to-keep-the-finish-on-metallic-and-dyed-beads/