
Peyote Stitch with SuperDuos and Two Hole Beads
So, now I’ve written blogs to teach you pretty much all the different possibilities with Peyote and seed beads. But have you ever wondered how to do Peyote stitch with SuperDuos – or other two hole beads?

Well, if you have been puzzling over that idea, let me enlighten you.
I’m going to start with a bold statement. I think Peyote stitch with Superduos is easier than Peyote with single hole beads. Why would I say that?
Well, I’ve found that the two-hole structure means your beads are sitting more naturally in position. So, you don’t need to puzzle over which is your next ‘up’ bead. It’s the next bead with an empty hole!
Before I explain that properly, please make sure you know how to do basic Peyote stitch. This blog on even count Peyote will give you all the information you need for now.

What beads can I use?
Since this is a blog about Peyote stitch with superduos, you can obviously use superduo beads! But I also mentioned ‘other two hole beads’. So, which do I mean?
Broadly, any two-hole bead that has a regular shape will work in Peyote stitch. So, this could be a square shape, a diamond shape, a circle, an octagon or oval. As long as the bead is symmetrical and will tesselate, it should work for Peyote stitch.
You can take a look at this section to see how many different two-holed beads you can spot that would work in Peyote.
I have also included images of projects made with Peyote stitch using different two-holed beads. So, if any take your fancy, just click on the photo to get the pattern.
For the rest of this blog, I am going to talk about Peyote stitch with superduos, but the same rules apply to all two-holed beads.

How to do Peyote stitch with Superduos
Let me start by saying that you can do any form of Peyote stitch with Superduos. So, that includes flat, circular, tubular and even the shaping. The same principle applies to all these variations.
So, here it is: normally in Peyote stitch, you would pass through each bead two times. On the first pass, you are adding the bead. On the second pass, you are using that bead to join your next row.
Well, with Superduos, you have two holes. So, you will use the first hole when you initially pick the bead up and add it. Then, when you are adding the next row, you would be picking up your new bead and passing through the second hole of your existing bead.
That probably sounds very complicated. So, let me break it down into steps for you…
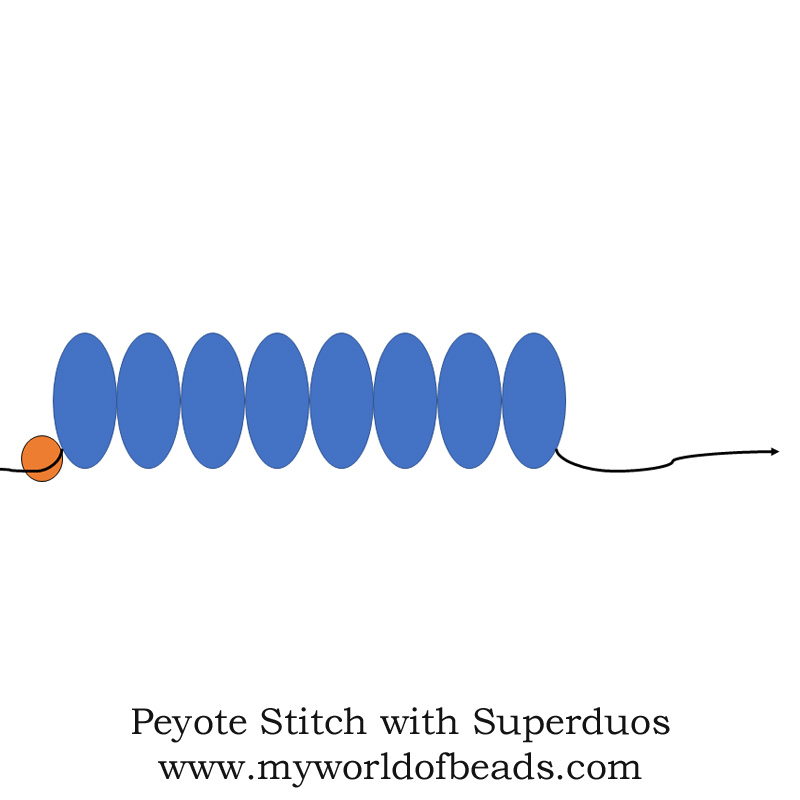
Step 1
Use a stop bead. Then pick up an even number of Superduos.
These beads will form your first two rows, just as in ‘normal’ Peyote.
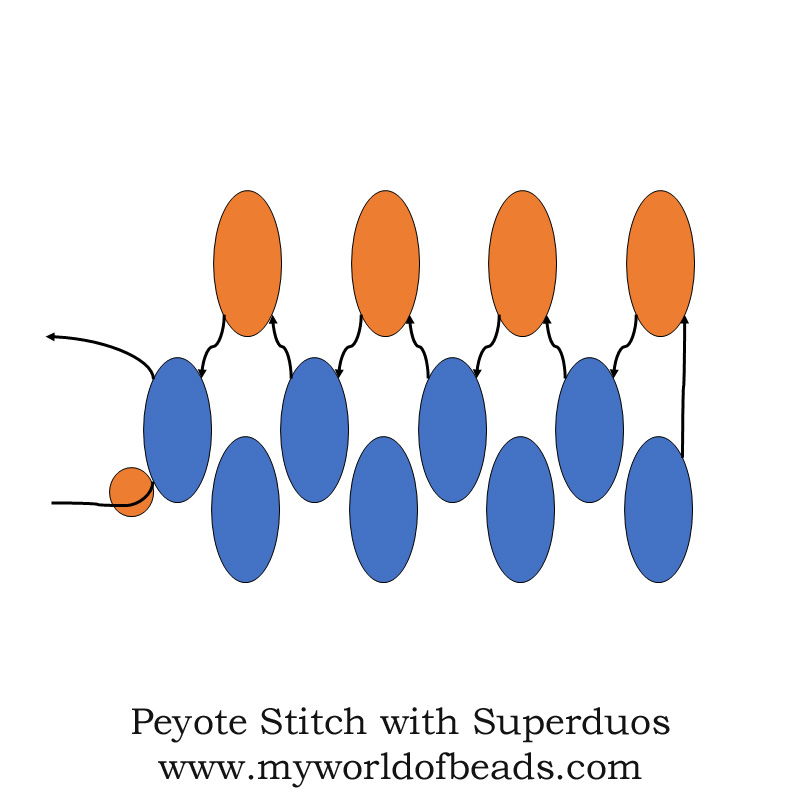
Step 2
To add row 3, you are going to pick up 1 Superduo, miss out the last bead in your string and pass through the SECOND HOLE (that’s the empty hole) on the next Superduo.
Repeat: pick up 1 new Superduo, miss the next bead in your string, and pass through the empty hole of the bead after that.
Each bead that you miss out will ‘flip’ over so its empty hole is pointing downwards. The new beads that you add will sit upright with their empty hole pointing upwards.
Next Steps
Having started a piece of Peyote stitch with Superduos and completed your first row, you’re going to need to start a new row. That is, turn around, or step up.
As with ‘normal’ Peyote, the way in which you start the new row differs according to which variation you are using.
So, let’s go back to that even count sample…
Even count turn around
When you reach the end of the row, you are going to do just as you would normally. Pick up a new bead – this will be the first bead in your next row – and pass back through the last bead you just added. Of course, you will be passing through the second (empty) hole on this bead. So, it’s nice and simple.
Then continue to add your row as before.
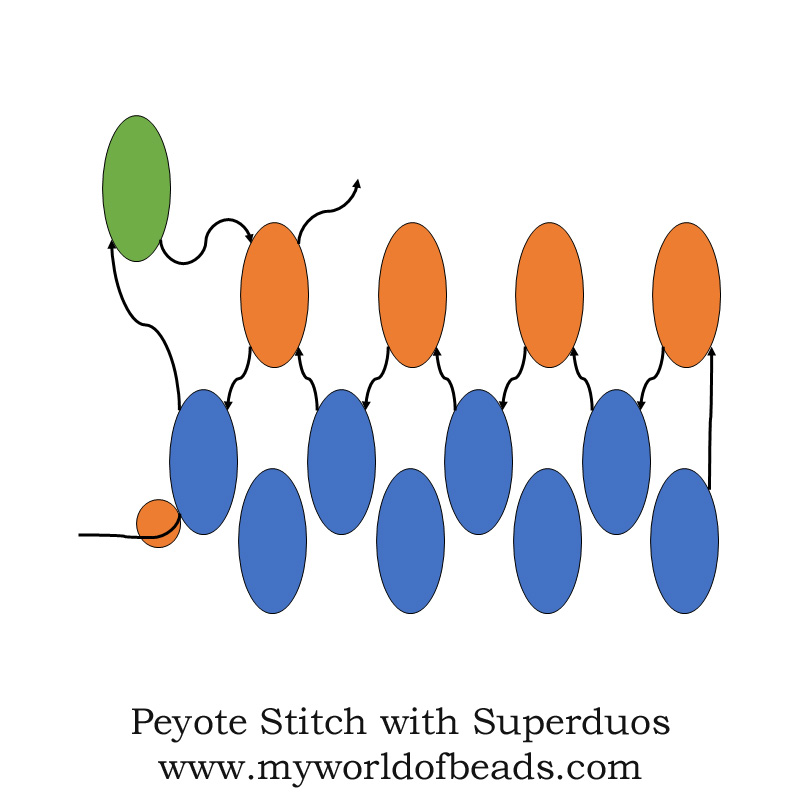
Odd Count Turn Around
Now, let’s imagine you started with an odd number of beads in your first strip. As with ‘normal’ Peyote, when you reach the end of row 3 (your first ‘proper’ row), you will have your final bead on your needle and no ‘up’ bead to pass through.
Normally, you would then have to fiddle with the odd count turn around. Happily, when you are doing Peyote stitch with superduos, the turn around is so simple.
Slide your final bead into position and just pass up through the second hole on the bead. Then, pick up the new bead for your new row and continue as usual.
However, this does create a tiny problem. See where I am indicating with the red arrow in the diagram above? There is no thread to join the final bead in row 3 onto the row 1 bead beneath it.
At this point, that’s not a problem… you can remove the stop bead and then use your tail thread to pass up into that end row 3 bead and create the join.
But, what happens on the rows above? Well, that depends on you and on what your pattern instructions tell you. So, that just gives you something to think about…
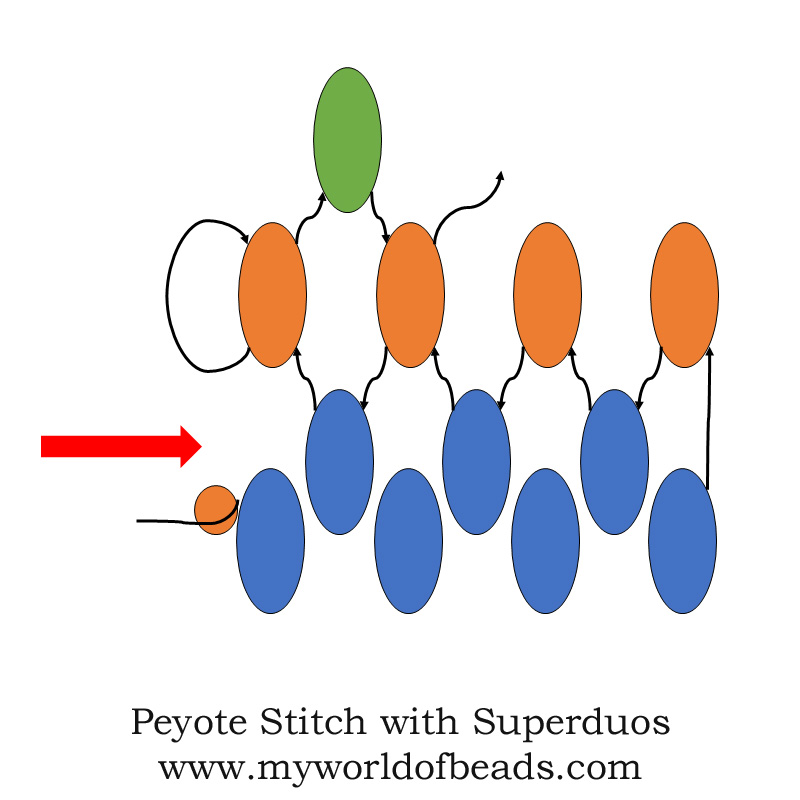
Stepping up
Now, if you are working in tubular or circular Peyote, then you would use a step up to move between rows.
Peyote stitch with superduos also uses this. But you have a couple of different options. Take a look at the diagram below. I have just added my row of orange beads. I’ve added my final bead, passing through the bead from row 1 (blue) and I’m exiting at the black arrow.
In order to step up, I need to move up so I am exiting from the empty second hole on one of my orange beads.
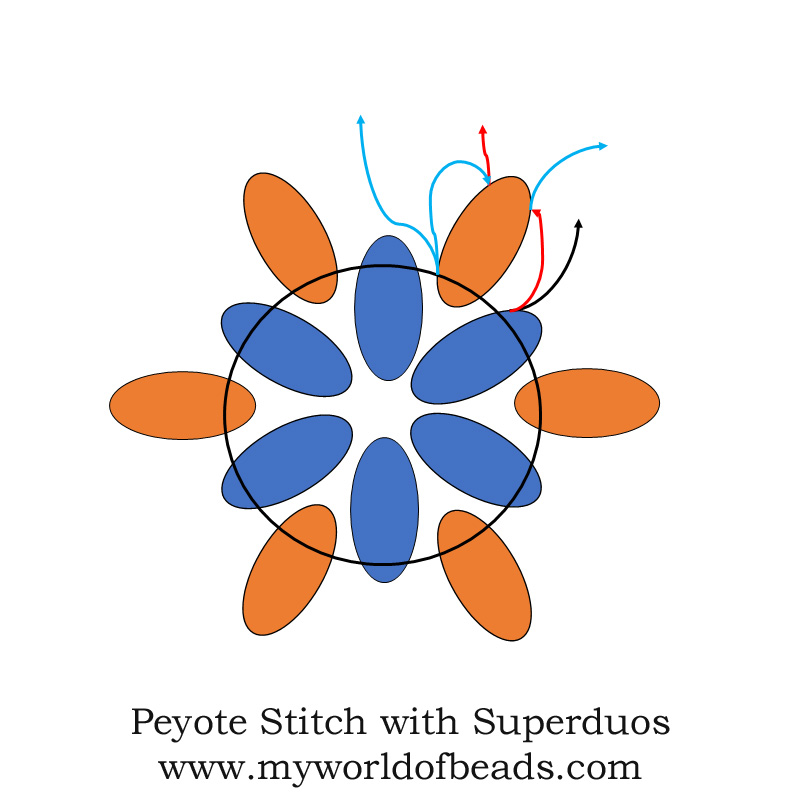
So, I could just follow the red arrows and step straight from the second hole in my row 1 bead through the second hole in the next row 2 bead. That is the simplest method and it means I continue to travel around my circle in the same direction.
However, it may also pull that row 2 bead slightly out of alignment. So, I have another option. I can continue on through the row 2 bead, so I would be exiting at the blue arrow. Then, I can pass back through the second (empty) hole in the same row 2 bead.
That way, my thread isn’t pulling on the bead. But, I have reversed my direction of travel around the circle. This isn’t a big deal, but it’s something to be aware of.
You will see both versions of the step up used in projects. So, just be aware of which the designer has asked you to use.

Exposed threads
With all these turn arounds and step ups, you probably spotted the obvious. As you pass from one hole in the bead through the second hole, you will end up with thread sitting on the outside of your bead.
In tubular and circular, this exposed thread will be buried between the beads in your completed work.
But in flat Peyote, these exposed threads will run along the edge of your work. So, how do you deal with them?
You don’t have to do anything. If your thread is a good match to your beads, it’s won’t really notice.
But, if you hate exposed thread, you can use small seed beads to cover it. So, in the odd count turn around example, you would slide your end bead into position, then pick up a few seed beads to cover the thread before you pass through the second hole on your Superduo.
Don’t worry about trying to work this out. Your beading pattern will tell you what to do!

Finishing the ends
The other big difference in Peyote stitch with superduos is that you end up with exposed holes at the end of your final row.
So, you will probably need to stitch your final row using one-hole seed beads to just neaten that edge. You can see how I used this method to complete the edge of the bangle in the photo above. (If you want the pattern for that project, just click on the image).
The most important tip of all!
Whether you are doing Peyote stitch with Superduos (or any other two-holed bead), or whether you are doing some other project with them, I have one top tip.
You have just seen how this technique uses just one hole in the bead to begin with. Then, you come back to use the second hole later on. So, imagine what will happen if you find your second hole is blocked…
A lot of frog stitch, possibly some unsavoury language, definitely frustration, is what will happen!
So, if you want to avoid this, please check that BOTH holes on your bead are free before you use the bead. And please remember to check this on every single bead!

What next?
I think that has covered the basic principles of Peyote stitch with superduos or two hole beads. So, your next step should be to try a project.
I have dotted some ideas, in the form of photos, throughout this post. So, if any of them appeal, just click on the image to get the pattern.
If you found this information helpful, please share it with your beading friends. And don’t forget, you can bookmark this page to return to at any time.


Thank you so much for this easy to understand making sense article! Blessings too you and thanks for all the inspirational ideas!!! If it weren’t for a pandemic and being unemployed, I’d donate in a heartbeat! I’m definitely bookmarking this page and already know I will be returning quite often!!!
You are so very welcome! I’m happy to help. And I hope your situation improves, but meantime, hope the beading is helping to keep you occupied and bring you some joy. Take good care!