How to finish beading thread: 2 options
One of the questions I am most often asked is how to finish beading thread. As my beading has evolved, I’ve found new ways to finish my threads. I have also experimented with different types of beading thread. I have found that different threads sometimes need different ways of finishing. The same is true with different techniques. So, the best way to finish your thread may differ between techniques.
Basically, there is no ‘one way’ finish beading thread. Today I’m going to give you a couple of options. I will talk about the pros and cons of each option as I go.
How to finish beading thread: option 1
The simplest way to finish your beading thread is just to weave it in through the beadwork.
For this option, you will need about 6″ of thread left to be sure that you can weave far enough away from the point you finished to keep the beadwork secure.
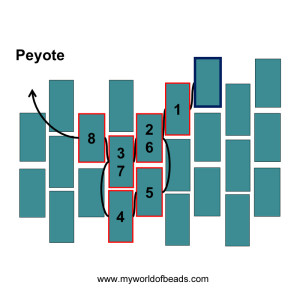
Take a look at the Peyote stitch diagram above. The last bead added is the bead outlined in blue and the beader has been moving from right to left along this top row. I have marked out a possible thread path to secure the end of thread.
Notice how you are going to move downwards, keeping to the original line of the thread for the first three beads. I then turned back on myself to pass through beads 4 and 5. Make another turn to go through beads 6, then down through 7 and up through 8.
If you have a long stretch of beadwork, you can just keep weaving downwards for several rows. Then start to weave back up towards the final row for a while. To check if your work is holding firm, give the final bead you added a good hard tug to see if it moves.
With Peyote stitch, I do find that if I just keep to the thread path, the last bead can sometimes be moved. So, as you’ve just seen, I often go against the thread path to create a turn. This will create a thread path that is harder to pull out. But you must make sure you pull your thread really tight so that it is tucked well between the beads at the point where you have made the turnaround. Otherwise the thread may show.
Thread paths for other techniques
If you are working in Right Angle Weave, then you must stick to the circular thread path. But you can work around and around a few units to hold your thread firm. If you try and jump straight across between units, you will find your thread shows.
For Square stitch and Herringbone, you can easily change direction. This will ensure your thread is not just finishing by passing through beads in a straight line. It is this changing of direction that creates security, more than the number of beads through which you stitch. So bear this in mind when you are considering how to finish beading threads.
When to cut the thread
I like to leave my old thread attached until I have beaded a row or two with my new thread. That way, I can be sure that the thread join is holding.
If I cut the thread, then discover my beads are pulling out, I won’t be able to do anything about it. Whereas, if the thread is still available, I can either just pull it tight, or pass through a few more beads.
Starting a new thread
When you come to start a new beading thread, you can just follow the same process in reverse.
Weave into your beadwork a little way away from where you want to start. Weave through securely, as described above, leaving a tail thread that you can hold as you stitch. Make sure you emerge from the point where you finished, then continue beading.
When you have stitched a row, you can then trim your tail thread off close to the beads. (Do not confuse this with the tail thread that starts your beadwork project. That will need to be woven through beads before it is cut off, or your work may start to unravel!)
This method of finishing beading thread works well on all types of thread. The top tip is to just make sure you give your last bead (and the first bead you re-start) a good tug to make sure it is secure before you have trimmed off your thread.
How to finish beading thread: option 2
After a while spent weaving my thread ends into my beadwork, I learned about another option. I think this second option offers more security. However, you may want to think carefully about this option if you are considering how best to finish Fireline.
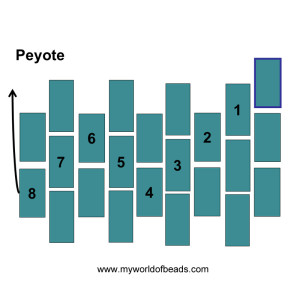
This means of finishing beading thread is not too different from the first option. Start by weaving through two or three beads. (This could be the first three beads marked in the peyote diagram).
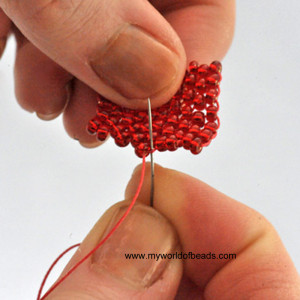
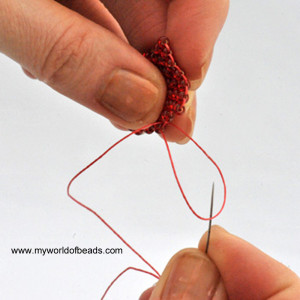
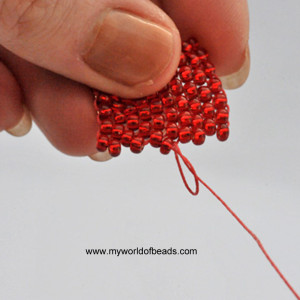
Instead of making a turnaround and continuing to weave, you are now going to ‘knot between beads’. Pass your beading needle under the loop of thread that is sitting between the bead you have just exited and its neighbour (see the first photo below). Pull the thread through until you have a small loop. Then pass your beading needle through this loop (see the next photo below). Finally, pull your thread up tight and it should form a knot between your beads. Continue to stitch on through beads 4 and 5 in the diagram and your knot will be pulled inside a bead and out of sight.
You can then make a second knot after bead five, then pass on through a couple more beads. At this point your thread should be secure (check by pulling on your final bead), so you can trim it off.
Do not ever trim the thread directly next to a knot. If you do this, the knot will unravel over time. This can allow the thread to loosen and work its way out, eventually resulting in beads falling out of your work.
Starting a new thread this way
As with the other method, you can use this in reverse to start a new thread. Pull your thread through a couple of beads a little way away from where you want to start again. Knot between beads, then pass through a couple more beads – heading towards your starting bead – knot between beads again. Finally, move on through the beadwork until you reach the point from which you want to start. Give the thread a good hard tug to make sure it is secure, then continue stitching.
This method of finishing beading thread works well on every single technique. Just make sure you stick to the thread path for each given technique as you weave through your beads and knot.
Issues with different beading threads
The wonderful beading designer Huib Peterson has given a word of caution about using this method if you are working with Fireline. He has found that the knotting process can put pressure on the Fireline and eventually cause it to snap. I can honestly say that this is a problem that I have never ever encountered in my own beading experience. I have had Fireline break if it has been rubbing on crystals with particularly sharp edges, but never break as a result of knotting. However, I just issue this word of warning in case it is a problem you encounter.
If you are working with a nylon based thread, then you will want to take care as you make the knots. This type of beading thread is prone to knotting and twisting anyway. So it is easy to accidentally pull the knot to form further up the thread, instead of in between your beads. To avoid this, just ease your thread gently through the loop, taking care to watch carefully that it doesn’t get caught around any beads on the way.
As with many other aspects of beading, learning how to finish beading thread is a process that will improve over time. So if your first efforts are a little messier than you might like, just keep persevering and you will win out in the end!
If you want some more tips and tricks for bead-weaving, this handy free tutorial is a great place to start.




Patrick Duggan has a great join for fireline. I love it. No weaving and it is as strong as your fireline.
Thank you! Yes, that is the method I always use. I wrote about it on my blog post about joining Fireline, so thank you for sharing the link here as well!
Thank you – I learned something really useful today!