Geometric Beadwork Patterns
So what is geometric beadwork? Well, you may be relieved to hear, it does ex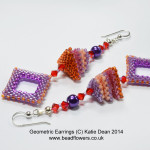 actly what it says on the tin: it is beadwork that is formed from basic geometric shapes. It is most commonly three dimensional in nature, although there is no reason why it cannot be two-dimensional. The most famous exponent of this style today is, arguably, Jean Power, who also happens to be a good friend of mine. Her style is bold and full of colour and it definitely influenced me when I designed this pair of Geometric Earrings. They were created for another beader and you can read the whole story behind their creation here. For now, let me use them to illustrate some of the ways in which you can recognise geometric beadwork. The square dangling from the base is an obvious geometric shape. If you look closely you can see that it has two sides in different colours, so this distinguishes it from a basic flat square. It also helps to create a very clean-looking shape with a hole in the centre. This is the kind of shape that also makes a fantastic beaded toggle clasp. From here, work your way up the earring: the main body is made from a series of triangles, descending in size and joined together almost like a concertina. Again, changes of colour accentuate the dimensions and layers.
Geometric Beadwork Materials and Techniques
The distinctive style of geometric beadwork means that it tends to rely on specialist materials and techniques. It needs a solid structure and the geometric shapes need to be clean. As you learn more beading techniques, you will recognise the strengths and weaknesses of each. The need for a solid structure means that you will most likely be working in either Peyote stitch or Cubic Right Angle Weave. That’s not to say tha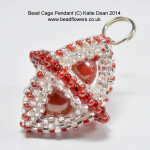 t geometric beadwork isn’t possible with other techniques, but it is a lot less common. You will also find that Delica beads are commonly used for this style. Their incredibly regular size and shape helps them to clip together so neatly that you can achieve very clean edges for your shapes. Having said that, it is possible to create geometric beadwork with other brands of seed bead, as I did with this Bead Cage Pendant. It is made from a series of interlocking triangles and this brings me onto another aspect of geometric beadwork…
Tessellation and Geometric Beadwork
You may well be asking what is tessellation? Or this may be ringing bells from your school maths classes. Tessellation is fitting several samples of one shape together in order to create a different shape. For example, four equilateral triangles can be joined together to make a square. Six equilateral triangles make a hexagon. Moving into three dimensions, four triangles and a square will make a pyramid. I certainly never realised that I would be using all that maths and geometry in my beading! Once you make the connections between the shapes that fit together, you can really have some fun.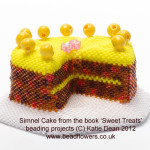 In my book, ‘Sweet Treats‘ I used a lot of geometric shapes to create the different cakes. I was particularly proud of the Simnel Cake project. For those of you who don’t know, Simnel Cake is a traditional Mother’s Day or Easter cake. It is a fruit cake, but has a layer of marzipan baked into the centre of it. The real challenge is making sure that the marzipan remains a flat layer across the centre of the cake and doesn’t sink to the bottom. Of course, you can only appreciate this cake if you can see the centre of it. So I used the idea of tessellating triangles in order to create a whole cake that had a slice cut from it, so that the marzipan layer would be visible.
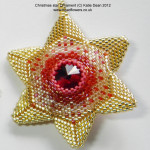 In another example of a tessellating geometric beadwork pattern, I joined a hexagon and triangles to create a Christmas Star ornament for a Christmas tree. This also gave me an opportunity to play a little with shading and colouring in the beads.
An even more ambitious geometric beading project is my 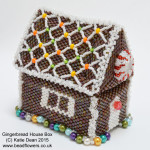 This takes rectangles and triangles and tessellates them to create a completely stable box with a lid. It’s big enough to hold a few small packs of beads, needles or reels or nymo. If all this is sounding a little complicated to you, it’s actually not. Once you have learned how to create the flat shapes, then adding the dimension is usually only a matter of either transferring from flat (circular) Peyote into tubular Peyote, or taking the flat shapes and zipping them together.
More Geometric Beadwork Patterns
Somewhere along the lines, I developed a small reputation for geometric beadwork and this led to me being asked to teach some classes to introduce this style to beginners. O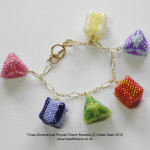 ne of the patterns I used in a class was the Bead Cage Pendant you saw above. For another class, I taught this Peyote beaded charm bracelet. This is an excellent introduction to the style as you will learn two basic shapes and also both the tubular and the zipping up methods for turning two dimensional shapes into three dimensional objects. I designed the project so that you will be using different colours of bead to help you understand the structure of the shape, so it’s a great beginner level geometric beadwork project.
Having mastered that, you can move on to use the techniq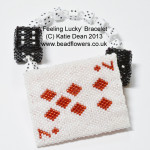 ue to create more adventurous cubes, like the dice I included in this bracelet. The basic geometric technique is just the same, but you will be adding in some pattern to create the dice markings. If you don’t want to make the entire bracelet, you can always turn the dice on their own into a pair of earrings, or use them for a charm bracelet.


Please let me know if you have a pattern to make a rectangular shape prism. I’m attempting to make a maj jongg tiles out of beads. If you have a tutorial I would be happy to purchase it.
Thank you,
Sherry
Hi Sherry,
Yes, I think I can help you out there. If you pop over to this link http://beadflowers.co.uk/beads/intermediate/twinkies-suzyq-necklace-recipe-card/ and focus on the Suzy Qs (the dark brown cakes!) – is this the kind of shape you need? The Suzy Q pattern is only available in my Sweet Treats book, which has loads of other geometric shapes too. I understand if you don’t want to buy the whole book. I have also just remembered that my chocolate beaded beads use the Rectangle shape as a base too. You can find that tutorial here (so you get a rectangle and a square shape with that) http://beadflowers.co.uk/beads/beaded-beads/chocolate-beaded-bead-bracelet-pattern/
If this is on the right lines, but not quite what you’re after, let me know and I’ll be happy to put something together specially for you. I love the Mah Jong idea though! Thanks for getting in touch.
Katie
One more idea that might help…I also have a playing cards pattern, so that could be adapted to Mah Jong tiles… http://beadflowers.co.uk/beads/brick-stitch/peyote-stitch-bracelet-card-games/
Katie
I think the dark brown cakes will work. Although I’m not sure about the ends. Are they flat, or is there a point? I’m looking into software so that I can print a pattern for the fronts of the tiles.
Thank you so much!
Sherry
Hi Sherry,
The dark brown cakes (pattern in Sweet Treats book – and the book also includes some technique variations for creating shapes, so that might help) have a flat end, but the dark brown chocolates have a pointed end (just to confuse!). I think the pattern on Mahjong tiles is quite complicated, so you the software sounds helpful, but think about sizing…if you try and get all the accurate detail in, you may end up with huge tiles!
Let me know if I can help any more and good luck…you’ll definitely have to show me a photo of your finished tiles – I’d love to see.
Katie