French beaded flower patterns: your complete guide
Today I want to look at French beaded flower patterns. This may sound a little strange, but if you’re used to bead weaving patterns, you’re going to find French beading instructions a little different. So, let me tell you why and explain how to use them well.
Two styles of pattern writing
The first thing you’ll notice if you’ve done a little French beading is that there are two basic styles of writing French beaded flower patterns.
Measurements
The books from which I taught myself were all written using measurements. What on earth do I mean by that?
Well, a French beading pattern might look something like this:
“Using the basic technique, round top and round bottom, start with 1″ of beads. Add eight rows.”
What on earth does that mean? Well, for starters, you need to know your techniques. So, let’s assume you do. You would know that the basic technique is commonly used for creating petals or leaves. You would also know that it has some shaping variations. So, that covers the first part.
Now, the 1″ of beads refers to the beads for row 1. So, instead of being told how many beads to use, you are being asked to work with a measured length of beads.
Then, as you add your eight rows, you don’t need to count your beads. Instead, you will position them and judge the appropriate length/number for the rows.
 Get the French beaded rose kit here>>
Pros and cons with measurements
Now, you may be reading this and thinking, what a great idea! It’s quick and easy to just measure lengths of beads. Yes it is. So, that is a major benefit to this style.
The second major benefit is related to the beads themselves. Having told you that you don’t need to use expensive beads for French beading, you probably realised, you may end up working with quite irregular beads.
So, if this is the case, by using a measurement instead of a quantity of beads, you don’t have to worry about the irregular sizes. For example, if I told you to use 20 beads, you may end up with 20 small beads on one petal and 20 large beads on another. So, you would have slightly different sized petals. By telling you to use 1″, the quantity of beads (and their size) becomes irrelevant.
The problem with this method is that you really have very little guidance. Once you are experienced, this may not matter. But as a beginner, you are going to be feeling your way. So, having actual bead counts is a huge help in ensuring you get petals of a similar size and shape.
Let me just touch on a couple of problems that you may face as a beginner.
Common problems with the measuring method
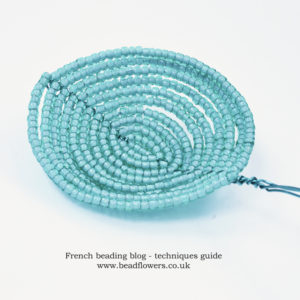
The photo on the left shows what happens if you add too few beads in a row. You end up with a cupped leaf/petal, rather than something flat. Now, this may be what you are aiming for and it’s good to know that you can achieve this effect. However, this cupping only happens gradually. So, each time you add a row and use slightly too few beads, you start to pull the wire inwards just a little. Over the course of multiple rows, this effect becomes extreme. But you may not notice that until you have finished beading.
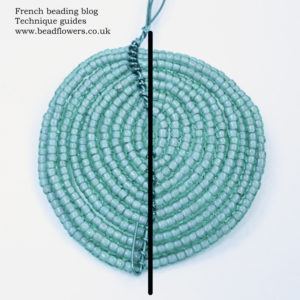
The second problem is illustrated in the photo on the right. Ideally, you want your base wire to extend in a perfectly straight line through the centre of your leaf/petal. I have illustrated this with the black line. In this illustration, notice how the base wire curves back and forth. Again, this is caused by adding the beads ‘by eye’. You will find your wires naturally want to pull to left or right as you wrap around them. The onus is on you to keep pulling them back into vertical alignment at the end of each row.
If you are counting your beads and adding the same number on each side, then the wires are more likely to remain straight. Whereas, if you are ‘eyeing’ the rows, it’s very easy to add just one more or less bead and that very soon pulls the wires drastically out of shape.
Again, this may not matter. It may even be an effect that you want to create. I just want to make you aware of the potential.
Bead Counts for French beaded flower patterns
This brings me neatly to the second common method of writing French beaded flower patterns: counting beads.
So, let’s stick with the same example. A pattern written with bead counts might look something like this:
Use the basic technique, round top, round bottom
- Row 1: 11 beads
- Rows 2 & 3: 15 beads each
- Rows 4 & 5: 19 beads each
- Rows 6 & 7: 23 beads each
- Rows 8 & 9: 27 beads each
So, this gives you a lot more to work on. You know exactly how to wrap your wire and how many beads to use in each row. This is the style I use for my own French beading patterns.
 Get the carnation pattern here>>
Pros and Cons
This method gives you plenty of structure and very little opportunity to ‘go wrong’.
However, there are a couple of potential down-sides. First, the bead size issue that I spoke about above. If your beads are really very irregular, then by counting, you may find you end up with gapping in your rows, or badly fitting rows simply because your beads are a different size to the ones used when designing the pattern. If you want to know more about variations in bead sizes, check out this blog>>
With experience, you can overcome this. So, you learn to adjust to create a neat finish. By that, I mean you can add or remove 1 or 2 beads in any given row if you feel this is essential to get the beads to sit right.
The other obvious down-side is the counting. When it’s just a small number it’s not too bad. But you may curse me (and others who write in this style) when the pattern calls for rows of 100 beads!
 Get your Calla Lily pattern here>>
Materials lists in French beaded flower patterns
Now, the materials list is also a bit of a funny thing. You see, if you are using a bead spinner, then it needs a good quantity of beads (10-20g) to work properly.
But what if your actual flower only needs 3g of beads?
Should your materials list tell you 20g or 3g?
Well, either would be correct, but possibly not useful. I tend to give the actual quantity needed for the flower(s). Then, I will add a note to say that if you’re using a bead spinner, you should get more beads to make the spinner work effectively.
Again, this is something that you will get used to with experience. But for any beginners out there, it’s a good point to note. So, when you get your French beading pattern, just bear this in mind as you get your materials together.
Of course, if you only want to buy (or only have) the quantity needed for the flower, you can always string them by hand and not worry about the bead spinner.
If you’re buying beads for French beading, then it’s quite a good idea to buy bulk packs whenever you can. You’ll save money that way and the beads will just get used over time.
Choose from 10g or 50g packs of seed beads here>>
Wire
Most French beading patterns will tell you the wire size and colour. So, why not the quantity?
Well, just as a bead-weaving pattern wouldn’t tell you the quantity of thread. If you’re a complete beginner, then you may not know this: for all French beading, you work from a spool of wire. So, you don’t need to know the quantity – just get yourself a spool in the correct size and colour.
Notice, I say spool of wire, not coil. Although a coil of wire may have sufficient quantity for your project, it will be a bit of a nightmare to work with… Unless, you wind it onto a spool. Now, this is easy enough to do – any round object to which you can secure the wire, will be fine for a makeshift spool.
But, as with the beads, you’re better off buying larger spools of wire to take advantage of better prices. Trust me, you’ll use them all up in no time!
Get great value spools of wire in a range of colours here>>
Diagrams, Photos, Letters and Words!
Yes, French beading patterns are like any other beading pattern in that they will have words and images to guide you through the steps.
However, I tend to find they are a lot shorter than a bead-weaving pattern. You can also expect to see fewer diagrams and more photos. This is because, the French beading is a more dimensional craft. So, in my view, you need to illustrate how the beadwork should look, rather than a thread path. That’s not to say there won’t be any diagrams. Some designers like to use them.
You won’t find thread paths. So, the instructions are perhaps more descriptive than in a bead-weaving pattern. Just as in bead-weaving, they will rely on you being familiar with techniques. So, you might see terms like, ‘using the four row crossover [or x other technique] make…’
If this sounds scary, it isn’t really. Just think of it like a pattern saying ‘bead ten rows of tubular Peyote using your white beads’.
So, yes, you will be getting used to new terminology as you learn the new techniques. But I really think that French beading is a much more accessible craft for complete beginners, than bead-weaving. You will quickly learn the techniques (or arm yourself with some of my free tutorials to sit by you and act as a reminder).
So, hopefully, this has given you lots of helpful information and taken any potential confusion out of using French beading patterns. Do let me know how you get on in the comments below.


