
French beaded flower colouring
What do you think I’m going to talk about when I mention French beaded flower colouring? Well, I have one specific idea to explore. How do you create French beaded flowers with patterns and multiple colours in them?

For me, once I had designed basic flowers, this was the next logical step. So, now, after 15 years experimenting with these ideas, let me show you some simple tricks…
French beaded flower colouring for dappled flowers
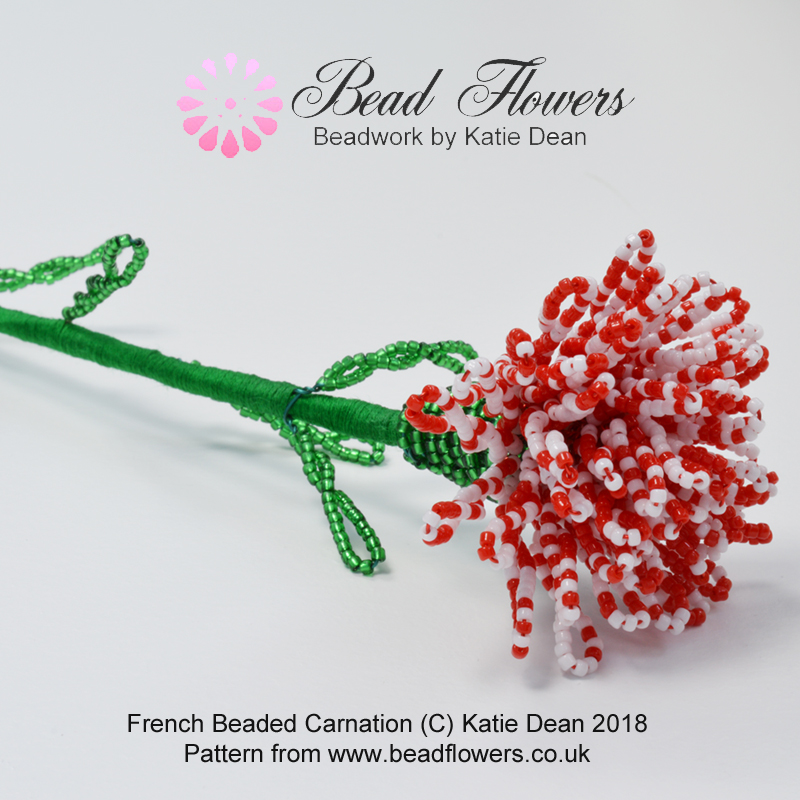
This is definitely the simplest French beaded flower colouring effect. You can use it for flowers like the Tiger Lily or Carnation where the petals have a dappled or spotty effect.
Find the pattern in this department>>
All you need to do is create a bead soup mix in your bead spinner. Then, as you thread the beads onto your wire, you will end up with a mix of colours. These will arrange themselves randomly as you create your petals.
However, you do need to be aware of one important trick for this method of colouring. Getting the balance of colours right.
How to string your beads for this effect
So, let’s take the Tiger Lily. If you look at a real flower, it is predominantly orange with a few black spots scattered across it. Now, you need to look at the proportion of these colours.
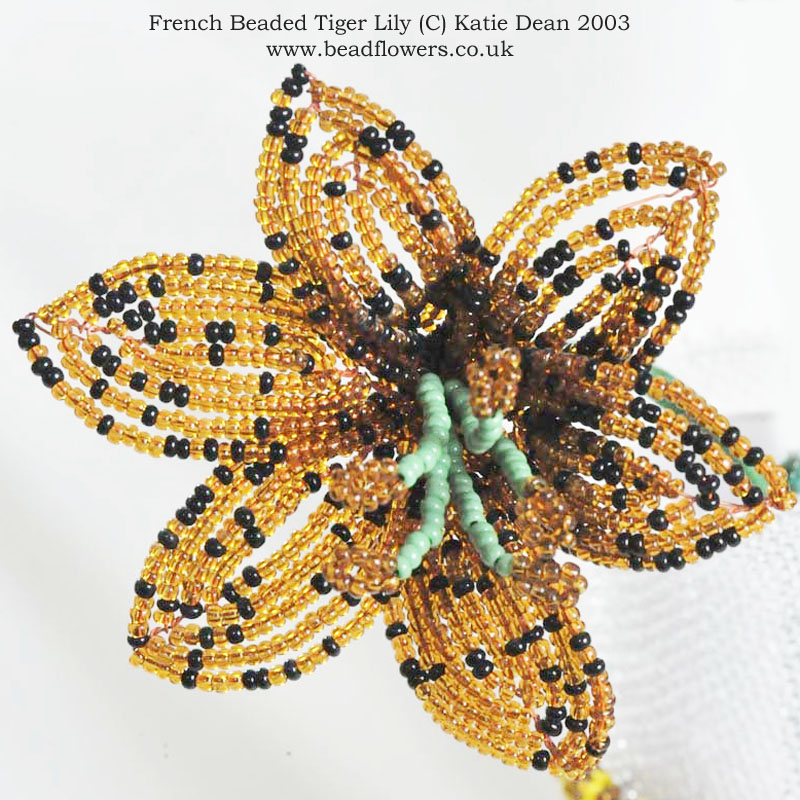
So, let’s say it is 85% orange and 15% black. You might disagree and decide it’s 90% orange and 10% black. That’s fine. Just decide on the proportion that you think. Then you need to reflect this proportion in the beads you add to your bead spinner.
That means when you fill your bead spinner, you add roughly 85% orange beads and 15% black beads. Then you need to mix them really well. So, the mixture you see in your spinner should reflect the mixture – or balance – you want to see on your flower.
From here, you lose control of the effect. Except, that if you see too many black beads jumping on the wire together, you can pause and remove some. Then start adding beads again to get a better balance.
The part you won’t be able to predict is where the beads end up sitting next to one another when you make the flower. So, let’s talk about that next.
Creating Structured French Beaded Flower Colouring
What do I mean by ‘structured’ flower colouring?
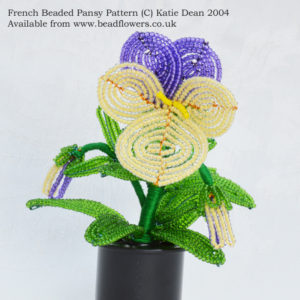
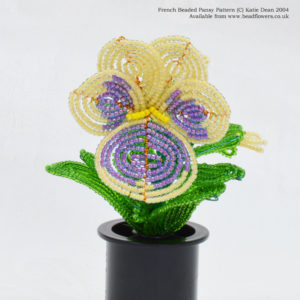
I’m thinking about flowers that have distinctive blocks of colour in specific places. So, a Pansy or Viola is probably the best example that springs to mind immediately.
 Get this Pansy pattern in my Etsy store>>
In order to create this pattern, you need to know exactly where each colour of bead is going to sit on your petal.
That means you need to thread the right number of beads in each colour, in the right order, onto your wire. So, to do this, you need to factor in two things:
First, you will need to follow a pattern that uses bead counts, not measurements. If you don’t know what I mean by that, then take a look at this blog where I explained how bead patterns can be written.
Second, you need to have designed the pattern to tell you – or your reader – which beads to string and where to place them.
So, when I created this Pansy design, I first made a plain flower to get the bead counts, petal shaping and design. From that, I worked out where the colour blocks should end up. I then calculated which beads these would be when I strung them. So, that meant, as I followed the bead counts for each row, the colouring naturally fell into place.
How to add the beads for this technique
Basically, once you have your flower design, it is straightforward to work out the colouring you want to add. I say straightforward, but in reality, this can get quite complicated. You have to bear in mind that the order in which you string your beads is the reverse of how you add them.
This also means that you will probably end up stringing your beads by hand. Or, if you have multiple bead spinners, you can use several at once. Just fill each spinner with a different colour and then add from these multiple spinners.
So, let’s talk about two much simpler methods of French beaded flower colouring. Both of these still require specific colours in specific places, but they are a lot easier to calculate on your own!
Petals with central colouring
What do I mean by this type of French beaded flower colouring?
I’m thinking of flowers where there is a small band of colour in the centre of each petal. This is a technique I used for my African Violet flowers.
 Get a kit for this project here>>
For this kind of colouring, you would make rows 1-3 of your ‘basic’ technique in colour 1. Then use colour 2 for the remaining rows. Of course, the balance might be different. It might be just row 1 that is in your first colour. Or, on a much bigger petal, you might have more rows, so the inner colouring could be across rows 1-5.
The point is, for this style, you are creating a central block of colour, surrounded by a wide block of contrasting colour.
How to string beads for this effect
When you come to string your beads, this is quite simple. You would need to add a long string of whichever colour is used in the outer area.
Then, before you knot your wire, string the EXACT number of beads required for your inner colour.
So, let’s imagine row 1 has 5 beads, row 2 has 7 beads, row 3 has 9 beads. You need to add those up: 5+7+9=21.
You would add 21 beads, then make your petal as normal. The colouring will naturally fall into the right place.
When you complete petal 1, make sure you still have lots of outer colour beads on your wire. Then just add 21 of your inner colour and make your next petal.

French beaded flower colouring for the loop technique
The idea is exactly the same, but you would need to string your beads in the right order. So, this would be more like the method I used for the Pansy. First work out how many beads need to be in each colour and where to place them. Then string accordingly. As you make your loops, the colouring will just fall into place.
Adding colour to edges
When you want to add colouring to the outer edge of your flower, you will use the same idea. However, your outer edge will be the last beads that you add. So, they would need to be first on your string.
So, rather than stringing two colours, I use a difference technique.
Remember in my last blog, I was talking about what to do if you run out of beads but still need to add some rows? Well, I told you that the solution was simple:
- calculate the length of wire you need for those rows
- cut the wire from the spool, allowing that length
- thread your beads for the final two rows onto the wire you have just cut
- add your two rows and finish as normal
Well, this is exactly the technique you use for adding a contrasting colour to the outer edge of your flower. Except you are choosing to cut the wire and add the additional beads so you can use a different colour.

If your outer row happens to have a mix of colours, it’s easy enough to calculate that and string the beads you need in order.
Adding coloured tips to loops
For this, you would need to calculate where the tip beads sit. Then add your different colours in the right order and quantity as you string your beads.
What French beaded flower colouring will you use?
So, now it’s over to you. I’ve explained the principles for achieving different colour effects. You can try these out on your own. Or just follow the instructions in the beading patterns!
Let me know how you get on in the comments below.
And if you’re looking to get more advanced with your French beading, don’t forget to get your copy of my newest French beading ebook>>


