
Connectors for Jewellery Making
Connectors for jewellery making are useful for connecting things. You don’t say? I’m guessing you probably worked that much out already. So, what can you connect and how can you do it?

What are connectors for jewellery making?
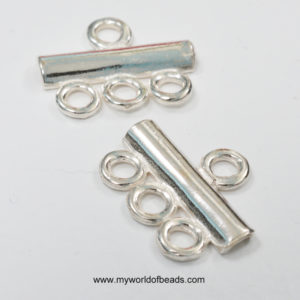
Well, these come in all sorts of shapes and sizes. So, let me start with x-to-1 connectors for jewellery making. (Note: the ‘x’ could be ‘2’ or ‘3’ etc – it just denotes the number of hooks on one side).
These basically look like a metal bar with hooks on two sides. So, on one side you will usually find multiple hooks. On the other side, you will find a single hook.
They come in all different types of metal finish. So, you should choose the metal that is the best match to your project.
How do you use connectors?
Having now seen what connectors for jewellery making look like, how do you use them? Well, basically, the idea is to connect multiple strands on one side to a single strand on the other.
So, typically, this will be connecting a multiple strand necklace or bracelet to a single clasp.
You would attach your strands to each of the rings on the one side. Then, the clasp just attaches to the single ring on the other. So, you might need a jump ring or split ring to attach the clasp. (You can also check out this blog about attaching clasps).
Using Connectors in Beading Projects
When people talk about jewellery making, they often forget about bead-weaving. In fact these connectors for jewellery making are also great in beadweaving projects.
So, you can still use them to join a clasp. This is great for something like a flat bracelet made from a bead-weaving technique, like Peyote or square stitch. You could stitch the multiple rings to the bracelet end. This is the same technique used for attaching a slide clasp (so you can see an example of how to do that in this blog post.)
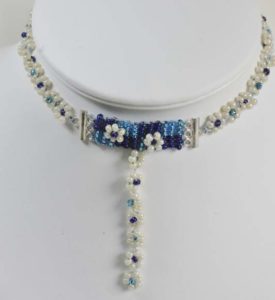
You can also use these connectors for attaching different components in your beadwork. Take a look at the photo below. See, how I attached a beaded motif in a band to the multiple rings on the connector. I then attached a single chain of beads to the single ring on the other side. You can get this pattern here>>
One to one connectors for jewellery making
So far, I have been talking about connecting multiple strands, or wide sections, to a single narrow point.
If you are interested in making your own jewellery, then you will want to create your own style. So, maybe you could use one-to-one connectors to do this. They are simply a piece of metal that can be placed between two sections of work to add some interest.
This is great for breaking up the flow of a piece. If you want to know more about designing and technical elements like ‘flow’, then check out this section.
Connecting Multiple Strands
Last, but not least, let me say a bit about another type of connector. This is used to link multiple strands of beads. You might want to use it in a necklace, but more commonly, think multi-strand bracelets.
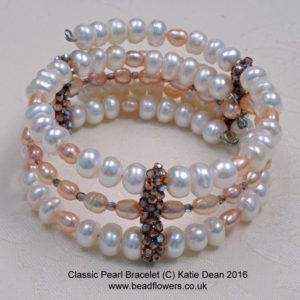
So, if you are stringing a multi-strand bracelet, you may want to ensure the strands are separated all the way around. Think of a design like the pearl cuff below.
In this case, I made my own connectors using beads. You can also buy metal connectors in this style. So, you simply need to use them at intervals around the bracelet in order to separate out the different strands of work.
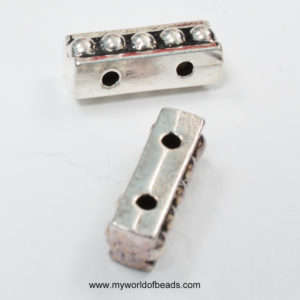
You can buy these connectors for jewellery making with different numbers of holes. So, just choose how many strands you want and pick the connector accordingly.
These connectors also come in a variety of styles. So, you can get plain metal for a subtle touch. Or, try something more decorative like the connectors shown below.
 When you string your beads, simply make sure you have the same length of beading between the connector on each row. It couldn’t be easier and adds a lovely professional touch.
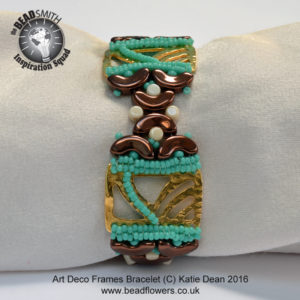
Get fancy with connector frames
If you want to try something even more fancy, just search the bead shops. I got these fabulous connecting frames from the Beadsmith. They were simple to use, but added so much style to this bracelet design. Grab the pattern here >>
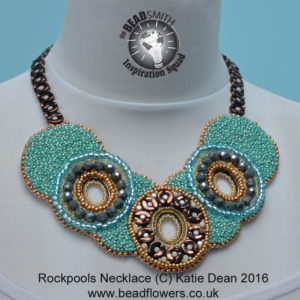
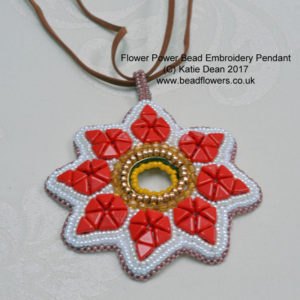
Or, how about using some connector frames for Bead Embroidery? See, there really is no end to the way you can incorporate connectors to add your own style!
Grab the Rockpools Necklace Pattern here>>
Or try the flower pendant pattern here>>


