
Understanding Right Angle Weave
Before you start to actually learn Right Angle Weave, there are some things I think you need to know. So, I’m writing this blog to help you with understanding Right Angle Weave structure and principles. Then, I think, you will find it easier to grasp the technique.

How is RAW different?
If you already have some experience of the basic bead-weaving techniques, then you will be used to adding stitches. In techniques like Peyote, you will have one bead in a stitch (mostly). For netting, you will usually have three or more beads in a stitch. With herringbone, it is two beads in a stitch.
But all these techniques have one thing in common: you pick up your beads, pass through a bead(s) to anchor your new beads and you’re then ready to add your next stitch.
I was trying to break this down as I got to grips with understanding Right Angle Weave. And I think I concluded that the best way to think of this is as a stitch in two parts.
So, in part 1, you will pick up beads and pass through a bead to secure your new beads in place.
However, you then have a part 2, which involves passing on through some of your existing beads to get into position for the next stitch.
Over the years, as I’ve taught people, I think it is that part two that they find most confusing. So, it’s easy to enough to grasp how many beads to put on your needle and which bead to pass through in order to secure them. But, the confusing bit is that part 2 – the moving into place.
Understanding Right Angle Weave as a two-part stitch
So, as I teach you the RAW techniques in the blogs here, I’m going to focus on this two-part idea.
As you go away and work on your own, I want you to also think about completing two parts. So each time you add a new stitch, ask yourself:
- have I passed through the right bead to anchor my new beads in position?
- where do I need to go next before I pick up more beads?
Passing Through vs Passing Back Through
The second area that can confuse people as they begin RAW is the direction of travel (pass) through beads. It’s easy enough to grasp that you are picking up new beads and passing through the bead you are exiting. But I often see people get confused with the direction of travel through that bead.
If you are learning from a pattern that breaks this down, or if you are observant as you follow along with diagrams, you may be fine. But if you are reading words, you need to understand this key piece of beading terminology. ‘Pass through’ or ‘pass back through’
What is ‘passing through’ a bead?
Basically, this is moving through in the same direction that you have already moved through. So, look to see which side of the bead your thread is exiting. Then enter from the other side. So, your direction of travel through the bead remains the same.
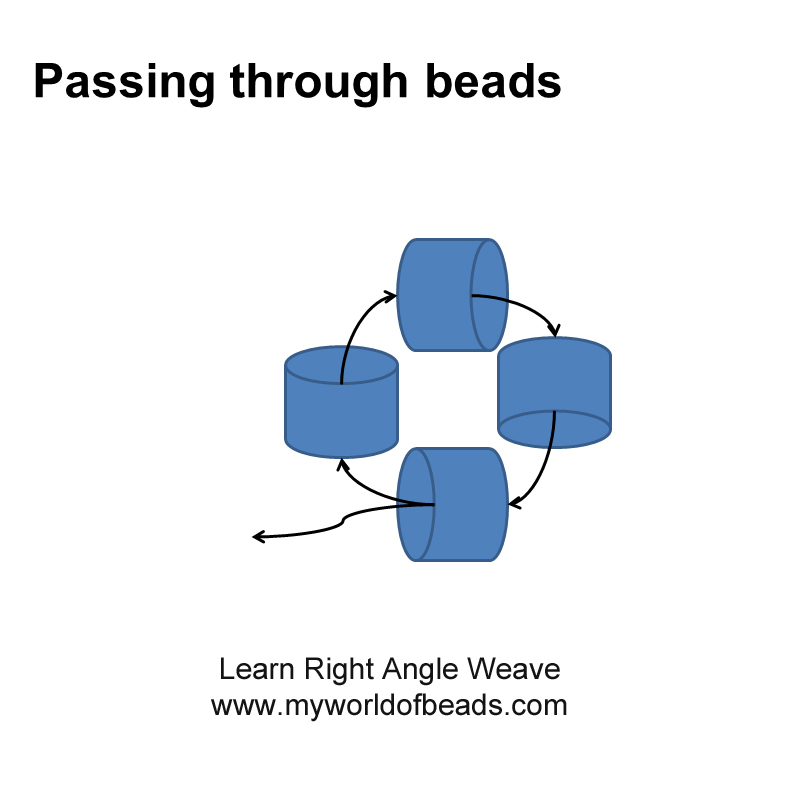
This sounds blindingly obvious. Indeed it is, in most stitches. But because you are going to be travelling in circles in RAW, it can become confusing. Every time you go to pass through a bead, you have the option of entering it from either side, so maybe the correct side isn’t obvious to you.
What is passing back through a bead?
That is entering the bead from the same side that you just exited. So, that would take you through the bead in the opposite direction. This is the technique you would use to add picots. But you should never use it when you are working in RAW.
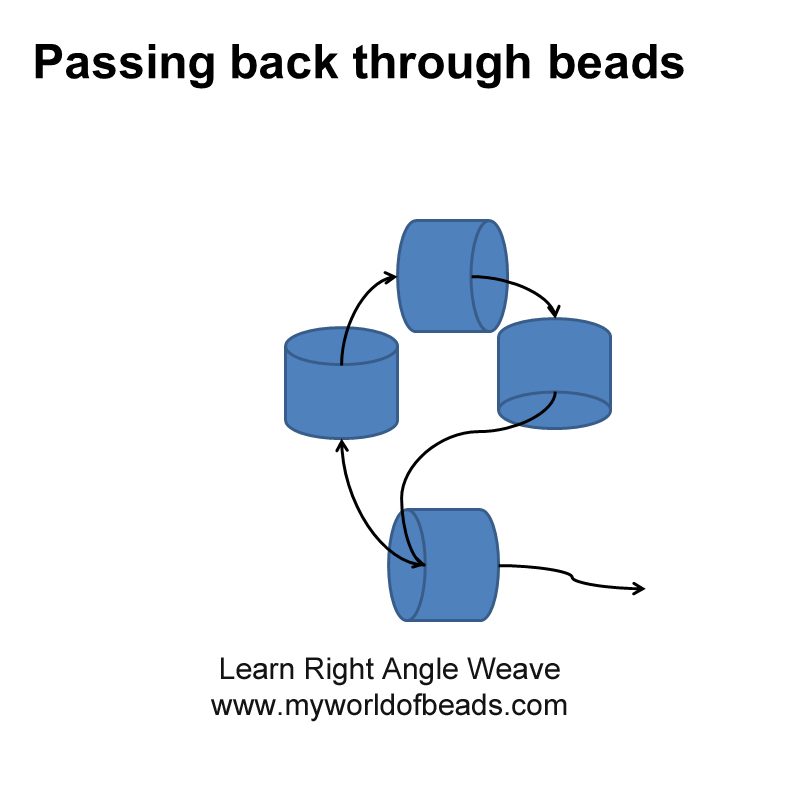
So, because you are always wanting to create circles, if you pass back through a bead, your circle wouldn’t work. Instead, you would end up with a cluster (picot) of beads hanging on the edge of your work.
The golden rule for understanding Right Angle Weave
Before you pass into your bead, look and see which side your thread is exiting. You are going to enter from the opposite side, so you end up exiting in the same direction.
If you can understand this rule and keep using it on every stitch, you will go a long way towards understanding Right Angle Weave.
Summary: 2 top tips for understanding right angle weave
So, to summarise what you have just learnt…
Each stitch in RAW has a two-part process. So, keep asking yourself if you have completed both parts of the stitch before trying to add more beads.
Hold tight to the concept of passing through beads. So, ask yourself, are you travelling in a single direction, not trying to double back on yourself.
Keep these two ideas in mind as you work on RAW projects, or start learning the techniques from these blogs.


Oh my goodness, a library of knowledge on beading in one place! I’m a newbie so this is absolutely wonderful. Thank you, thank you so much.
You’re very welcome, Linda! I hope this will help and enjoy your beading 🙂