
Two Needle Right Angle Weave
Are you someone who struggles with the Right Angle Weave thread path? If so, then you may well find two needle Right Angle Weave is the perfect solution. It may sound more complicated, but unbelievably, using two needles instead of just one, makes RAW much, much easier to accomplish. So, how does it work?

How do you use two needles?
For most people, that is the first question that springs to mind. How do you work with two needles?
Well, basically, you thread one needle onto each end of your thread. So, instead of the beads sitting at one end when you begin, you will place them in the middle of the thread.
You can still use your normal thread length if you wish. But, as you are working from the middle, you might like to use a longer length of thread. So, that’s something you can try out. There isn’t a ‘right’ or ‘wrong’ – just experiment with different lengths and see which feels most comfortable.
You might also be thinking that with a needle on each end, you’re going to need to be ambidextrous! Well, I won’t lie – it can help. But you don’t have to use both needles simultaneously. So, if you are one of those people who is really un-coordinated with your non-dominant hand (that’s perfectly normal), you can still use one needle at a time. Just lay the other needle down and take care not to mix them up.
So, now, hopefully you have some conception of how you can use two needles, let’s take a look at the thread path for RAW and show you how it makes life easier.
How to work Two Needle Right Angle Weave
Basic RAW is confusing to many people because with each unit, you are working in a circular direction. That’s not too bad on its own. However, the thread path requires you to reverse your circle for each new unit. So, it’s more like a figure of eight. (If you need to learn, or revise, basic RAW, use this link).
For some people, this makes perfect logical sense. For others, it’s too much to compute. So, if you fall into that category, two needle Right Angle Weave might help.
Let me explain the thread path…
Row 1
Your first row starts simply. Pick up 4 beads, slide them to the middle of the thread, pass through them all again to form a circle. You can do all that bit with just one needle. But you need to make sure that you end up with your two ends of thread (and their two needles) exiting from opposite sides of the same bead.
Then, pick up 2 beads on your right-hand needle (or left-hand if you are left-handed). Pick up 1 bead on your left-hand needle (right-hand needle for you ‘lefties’) and pass this needle on through the second bead on your other needle. As you pull both threads tight, you should find you have created a new unit and your needles and thread will again be exiting from the two sides of the same end bead. Take a look at the diagram.
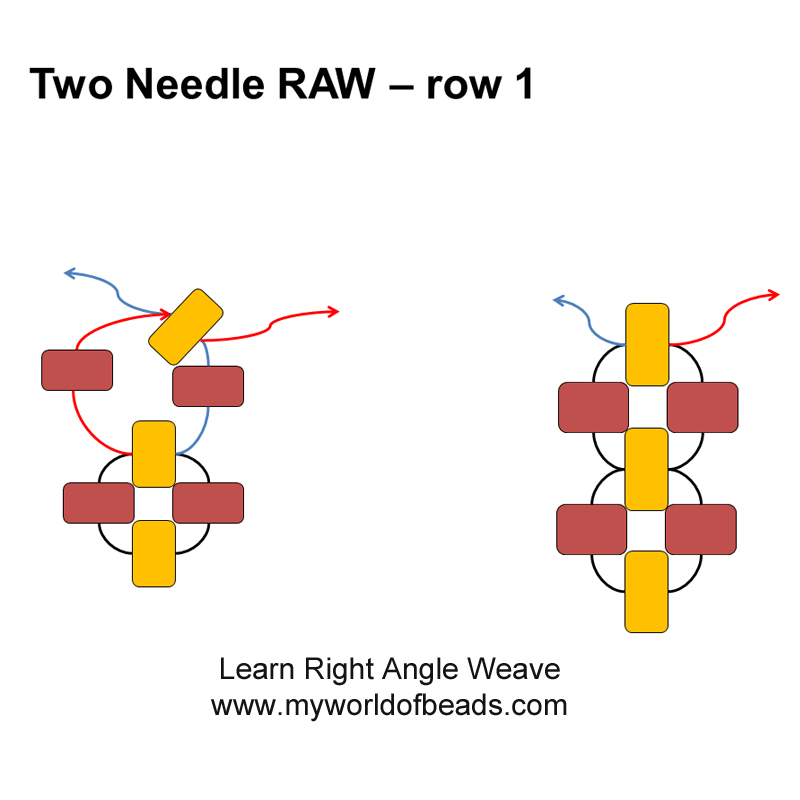
You just continue to use this same technique to create all your units. So, you see, you’re already avoiding that complicated round-and-round thread path that you get with basic RAW.
Rows 2 and beyond
As with basic RAW, your technique for all following rows will be the same. You are building new rows off the side of your first row. So, that means you always have a bottom and side bead in place for each now unit. So, let’s see how that breaks down for two needle Right Angle Weave.
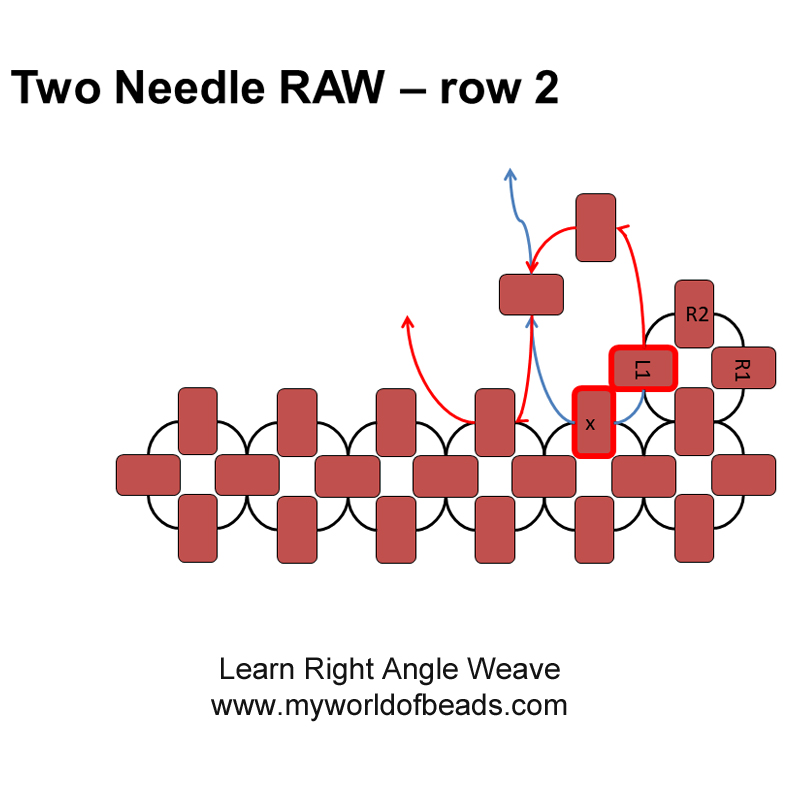
Unit 1
You can add the first unit using the same technique that you used for row 1. So, that will leave your needles sitting in the following position, pointing towards the red and blue crosses, as shown in the diagram below.
 Your next unit is going to add 2 beads to sit where the black crosses are in the diagram. So, you need to get your needles into place before you begin to add the next unit.
The right-hand needle – red – needs to pass on all the way around the current unit, moving clockwise, so it ends up exiting from the side of your unit (bead L1), as shown.
The left-hand needle – blue needs to continue on down through the side unit and on through the top unit from row 1 (through L1 and on through X), as shown in the diagram. So, that leaves you in position to begin adding the next unit.
Units 2 and onwards
Pick up 1 bead on the right-hand needle (red) and 1 bead on the left-hand needle (blue). Take the right-hand needle through the other bead and continue on through the top bead in the next unit of row 1. Your left-hand needle doesn’t need to move – it’s already in place.
That leaves you in position for the next unit. Naturally, your needles will be swapping over, so the left-hand will now become the right-hand and vice versa. But you don’t need to worry about that – it all happens naturally and is much simpler than you having to think about changing direction!
So, all you need to do is add each unit in the same way.

What happens next?
So, that gives you a new technique to try! Start by grabbing a few beads and trying the technique. If you find this easier to use, then that opens up the possibility of making any RAW project. You just need to use the two needle Right Angle Weave method! You can easily apply that to any RAW pattern, even though it might be written for the more usual single needle technique.
If you want a few project ideas to try, then check out this link.
Let me know how you get on in the comments below!


Hello:
Is there a download for the 2-needle raw tutorial?
No – this is all the information on here, Lesley, but thanks for asking.
Thanks, I will study what is there and make notes!!!