
Tubular Brick Stitch: Free Tutorial
In this lesson, I’m going to show you how to work in tubular brick stitch. I also want to talk about shaping a tube, so you can create dimensional work. If you need to revise any other areas of brick stitch technique, use this link to find all my mini lessons.

Before I show you the tubular brick stitch technique, let’s have a think about what I mean by a tube and where you might use it.
What is tubular brick stitch?
This technique is used to build a tube. However, you can actually create brick stitch tubes by just working in flat brick stitch… So, you would stitch a flat strip, then fold it so that the two sides meet. You will find they lock together like the teeth of a zipper. So, all you need to do is zip them together, just like you would with Peyote stitch.
That’s nice and simple. If you want a beginner level pattern to try, then these animal print beaded beads are a great place to start…
 So, why do we need a separate technique for tubular brick stitch?
Well, the technique I am about to show you starts with a ring of beads. Think of this like your starting rows in basic brick stitch. You then use the basic brick stitch technique to build rows on top of this ring, taking it upwards into a tube.
So, your straight tube will look and feel just the same as a tube made by folding over a flat piece. But, what if you want to shape your tube? Maybe you want to create a cone?
Well, that shaping is something you can’t do with the folded flat strip. So, if you need a shaped tube, you need to know the tubular brick stitch technique. Because this technique works in rows around the tube, you can actually use the increasing and decreasing techniques to shape your tube. So, you might make it fatter, or bring it in narrower.
I’ll come back to share some examples and talk about when it is appropriate to use tubular brick stitch. But for now, let’s start learning…
How to do tubular brick stitch
You are going to start by making a ring of beads. Then you will add rows, one by one, on top of this ring, to build a tube.
Step 1
So, decide whether you want to use the ladder stitch starting method or the Peyote method. You can find a reminder of both at this link.
If you are using the ladder stitch start, then stitch six beads into a line using ladder stitch. Fold this line in half so that bead 6 is next to bead 1. Then, use the ladder stitch thread path to link beads 1 and 6, as shown in the diagram below. This will give you a ring that makes the first row of your tube.
 If you prefer to use the Peyote start, then add 12 beads to your Peyote string. Again, fold the string over so that the two ends meet. Keep to the thread path to join beads 11 and 12 onto the first two beads. So, you will be exiting from bead 11. Pass up through bead 2, on through bead 12, then down through bead 1. From here, you can exit from either row, depending on your pattern.
 So, this will give you the first two rows of your tube. If you are making a patterned tube, then you need to make sure you have this little ring up the right way so you will add row 3 on top of row 2 (not on top of row 1!)
Step 2
You are now ready to begin adding your rows. Every row starts in the same way, just like basic brick stitch. So, pick up 2 beads, pass under the next exposed thread and back up through your second bead. Then, for each of the remaining stitches in the row, you will pick up 1 bead, pass under the next exposed thread and back up through the bead.
 Now, when you start a row, you can travel around it in whichever direction you wish. So, in my diagram, I am working anti-clockwise. This helped to show the beads more clearly. But I could equally have worked clockwise.
You don’t have to work the same way around every row. So, if you start working clockwise, then find that feels odd, you can try travelling anti-clockwise around the next row. But I’m getting ahead of myself… Before you start the next row, you need to finish this one!
Step 3
When you have added your final bead (bead number six), take a little look at the row. You should have a thread linking each of the beads, but you won’t have any thread linking bead 6 to bead 1. So, to finish the row, you need to just add that thread.
You will be exiting from the top of bead 6. Simply pass down through bead 1, then up through bead 6. That puts your final thread in place, giving you a foundation of 6 threads on which to build your next row.
 So, just keep following steps 2 and 3 to keep adding rows until your tube is the desired length.
When should you use tubular brick stitch?
If you have done a bit of beading before, you may have realised different techniques have different qualities. What do I mean by that? Well, some create a fabric that is soft and flexible. Others give a rigid fabric. So, the kind of project you want to create will dictate the best beading technique to use.
Tubular brick stitch is very rigid. So, much so, that the tube won’t bend at all. That means this technique is no good for making a beaded rope. Your tube has no flexibility, so it won’t curve around your neck or wrist.
However, this quality makes tubular brick stitch brilliant for dimensional work…
Shaping tubular brick stitch
I mentioned above, you can also shape a brick stitch tube. So, if you add increases within a row, this will take the tube outwards, growing it wider. Then, if you want to narrow it again, you just decrease within a row.
If you need a reminder of how to increase and decrease, take a look at this blog.
So, this is something you can play around with. Or, you can just grab a pattern to show you how…
Patterns to try
I found the rigid structure of tubular brick stitch, combined with the ability to shape it, makes it brilliant for creating 3-D beadwork.
So, I used tubular brick stitch with decreases when I created these little strawberry charms. If you want to give that a try, use this link to grab a copy of the pattern.

Then, if you want to have a go at tubular brick stitch with increases, try out my cute little cupcakes (iced buns if you’re English!). Here is the link to the pattern. These make great earrings, charms or key rings.
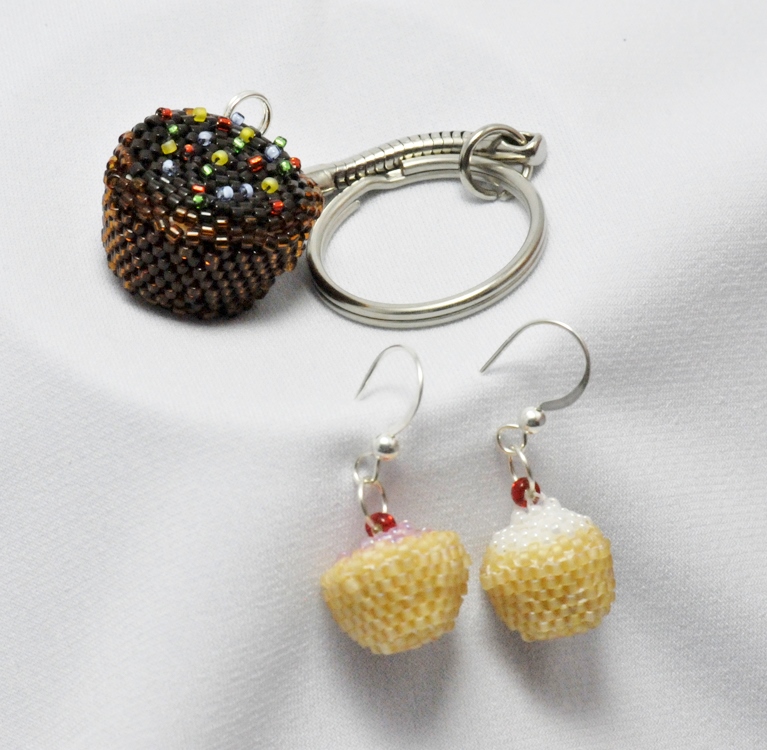
I also used brick stitch to create the base for the cupcakes in my book, Sweet Treats. So, if that is something you want to try, use this link to grab a cupcake kit.

What next?
Well, hopefully this mini lesson has helped you to understand what tubular brick stitch is and how to use it. If this has helped you, then please make sure to share it with all your beading friends.
You can bookmark this page to return to whenever you need a reminder. And, of course, you are now ready to learn some more brick stitch variations, so take a look at all the possibilities here!


