
Reading Dimensional Peyote Patterns: 2 Tips
I’m writing this post in response to a particular question from a Facebook group. How do you go about reading dimensional Peyote patterns?

Surprisingly, this is not an easy question to answer. Beading patterns don’t use a standardised language or format. Yes, they will (or should) all include certain things:
- a list of materials
- photo of the finished project
- written instructions
- photos or diagrams
But do you see how vague that list is? What format will the written instructions take? Will you be working with photos or diagrams, or both?
Well, all of that varies from designer to designer.
Similarly, looking at the language: yes, there are standard terms that refer to techniques or beading basics. But the way in which each designer interprets and uses those terms can vary.
Now, I don’t want this to turn into an essay on how beading patterns should be, or could be, written. I have actually got some posts on that topic, here, if you’re interested in delving deeper.
I thought it would be most helpful if I could give you a couple of tips that are general enough to apply to reading dimensional Peyote patterns from any designer.
Sympathy for designers please…!
Before I go on to offer those two tips, I think you would find it helpful if you understood a little more about how designers write patterns.
Perhaps this is obvious, but a beading pattern is there for one purpose only. To explain to the reader how to replicate the original steps taken by the designer.
Now, whether you think the pattern does that well, or not, is going to depend on two things:
- How good is the designer at communicating and explaining their steps to someone else?
- How well do you understand that designer’s personal ‘language’?
The first problem
Now, I’m sure you’ve been in a situation in a group where someone was explaining something. Half the group got it straightaway and the other half were still confused. The confused ones maybe turned to their friends who understood and asked for clarification. Sometimes just explaining something in a different way is all it takes!
Unfortunately, a designer, like anyone else has an individual voice. So, what they may think is crystal clear might not make sense to another person. But, as with any individual, if you ask them to explain it differently, they may not be able to. Equally, it’s actually not really feasible to include four different ways of explaining something in one pattern. Imagine how long and confusing that would become!
Often, when you’re following a pattern, you are doing it on your own. So, if it isn’t making sense, it’s tempting to give up, or to feel that you’re a ‘rubbish beader’.
Sometimes, all you need is to ask for some help. Maybe that’s from a beading friend, or at a beading group. Or maybe, you need to revise a basic technique to make sure you really understand what you are trying to achieve. Very occasionally, perhaps you need to accept that the way that designer writes just isn’t for you. But never feel that this is a sign to stop beading altogether!
The second problem
Aside from issues of communication, reading dimensional Peyote patterns can be tricky because they are dimensional. So, the designer has been faced with the incredibly complex task of using a 2D format to record a 3D project.
Yes, there are now brilliant design tools that can render diagrams in 3D. But even so, it’s impossible to show the work growing for ‘real’ with just diagrams.
Photos can help a lot. But if the camera angle is wrong, they might not show what the beader needs to see. Or they might show it, but the beader isn’t sure what they’re trying to look at.
By this point, you’ve probably been put off reading dimensional peyote patterns altogether. But stop there… I’m about to turn the ‘doom and gloom’ around and offer two pieces of advice to help you.

Reading dimensional Peyote patterns: tip 1
My first tip for reading dimensional Peyote patterns is simple. Make sure you understand the technique.
Now, dimensional Peyote is basically going to be tubular Peyote. It might start with a flat base, using even count, or odd count, or circular. But at some point, it is going to continue into a tube to give the sides that create a 3D shape.
So, before you try any dimensional Peyote, make sure you learn and understand tubular Peyote. You can use this link to do that.
Your pattern may also make reference to increasing or decreasing. Again, make sure you know what these technique are and how they work. So, if necessary, forget about the pattern for the moment and spend your next beading session learning or revising basic Peyote techniques. You can use this link to find all the Peyote lessons.
Now, you might want to go through and learn everything. Or, you might just read through the pattern and highlight the techniques that it uses. If the pattern isn’t very clear on what basic techniques it’s using, then learn them all. When you come to follow the pattern instructions, your brain will then say to itself ‘oh, so that’s like increasing – or even count – or whatever the technique might be.’
An illustrative example
So, let’s stick with that tubular example. Making a plain tube is pretty straightforward. But what happens when you want to add a design around your tube?
Frankly, this is a nightmare for the designer to document! Either they have to go row by row, telling you which bead to pick up in which order. Or, they have to produce a flat diagram that shows how the tube would look if you ‘unrolled’ it into a flat piece.
The first method is simpler for the beader to follow, but a lot more time-consuming and difficult for the designer to write out (Particularly if your tube has 40 beads in a row and is 100 rows high!! Imagine the length of those instructions and the potential for errors!).
So, let’s take a look at the diagram format.
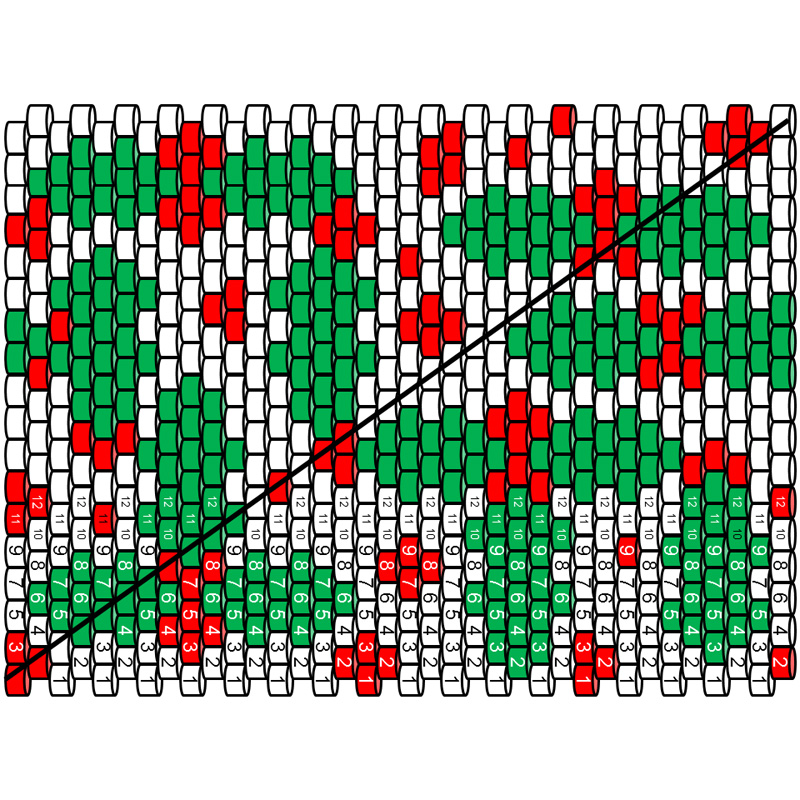 There you have an example of a tubular pattern in diagram form. If you don’t know how tubular Peyote works, that diagram is pretty much your worst nightmare!
But if you do understand tubular Peyote, then you know the following:
- A single row is made up of ‘up’ or ‘down’ beads (this designer has been kind enough to label the first 12 rows)
- Tubular peyote has a step up. So every time you start a new row, you will be moving a bead further around your tube (this designer has been kind and illustrated this with the black line. That line marks the first bead you add for each row. Then continue working from that point to the right of the diagram. Finish your row of beads by following the diagram along from left edge back to your starting point and step up to the next start point)
If you don’t know how tubular Peyote works, then even if the designer has explained that, you’re still wondering basics like what is a step up?
Same tip, different 3D patterns
Now, you can apply this first tip for reading dimensional peyote patterns to other techniques. So, whether it’s cubic right angle weave, tubular herringbone, or anything else, the golden rule applies…
Make sure you understand the basic technique before you attempt the pattern! Or, at least follow this advice if you’re struggling with a pattern. Put the pattern to one side and revise the basic technique, then come back to the pattern instructions.
Reading dimensional Peyote patterns: tip 2
Remember I said the designer was trying to document a 3D project in a 2D format? Well, this is relevant in terms of how you read the instructions.
Most of us have a natural inclination towards a particular form of information. So, some understand words, some understand pictures. Now, a well-written dimensional beading pattern will include both forms of information.
But you would be amazed how often I see people trying to follow a pattern by using just one set of information. So, maybe they are just looking at diagrams and following thread paths. Or perhaps they read the text and ignore the diagrams.
You can get away with that for a 2D pattern…maybe… But for 3D you’re just making life hard for yourself.
Whenever you are reading dimensional Peyote beading patterns, use ALL the information you have been given. In some cases, it is really tricky to describe a thread path in words. The designer finds themselves writing ten sentences to describe a really simple manoeuvre. Yet, that can be shown really easily in a diagram.
In other cases, the reverse is true: the diagram lacks a 3D view, so it needs some text to explain how the beads will be sitting in your hand. Or maybe this is the point to add in a photo as well to illustrate that.
What can you expect to see?
Again, as I said earlier, the 3D nature of the project often means that it’s not possible to show the full structure in a diagram. So, you have to get used to focusing on just the final row. Or just the coloured beads (depending on the format the designer has used). The work in your hand will have all that has gone before. But the diagram may just show the thread path and bead placement for this step or this row.
Take a look at the image and diagram below:


If you only had this information, would you know what you were trying to do in the step? Probably not.
You also need the written instructions which say: ‘add a stitch in the ditch row to row four on your box structure. You will need to add a bead between your pair of beads on each corner.’ If you have taken note of tip 1, then you’ll have made sure you understand the stitch in the ditch technique.
Then, your diagram ‘zones in’ to show you the details of bead placement and thread path. Your photo shows how this looks in reality on the actual beadwork.
Example 2
In this diagram, the focus is about the final row of beads. So, in order to keep the diagram big enough to see clearly, the designer has omitted the first few rows of work to show just the row you have finished and the row you are now adding. Your focus just needs to be on that outer row – your new row of beads. Even though your actual beads will contain more rows than you see in the diagram.
So, just to sum up, my second top tip for reading dimensional peyote patterns is to use all the information. This may take some getting used to at first. Just as I said, you are also trying to get used to a designer’s style of writing. But if they have included enough information and written it clearly, any beader should be able to follow along.
Can beginners use dimensional patterns?
Yes, they can. But, bear in mind one thing: you may need to learn some basic techniques along the way. Or you may not.
You can find beginner level dimensional patterns. And just to prove the point, I have two that are tried and tested by beginners.
So, let me challenge you…
Do you want to make a dimensional Peyote project?
If you said yes, then pick one of these two patterns…
This link will take you to the beaded box


If you prefer the look of the chocolate gateau earrings, then use that link to grab that pattern.
Now, my offer is, trust me. You can make either of those projects. If you get truly stuck, you can email me (you’ll get my contact details when you place the order) and ask for help.
If, after getting help from me, and following it, you really can’t make this project, I’ll give your money back on the pattern. All you need to do to qualify is include a note with your order: ‘I’m taking the reading dimensional peyote beading patterns challenge’.
So, there we go…a risk-free incentive to be bold and discover that you are capable of reading dimensional peyote beading patterns!


Hi Katie
This is a wonderful wealth of information and is very helpful, giving me the courage to attempt 3D beading, which has been very very difficult for me. Thank you so much.
You’re very welcome, Leslie! I’m so happy to hear this is giving you the courage to try some 3D. I think (hope!) you’ll be pleasantly surprised and find you can manage better than you feared. Just remember, one bead at a time and you’ll get there!