Kumihimo End Caps: Free Tutorial
Do you enjoy Kumihimo? Are you able to use a needle and thread? Then, check out this free tutorial for making your own Kumihimo end caps. All you need are a few seed beads and some thread!

Where did this idea come from?
I found myself on a two-week vacation, with my Kumihimo supplies, making rope after rope, and thoroughly enjoying myself. But then…disaster…I ran out of end caps. So, how was I going to finish my jewellery? Wait until I got home and could get some more?… No!
I also had some seed beads with me. So, I decided to try and make my own!
It turns out, this opened up a whole new world of design possibilities. I was able to add other bead-woven components to my necklaces and bracelets, matching my beaded end caps. And best of all – they were really simple to make! (I’ve written more about how I made these projects in the ‘Kumihimo Projects Inspiration’ blog in this section).


So, I thought I would share the technique for a basic end cap with you all. It’s completely free to watch and learn, so I hope you will find it helpful.
Make your own Kumihimo end caps
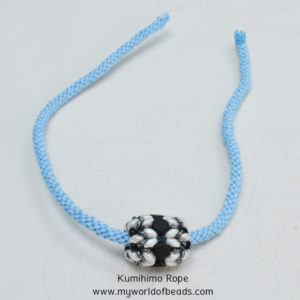
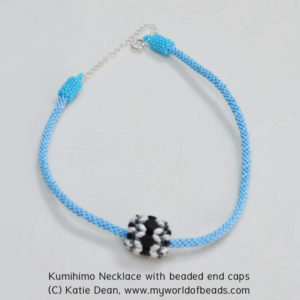
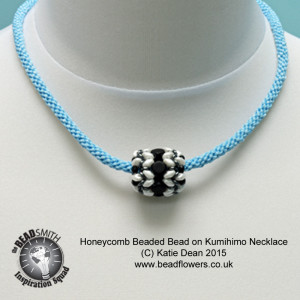
As you’ll see in the video tutorial, I started out with a beaded rope (8 strand braid). I then made this honeycomb beaded bead to hang on the rope. (Click here to get the pattern for the beaded bead).
The part I’m about to show you is how to create the beaded end caps and add the clasp to complete the necklace. Of course, you can use this on any Kumihimo jewellery project. So, you might be creating a bracelet, but the technique will still work.
Materials for the end caps
You just need the following tools and materials for this free project:
- Size 11 seed beads
- Beading thread
- Beading needle
- Scissors
- Your choice of clasp (in my example, I used a 7mm closed ring, a 7mm bolt clasp and about 3″ of chain)
The free tutorial
In this video, I have taken you through step-by-step. You can pause the video regularly to allow you to bead along with me. Or, you can watch all the way through, then use the technique reminders (below) to bead on your own afterwards.
Once again, if you want to make my beaded bead to hang on your own rope, here is the link to the tutorial. You could also use another beaded bead or pendant of your choice.
Technique Reminders
Step 1
Cut 120cm (4′) of beading thread. Pick up 1 seed bead and slide it to 20cm (8″) away from the end of the thread – you will use this tail thread again later. Pass through the seed bead once more, to anchor it onto your thread.
Step 2
Pick up enough seed beads to reach around your rope. You must have an even number of beads in total.
Step 3
Join your string of beads into a circle, then bead two rows of tubular Peyote.
Step 4
Check your circle is still a good fit for your rope. If you need to alter the size, you will have to remove all your rows and alter the number of beads in your original string. But remember, in order to maintain an even number, you need to add or remove beads in multiples of two.
Step 5
When you are happy with the fit, continue to bead in tubular Peyote until your tube is the desired length for your end cap.
Step 6
Decrease the end of the tube to pull it inwards. Depending on the size of your tube, this could take place over two rows, or more. This link will explain how to decrease in Peyote stitch.
Step 7
Add one half of your clasp and then finish your working thread.
Step 8
Slide the end cap onto your rope. Thread a needle onto your tail thread. Remember to undo the thread from around your first bead, then use the thread to stitch the bottom of the end cap onto the rope. Finish your tail thread.
Step 9
Repeat steps 1-8 to make a matching end cap for the other end of the rope. Remember, if you need to, you can alter the size of this end cap to fit your rope.
Over to you…
I hope that has given you something new to think about as you make your Kumihimo projects. I went on to bead Kumihimo end caps using other types of seed beads, like Mini Duos. So, this brings another creative dimension to your work. And it’s great fun if you also love bead-weaving.
You can find out about other aspects of Kumihimo using this link.