
How to follow a brick stitch pattern
If you are learning brick stitch, then you will need to learn how to follow a brick stitch pattern. Happily, I have good news for you… Basic brick stitch patterns are really easy to follow!

So, let’s get started…
How to follow a brick stitch pattern
I have two rules and one tip for you. That’s really all you need to know as you learn how to follow a brick stitch pattern.
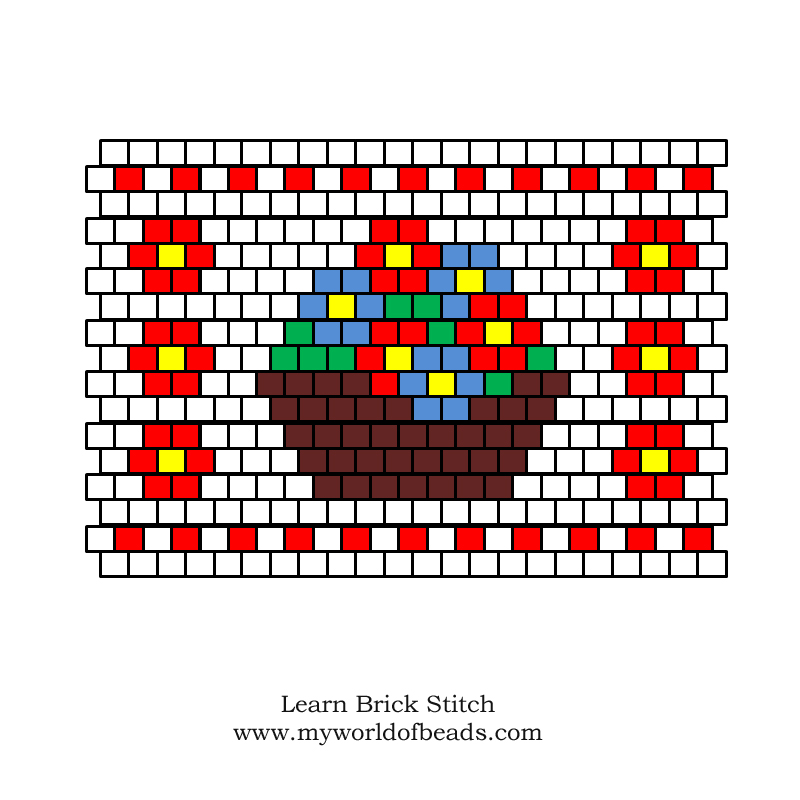
So, let’s start with the golden rules. First, take a look at the diagram below – it shows a basic brick stitch pattern. Where do you think you would start beading?
 Rule 1 – where to start
 Rule 1 – where to start
Typically, you start beading at the bottom and work upwards.
So, your first step would be to use your chosen method for starting brick stitch. This will either give you just the bottom row of beads (ladder stitch technique – start from the right-hand side), or the bottom two rows (Peyote start – begin at the bottom left).
From here, you can work your way upwards. You just need to follow one line of beads at a time, following each straight horizontal row. In a minute, I’m going to give you a great tip for doing this.
Rule 2 – following the rows
If you think back to your basic brick stitch technique, each row will begin with an overhanging bead. So, you need to take this into account as you work out how to follow a brick stitch pattern.
You will bead one row from right to left, the next from left to right, and so on. So, if you’re looking at the chart and wondering where to begin, you would start at the side where your row overhangs (sticks out).
In the chart above, your odd numbered rows will work from right to left and your even numbered rows will work from left to right.
This second rule is the most important to remember. If you can grasp that, then you will always be able to work out where to begin.
My Top Tip
It’s quite easy to get lost and forget which row you are trying to follow. This is especially true in a larger chart. So, it’s a good idea to mark your way as you work.
Grab a piece of paper, or a ruler, or something similar. Place it over your chart so that only the first row is visible. Now, bead the first row.
Then, move your paper/ruler up one row. You can now add the beads for your second row.

Just keep moving your paper up one row at a time so you can focus on just the row in hand, not the entire chart. However, do remember to keep glancing at the complete chart to make sure the design you are beading is looking like the chart.
Annotating Your Chart
If you wish, you can also make notes on your chart to help you follow it. If you are doing this, then remember to make a copy of the chart so you can scribble on that. It’s always a good idea to keep the original as it is!
If you are using the Peyote start, then number the beads in your first two rows in the order in which you need to add them.
Add an arrow at the start of each row to remind you which direction you need to travel. If you place the arrow at the start, this will also help you remember which end to begin reading as you add your beads. You might also want to number the rows.
 If you have to stop beading in the middle of your project, then make a note of which row you are working on. Then, when you return to the project, you won’t have to spend ages trying to work out where to start!
How to follow a brick stitch pattern for shaped brick stitch
In my last blog, I talked about how to shape brick stitch. So, you will have gathered that it’s not about using different techniques, but about calculating where to start and end rows.
So, bearing this in mind, you might want to think about how you use a chart for shaped brick stitch. Take a look at the example below:

The chart shows a leaf pattern made in brick stitch. It is a reasonably complex pattern with quite a bit of shaping.
Note that on the left hand side the shaping is very regular – the widest point is at the middle of the leaf and each row on either side of this wide point reduces by a single bead to create an even slope.
On the right hand side, the shaping is different. Note that some rows are one bead less than their neighbours. Other rows start, or finish, two beads early.
So, how would you approach this chart? Would you still start at the bottom and work upwards…?
Identifying where to start
When you are going to start a brick stitch pattern, take a look at the overall shape first in order to decide where it is going to be easiest to start.
In many patterns you can simply start at the bottom of the shape and work upwards, row by row. However, there are occasions when this is not the most sensible place to start.
If you look at the first few rows of leaf pattern, you will see that you could start with a ladder stitch row for the bottom row (this would contain 5 beads). Then row 2 has 6 beads. So, you can add the single overhang bead at each end of the row.

However, row 3 then creates a problem: when you get to the end on the right, the final bead has no thread to link from. If you’re familiar with the shaping techniques I talked about, you’ll know how to add multiple increases to the end of a row. But you will also know this can be fiddly.
So, as I was considering how to follow a brick stitch pattern like this, I thought about where I should start.
In this instance, I decided it was easiest to just start with the widest row – the middle row – and work first one side, then the other. If I find a pattern with an uneven or awkward pattern of increases or decreases, I usually look for the longest row and start from there, working above and below it as necessary.
There is no right or wrong technique for this. It is something that you will grow to develop as you learn how to follow brick stitch pattern charts. You may even find some designers split the pattern into chunks and tell you which bits to start with.
A pattern to try
So, now you have some idea of how to follow a brick stitch pattern, let me point you toward some projects you can try.
If you want some fairly simple shapes and patterns, the designs in this book are a good place to start. Just click on the image to get a copy of the book.
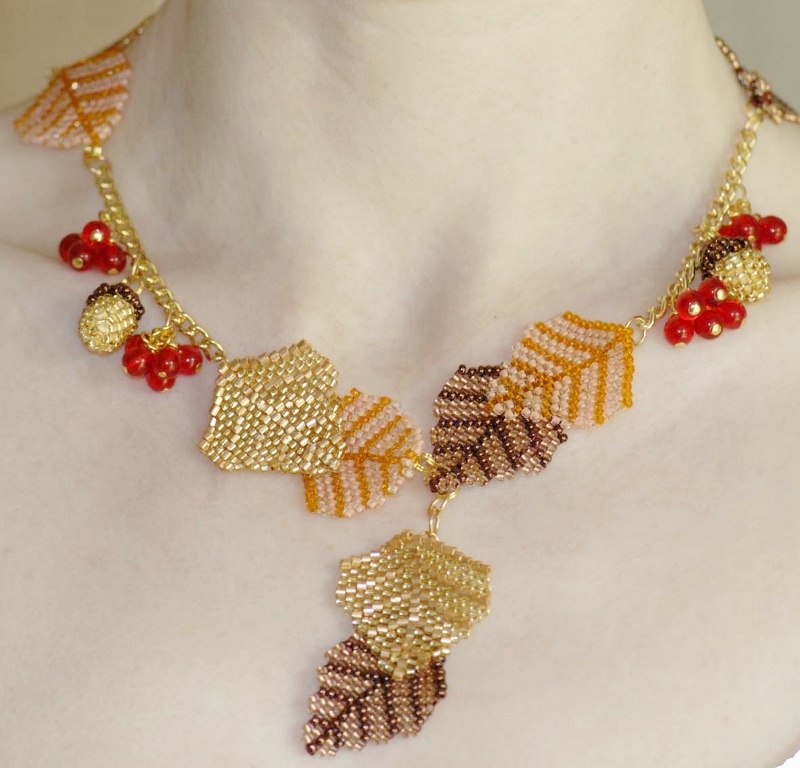
 Then, this Autumn leaves necklace pattern is a good beginner project for learning how to follow a brick stitch pattern. You will also get to test your brick stitch shaping skills with this one!
What next?
Now, you are ready to move on and learn some more brick stitch techniques. Or maybe you need to refresh your memory with some previous lessons. You can find them all at this link>>
Remember to share this with your beading friends. You can also download this free tutorial for more information about brick stitch basics. And of course, bookmark this page to return to whenever you need it.


