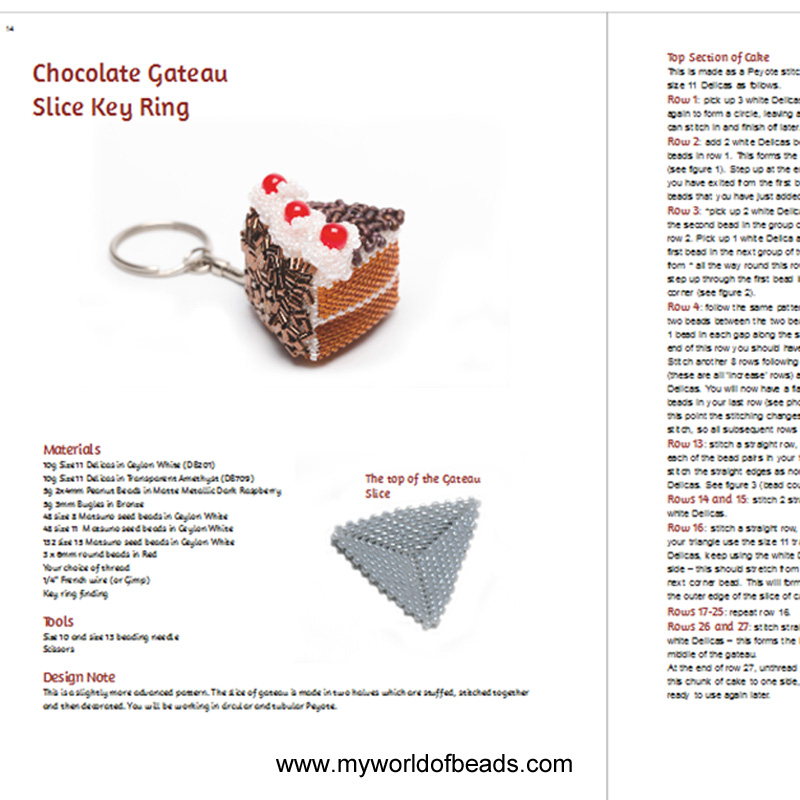
French beading tips for success
So far in my French beading blog series, I’ve been trying to cover everything you need to know to get started. So, I’ve looked at materials, tools, techniques and how to read patterns. Now, I think it may be time to move on to the French beading tips that are going to help when do start beading.

So, this would be the kind of advice I would give to students at the start of, and during, a French beading class. I’m not going to talk about correcting mistakes here. Instead, I want to write a separate blog post on that, which I will publish next.


Choose your French beading patterns here>>
French beading tips to avoid spilling beads!
OK, so however long you’ve been French beading, or however careful you are, there will be the occasional bead disaster!
For me, these have involved…
- Knocking over a bead spinner full of beads
- Forgetting to hold my wire when I cut it, so I sent beads flying around the room…literally
And yes, in both instances, I was still finding beads in the weirdest places months after the incidents occurred!
I’m sure you will find other imaginative ways to spill beads as you learn and work on your French beading projects. But I can at least share a couple of French beading tips that I’ve learned the hard way.
Tip number one
When you’re not using your bead spinner, try and remember to move it a little way away from your immediate working space. Make sure it is somewhere that you’re not going to just knock with your hand or arm.
Also, be aware of your wire – it’s amazing how much damage a piece of wire can do if it catches the top of the spinner…
And, naturally, don’t forget about your little furry beading buddies. I happen to know that cats in particular are very fond of playing with bead spinners. I mean, when you see the beads flying onto the wire like magic, who wouldn’t want to dip their paw in and see what that feels like…?
Seriously, though, if you do have small children or pets that may try eating beads, you should take care to avoid large-scale spillages. And, one more top tip for if the worst should happen…
If you place a pair of tights (pantyhose) over the tip of your vacuum pole (partway up), you can then vacuum up any spilt beads. The tights will form a mesh that catches the beads before they reach the vacuum bag. So, you should be able to rescue them.

Tip number two
This is one of the French beading tips that I repeat most often in class. And still, I guarantee that somebody will forget this tip at some point…
When you’ve completed your flower/petal/leaf and you’re about to cut your working wire from the spool, make sure you hold onto the spool wire. Your completed component can drop on the your beading mat or even the floor, without damage. But if you let go of the spool wire, do you know what will happen…?
Usually, the force of cutting the wire will cause it to spin back around the spool, rather like a helicopter rotator blade. And any beads on that wire will spin off, scattering around your room in a circular cascade. It’s fun to watch, but not so much fun to find all the beads again…

Also, back to health and safety… It is good practise to get used to holding on to wire as you cut it off. Even if you don’t shower your room with beads, you just don’t want wire flying around. If you’re trimming small pieces of wire and you don’t hold them, they can fly anywhere. So, they may end up flying into your eye (really dangerous) or into someone else’s eye. Even if they just end up on the floor, curious pets or little ones can do themselves some damage with a small piece of wire. So, please be aware.
French beading tips for taming your wire
If you are new to French beading, then you may not yet realise just what a mischievous personality your reels of wire have. Some are better behaved than others, to give them credit. But, on the whole, once freed from its packaging, a reel of wire seems bent upon making a beader’s life as difficult as possible.
You see, wire has a life of its own. It likes to unravel, tangle and bend in the most unhelpful places. The problem is, once your wire has done this, any kinks that result are a pain to work with. They may also create weak spots in the wire.

Tip number one
It’s not a bad idea to think about investing in some wire straighteners. These will help if you end up with a lot of kinks and twists in your wire. Personally, I don’t have a pair (confession time!), but carefully use my fingers to ease out kinks…or just try to avoid them.
Tip number 2
Rubber bands are your new best friend. Yes, you can get a gadget called a ‘wire tamer’ which cleverly fits around your reel of wire and allows you to feed out a single strand with which to work. So, by all means, look into that.
But, if you’re on a budget, or need something NOW, not when the mailman can deliver it, try a rubber band. You can just pop that around your spool of wire and it will at least stop the helicopter effect I mentioned above!

If you need more French beading tips for cheap – or free – handy tools, check out this blog>>
Tip number 3
One of the other helpful French beading tips I’ve picked up along the way is to be used with caution.
Now, imagine the scenario where you’ve strung a LOT of beads onto your wire. How do you keep the wire close by to use, yet stop it from rolling around as you pull it out to use the beads?
Simple: pop it on top of your bead spinner, so the spindle on the spinner will let the reel unwind naturally. But, here’s the ‘use with caution’ part. Don’t pop it on top of a spinner full of beads. Just in case the wire happens to feel like ‘playing’ and manages to tip the spinner over. (See my tips above!!)

French beading tips for threading beads
So, this set of French beading tips might not be quite what you expect. If you just want to know how to thread beads for French beading, then you need this blog post>>
Here, I want to deal with two common scenarios.
- Your pattern tells you to thread at least 250 beads onto your wire. So, what do you do? Count all the beads as you thread them?
- Your pattern doesn’t tell you how many beads you need to thread
Dealing with scenario 1
In the first scenario, you definitely don’t need to count your beads! I have two little tricks that will avoid that.
First, a little bit of maths… If you are using size 11 seed beads, then there are about 11 beads to an inch. So, if you want to thread 250 beads, you need to divide 250 by 11 (answer 22.7272!). That tells you, that 23inches should give you 250 beads.
Now, my little caveat… I’m not sure that there really are 11 beads to an inch. Certainly this may depend on the brand of bead you’re using. So, my clever little mathematical system isn’t perfect. I think, in most cases, it gives you a lot more beads than you need. But it’s still preferable to counting them all as you thread them, isn’t it?

My second trick is simply: experience. The more French beading you do, the more you will come to just recognise what a string of 100 beads looks like.
Dealing with the second scenario
So, what happens when your pattern doesn’t tell you how many beads to string?
I would recommend stringing about 3′ (90cm). That shouldn’t take too long with a bead spinner. It should also be a manageable length, so you can still shift the beads along the wire easily as you work. Plus, it will hopefully be enough for your needs.
If you do run out of beads partway through your petal or flower, there’s a very easy solution. I’m going to cover that in my next blog.


Get your copies of my French beading ebooks here>>
French beading tips for successful flowers
One of the most common things I see is this… people get so carried away with focusing on the technique that they are about to use. They then forget to set up their flower/leaf correctly.
So, when you’ve strung your beads and knotted your wire, the first thing to think about is your stem.
How long does it need to be? This will dictate the size of your loop if you are using the basic technique. If you are using one of the loops techniques, then it will dictate how much wire you leave between your knotted end and your first loop.
So, when we’re talking French beading tips, remember this one every time!

A quick word on ‘knotting wire’
If you’re new to French beading and you see the instruction, ‘knot the end of your wire’, you may be confused. Now, this instruction is just to remind you to find a way to keep your beads on the wire until you are ready to use them.
So, all you need to do is make a little loop of wire and twist it. This doesn’t have to be pretty – just keep the beads safe.
I often see people taking the instruction literally and trying to tie a knot in their wire. Well, this won’t work easily and it may not keep the beads safely on the wire either.
French beading tips for binding stems with leaves
I’m not sure if this should be among the French beading tips, or if it’s really more of a technique. But here goes…
When you’ve bound your stem and incorporated leaves – or branches – down it, it’s very easy to get your embroidery silk all tangled around the leaves.
So, how do I avoid this? Well, bear in mind that the joy of wire lies in its ability to move and re-shape. So, I push all my leaves and branches down flat against the stem – pointing to the bottom. This leaves me space to begin binding from the top. As I reach each set of leaves, I then pull it upwards and continue binding down below it.
This means the area I’m binding remains as clear as possible at all times. Plus, if you keep the leaves quite flat to the stem, there is less chance of your embroidery silk tangling in them as you work.

Tips for packing up
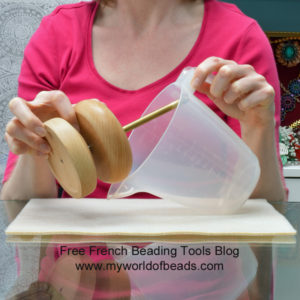
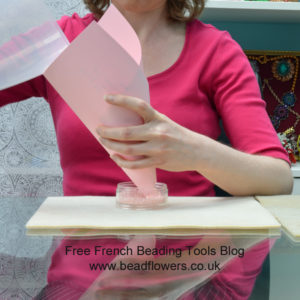
You may not think about this until you’re coming to the end of your first beading session. But, once you have a bead spinner full of beads, what happens when you want to get them back into their packet?
Well, a kitchen jug is a handy object to have around. You can empty the bead spinner into that, then pour the beads into their permanent storage.
Or, if you don’t have a jug to hand, use a piece of paper! Roll it into a cone and carefully feed the cone into your bead packet. Then tip the bead spinner through the cone. Just take care, though, or this could be your third method of spreading hundreds of seed beads around your beading room!!
Beading mats
While I’m talking French beading tips, I also strongly recommend using a large beading mat. Inevitably, some of your beads will end up flying out of your bead spinner. So, if your spinner is sitting on a large beading mat, then most of the beads will land safely on this.
When you come to pack up, you can just roll the beading mat carefully. Then tip any loose beads back into the spinner to clear away with the rest (see above!)
So, hopefully that selection of French beading tips will save you many hours of frustration. Or not. But where would the fun be if our beading always went smoothly…?!


Get started with some French beading patterns here>>