
Basic Right Angle Weave: your complete guide
I’ve been giving you a few introductory blogs to set you up to learn RAW. So, now it’s time to get going… Here is your complete guide to basic Right Angle Weave (RAW). If you want to look again at any of the other RAW blogs, you can find everything here>>

A brief re-cap of the stitch structure
If you have already learned other bead-weaving techniques, RAW is very different. With most stitches, you are working along a straight line, whatever combination of beads you are picking up and whichever bead you are passing through to attach them. For RAW, each stitch creates a little square. So, this means your thread path is constantly moving round in a circular fashion, rather than along a straight line.
This can be rather confusing for the brain to compute at first. So you should know that it is very, very common for people to struggle with RAW. If this is you, then don’t feel bad – you’re in excellent company!
Basic Right Angle Weave unit structure
Whereas most bead-weaving techniques talk about adding a stitch, when you are adding each bead, RAW usually refers to ‘units’.
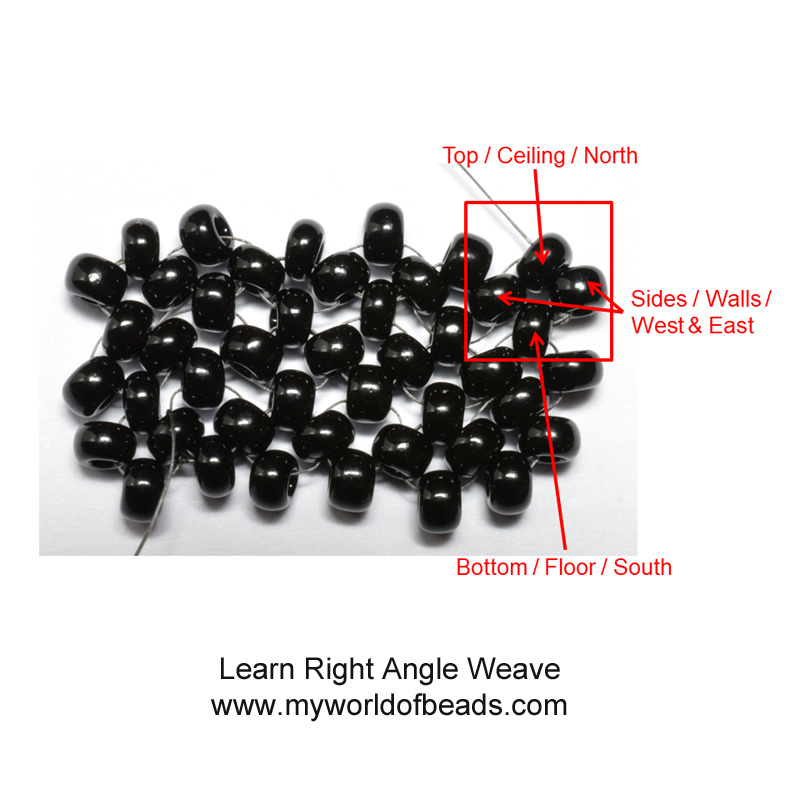
For basic Right Angle Weave, each ‘unit’ is made up of 4 beads. These sit at right angles to one another to form a square (although as you will see from the photo above, it can be hard to distinguish each ‘square’ if the beads are not sitting uniformly).
Each unit has a top, a bottom and two sides. Depending on the pattern and the teacher, you may hear these referred to in the language of a ‘house’, so each unit having a ‘floor’, ‘ceiling’ and two ‘walls’.
I have also seen it taught in terms of points of the compass, so each bead in the unit is referred to as ‘North’, ‘South’, ‘East’ or ‘West’. Personally, I think this terminology can cause more confusion. So, don’t get bogged down in it. Just play with the beads and find a language that makes sense to you. If you do find the house analogy or the compass analogy helpful, then use it, but if not, ignore it.
Understanding how to think about adding new units
Every time you add extra beads, you should be thinking of trying to add a new square onto your beadwork. This rule applies whichever direction you are working.
Unless you are creating the very first unit, each new unit (or square) that you add, will need to join onto the existing beadwork. So, you will find that part of the new unit is made up of an existing bead.
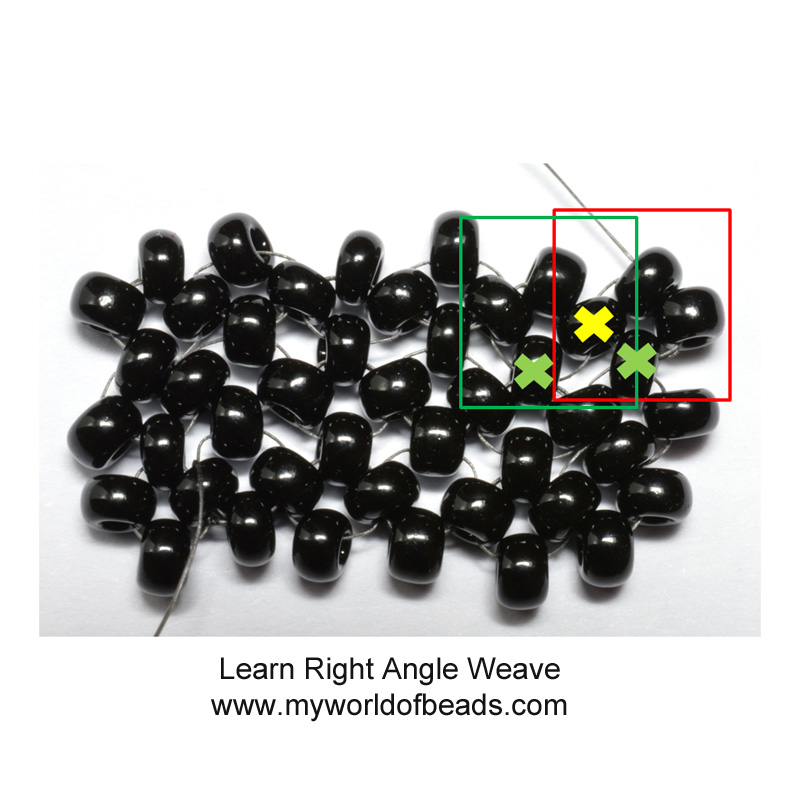
If you are working the first row of RAW, you will always have one side of your square in place. So you will only ever add 3 new beads to form the next unit. Imagine in the photo above that the unit outlined in red is your first unit (so, ignore the rows below it). The unit outlined in green is the second unit. The bead with a yellow cross on top is shared between these two units. This same rule applies whenever you stitch the first unit in a new row. Look again at the unit outlined in red: the bead within that unit that is marked with a green cross is shared with the previous row.
If you are adding to a row that is not your first row, then you will already have two sides of your square in place. One will be the bead from the row beneath and the other will be the bead from the unit you last added. Again, looking at the photo above. The second unit (outlined in green) shares the bead marked with a yellow cross with the previous unit from the same row. Then, the bead marked with a green cross is shared with the row beneath.
Orientation
First, try and get a sense of orientation. Your thread path will be moving round in circles (indicated by the yellow arrows in the photo below). But you also need to be aware of the over-all direction you are trying to follow.
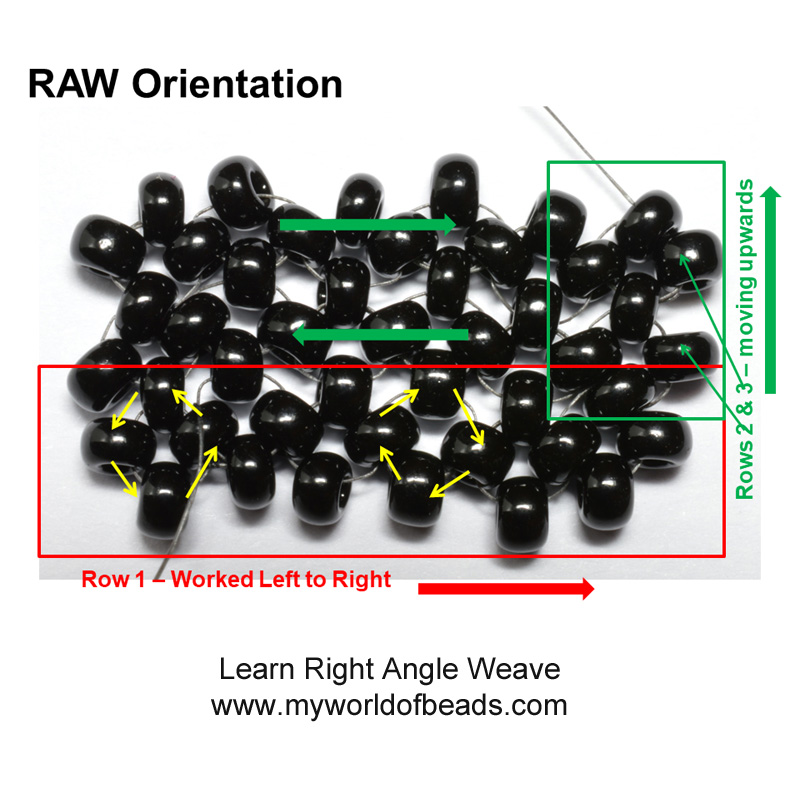
When you are stitching a single row of RAW, you will be moving in a straight line from left to right (or right to left). This means that when you are trying to work out where to add the next unit, you need to look at which bead on your existing work is pointing in the direction you want to travel. In the photo above, I have drawn a red box around the first row. You are working left to right. So, you will always start the next unit using the bead on the right hand side of your last unit.
Adding new rows
When you are adding extra rows of RAW to create a strip, you will be working in two directions. The beadwork will be growing upwards, row by row (the growing rows are outlined in green in the photo above). So keep that thought at the back of your mind. This may help you to see the beads in each unit in terms of:
- top (the direction in which your rows are being added)
- bottom (the direction that points towards the end from which your strip started)
- sides (the directions that point along the row you are working on)
As with the first row, each new row will still be worked from side to side. (In the photo above, the green arrows indicate the direction in which rows 2 and 3 are worked).
If you keep your beadwork in the same alignment as you work, then you will end up working the first row from left to right, the second row from right to left, the third row from left to right, etc.
However, if, like me, you find you are more comfortable working in one direction (eg left to right), then just turn your beadwork over at the end of each row. So you will always be working along the strip in the same direction.
Learn Basic Right Angle Weave
If you’re feeling a bit overwhelmed by all the theory, don’t worry! Just get out your beads and follow the step-by-step instructions below and hopefully all will become clear! I have outlined the rules you need to be following so that you are really learning to understand the stitch, rather than just blindly following directions. This may mean it takes a little longer to make progress, but take your time and persevere.
I have created this strip using two colours of beads. That makes it is easier to see where you are adding beads and where you are passing through them. Find two strongly contrasting colours of beads, but make sure they are the same size. Ideally, use a larger size of bead so you can see what you are doing as clearly as possible. You can check out this blog if you want some advice about which beads to use.
Lay the beads out in two piles on your beading mat. Then, label one pile ‘A’ and the other pile ‘B’ – this will really help you to follow the instructions. In the diagrams, I have shown the (A) beads in brown and the (B) beads in yellow. Cut a length of thread that you are going to be comfortable working with. Then, when you start, leave a tail thread that is just long enough to stitch in at the end.
Unit 1
Pick up 1(A), 1(B), 1(A), 1(B). Pass through all four beads again so that they are pulled into a circle.
You should find that your working thread and your tail thread are currently sitting between the same two beads, so knot these two threads together to hold the first unit firmly in place.
Continue passing your working thread through a few more beads until it is exiting from a (B) bead.
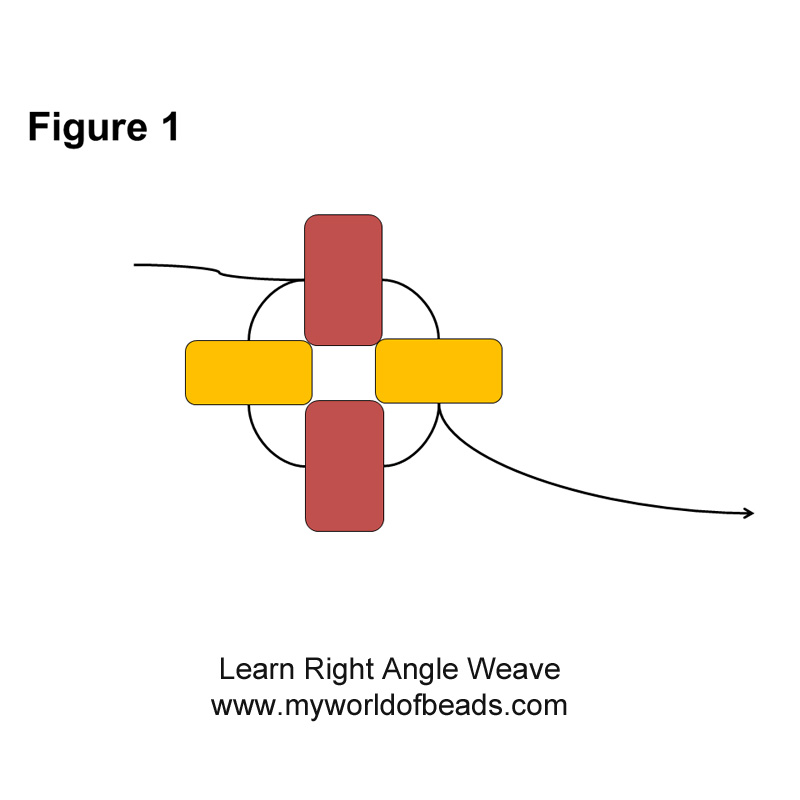
Now look at this unit. Your (A) beads are at the top and bottom of your square unit. Your (B) beads are at the sides of your square unit. Note this carefully!
This is your first row, so you will be moving along it from left to right. Bear this in mind if ever you are confused about where to start adding each new unit. You want to be exiting from the (B) on the right hand side of your final unit before you pick up any new beads.
Unit 2
Pick up 1(A), 1 (B), 1(A) and pass through the bead from which you started (this will be the bead on the side of unit 1), but make sure you pass into the bead from the opposite side that you exited it. (Remember what I said about ‘passing through’, in this blog – take another look if you haven’t see it!)
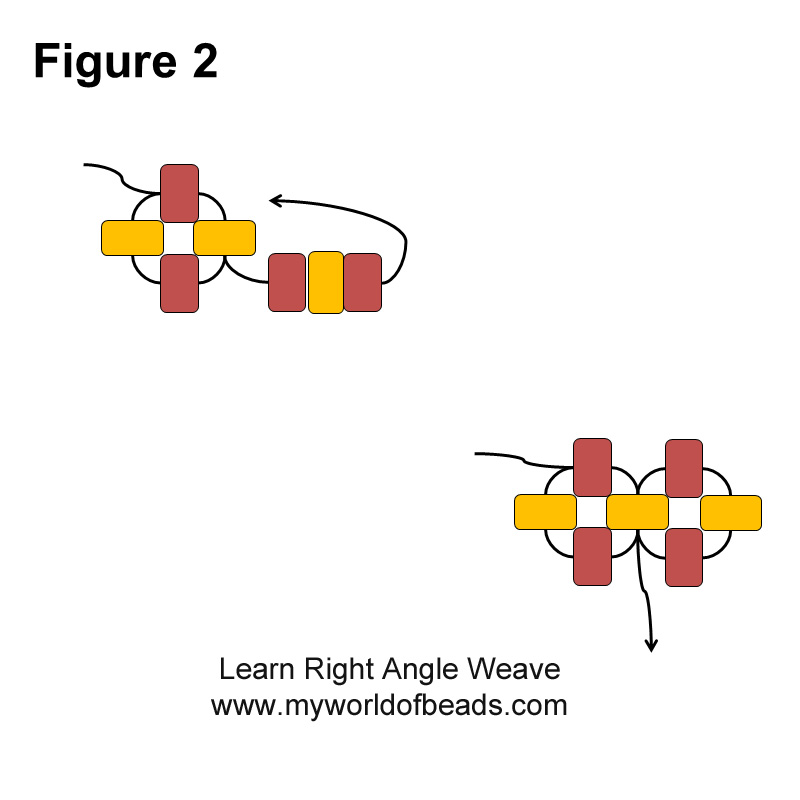
Take a note – you should now find that the 3 beads you have just added, are forming a new square unit. Your thread path will be moving in a circular direction. Once again, you should see that the (A) beads form the top and bottom of this unit and the (B) beads are at the sides.
Before you add the next unit, pass through the first (A) and the first (B) you just added (red thread path in the top diagram in figure 3, below). Again, remember the tip I gave you in this blog: each unit is a 2-part step. In part 1 you add your new beads. In part 2 you move into position ready for the next unit. If you need a reminder, use this link to read the blog again.
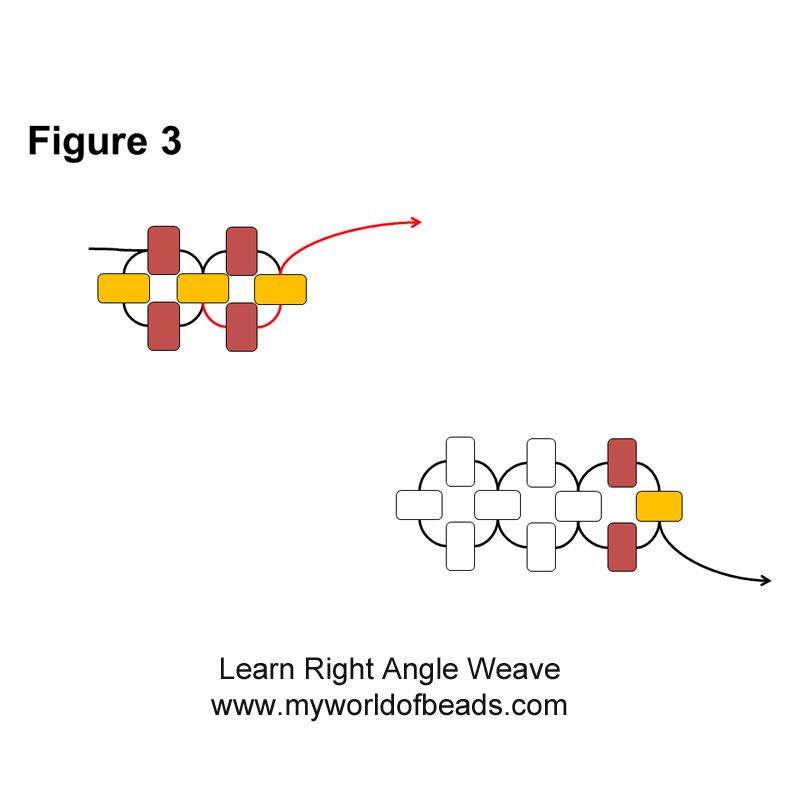
This should have taken you to the right hand edge of your row. So, when you add the next unit, you will continue growing your strip in a direction that travels from left to right (bottom diagram in figure 3).
Units 3-6
Keep repeating the steps for unit 2 until you have a total of 6 units. If you are starting out, it’s a good idea to make a list of the number of units you need to have in your row. Then, you can cross each unit off as you stitch it. I have started a list for this row (below):
Unit 1 Unit 2 Unit 3 Unit 4 Unit 5 Unit 6
Hopefully, you are noticing a pattern. In one unit you will be moving round the circle of four beads in a clockwise direction. Then, in the next unit, you will be moving round in an anti-clockwise direction. In the following unit you will return to move clockwise and so on. So, you alternate clockwise and anticlockwise all the way along the row. This pattern holds true in every row you stitch.
How to Count Rows or Units in Basic Right Angle Weave
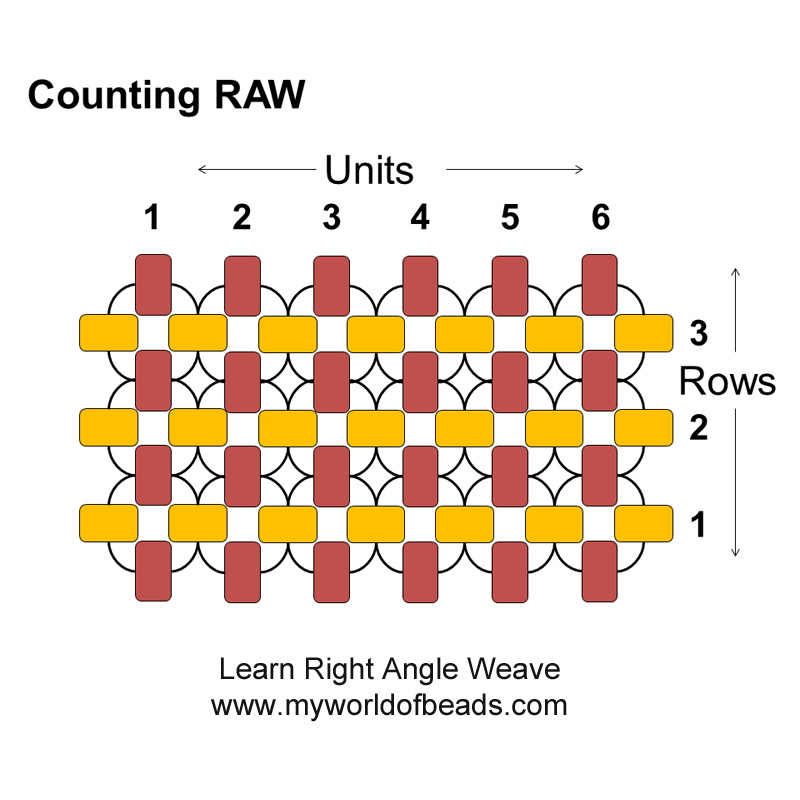
As you become more experienced, you will need to be able to count the number of units (or rows – the process is the same for each). Fortunately this is easy. Lay your strip down and count the number of beads that are pointing upwards. You will be counting the ‘top’ bead in each unit. So that tells you how many units you have.
If you have a longer strip and want to count how many rows, then lay the strip out so that the rows are moving from bottom to top (remember the orientation I showed you above). Then, count the number of beads that are pointing out of the side of your strip.
Row 2, unit 1
To add a new row, you want to work along the top edge of your strip. (Remember how the theory on orientation explained that you will move upwards as you add extra rows to a strip of RAW). You should see that you have (A) beads along the top of your strip. So, you will be using these beads to attach your next row.
Before you pick up any new beads, make sure that you are exiting from the (A) bead at the top of the final unit in your first row.
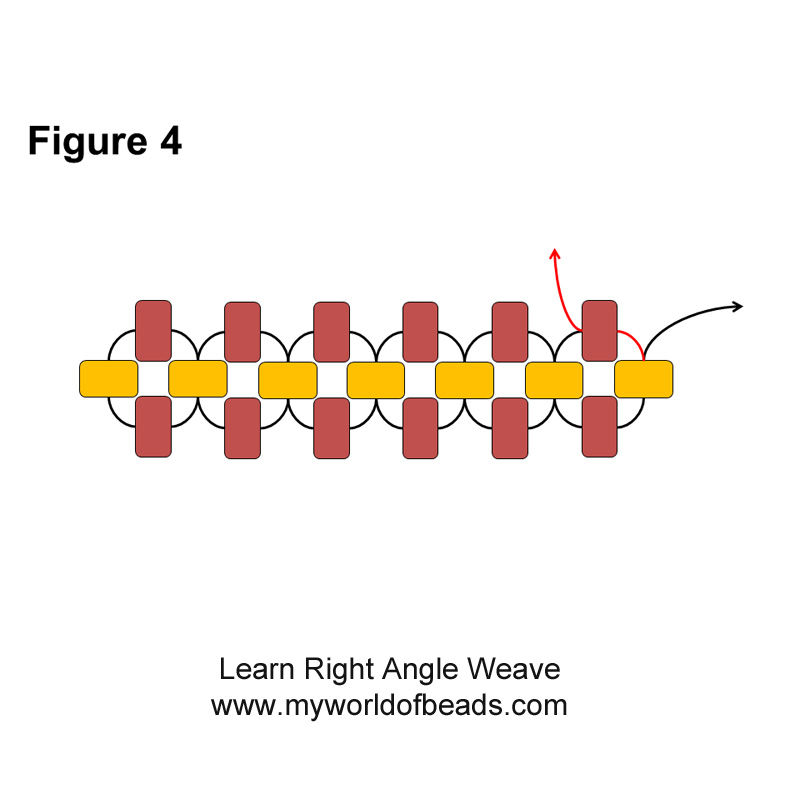
In figure 4, I had ended up exiting from the side of my final unit (black arrow), as if I were ready to add another unit to the row. However, as I want to now start a new row, I need to continue working round the unit until I am exiting from the (A) bead at the top. So, take a look at the red thread path and red arrow in figure 4.
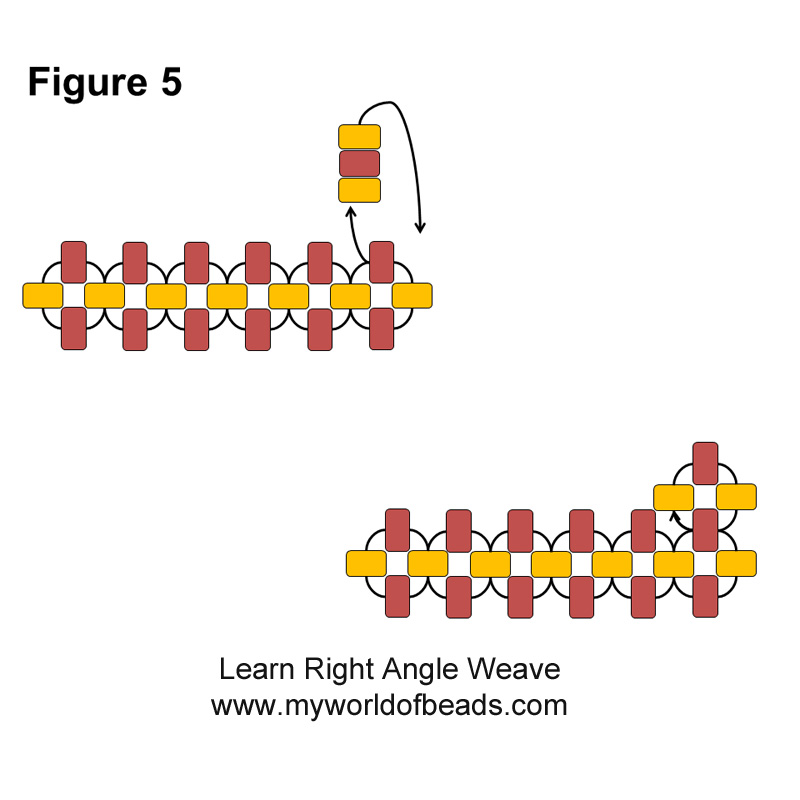
Pick up 1 (B), 1 (A), 1 (B) and pass through the bead from which you are exiting, just as you have been doing for each unit in row 1.
This should create a little square on top of row 1, as you see in figure 5. So far, so good…nothing new here, yet!
Row 2, Unit 2
Before you add any new beads, you need to identify where you should be exiting. (Remember, that’s part 2 of your stitch!).
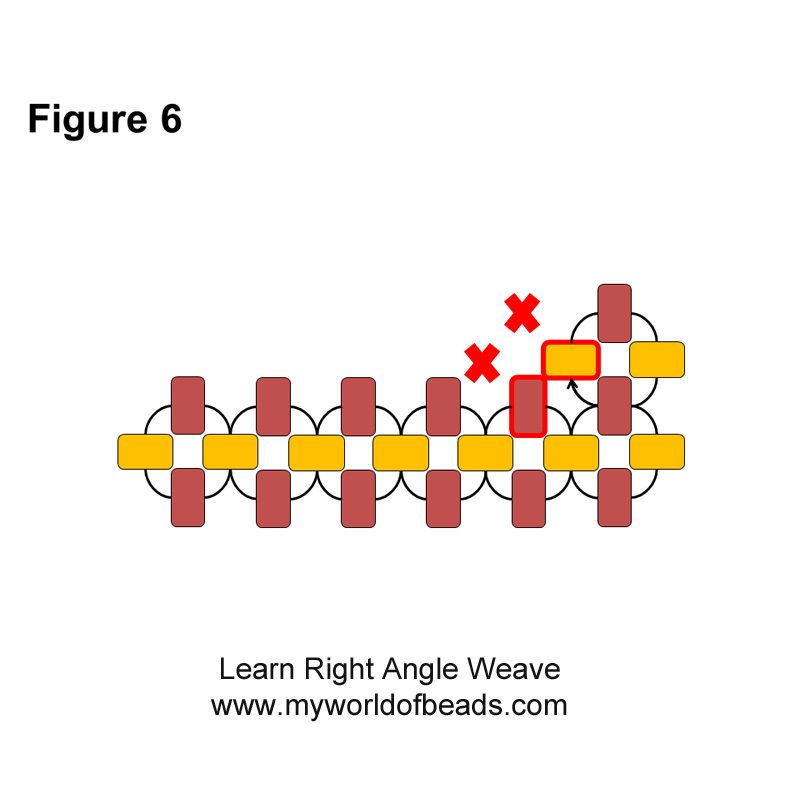
You will already have 2 beads of unit 2 in place (outlined in red in figure 6). One side of the square (this will be the (B) bead from row 2, unit 1) and the bottom of the square (this will be the (A) bead from the next unit in row 1). So, the new beads you add will form the top and second side of this new unit (indicated by the red crosses in figure 6).
Before you pick up the new beads, you need to be exiting from one or other of the existing beads in this unit – the beads highlighted in red in figure 6.
There are two possible thread paths to follow in order to get where you want to be. The thread path you need will depend on whether you stitched the previous unit moving in a clockwise or anticlockwise direction.
Currently you should be exiting from the bottom bead in unit 1 (refer back to the arrow showing your exit point in figures 5 & 6). In order to keep the thread moving in a circle, you must move into one of the side units.
Clockwise unit
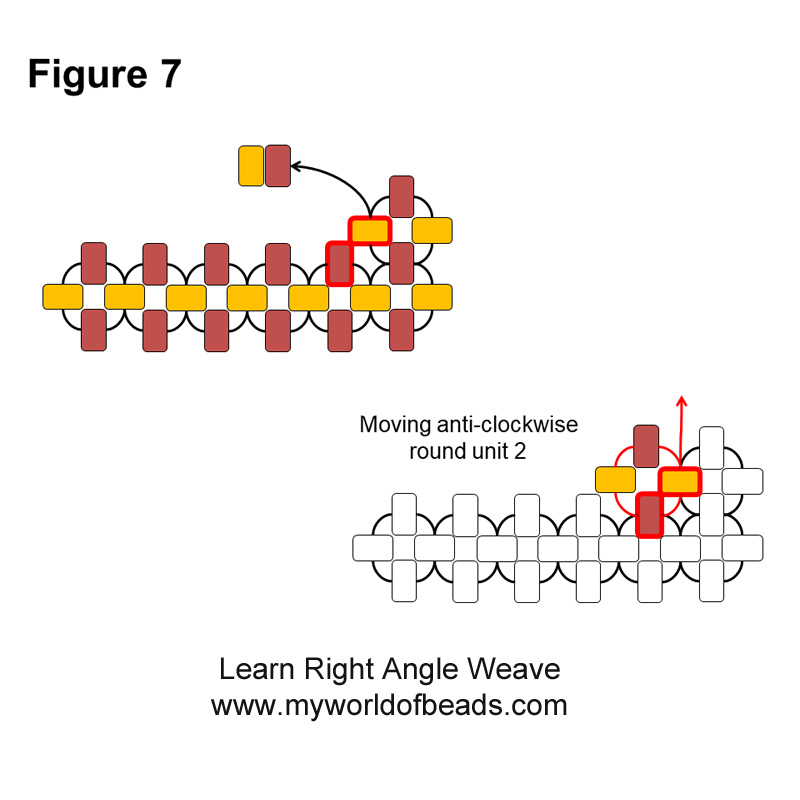
If you find you are moving into the side unit that is in the direction that your row is growing, then you are in the right place to add your new beads. See figure 7. This will be the case every time you have added a new unit using a clockwise thread path.
Pick up 1 (A) and 1 (B), then pass through the (A) bead from the top of the unit in row 1 and through the bead from which you started. See figure 7 – note the red arrow showing where you are exiting.
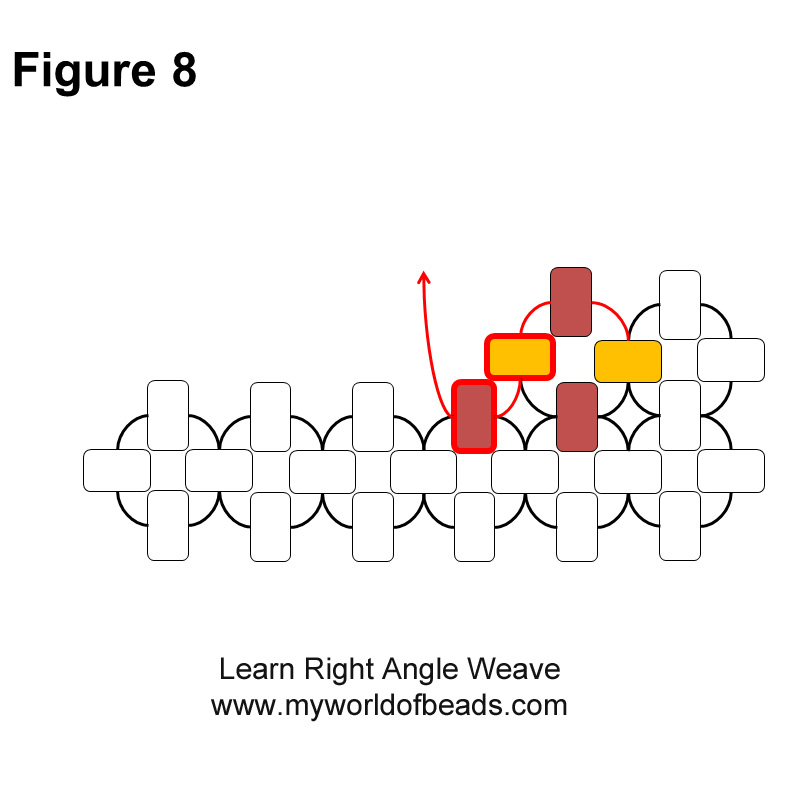
This completes your new unit, but you now need to get in position to add your next unit. So, continue moving around your circle, passing through the two beads you have just added. Then, pass through the (A) bead from the top of the next unit in row 1 (see figure 8 – this last bead is outlined in red).
Row 2, Unit 3
You just added unit 2 by working in anti-clockwise circle. So, to get into position, you should continue moving round the unit. Pass through the top bead, then into the other side bead (outlined in red in figure 9).
Now look at the direction your thread is moving. Although you are in a bead that is shared with the next unit, if you add your new beads at this point, they won’t sit in the right place. Instead, you need to pass through the (A) bead from the next unit in the previous row (outlined in red in the top diagram in figure 9) – this is going to become the bottom bead of your new unit.
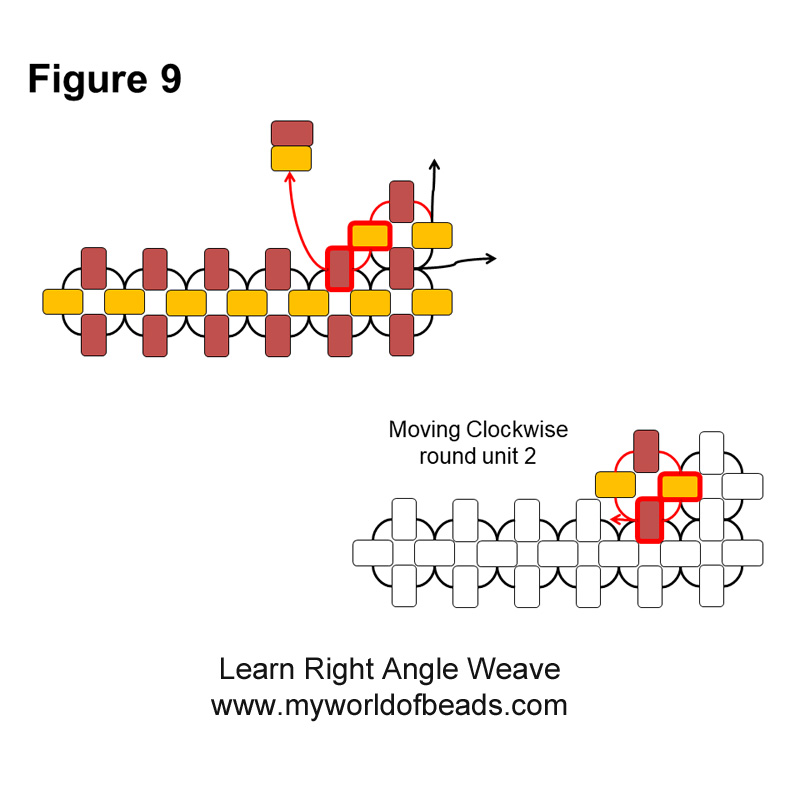
Pick up 1 (B), 1 (A) and pass through the side (B) from your previous unit, then through the (A) from which you started. See figure 9.
This completes your new unit, but you need to get into place ready to add the next unit. So, keep moving round your square and you will find yourself passing through the first (B) you added. See the red thread path in figure 10.
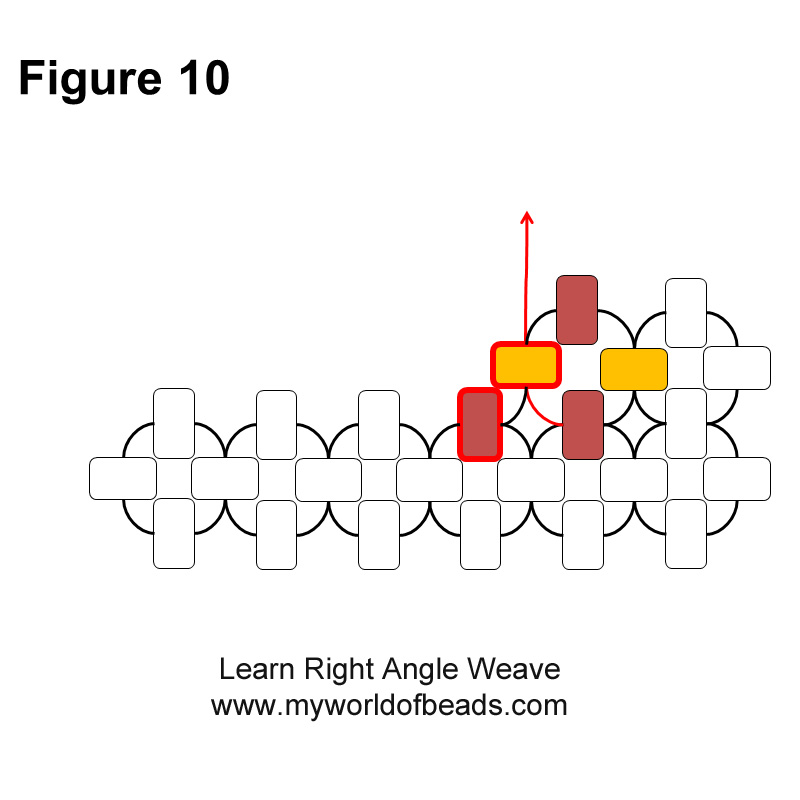
Keep adding units following either option 1 or option 2 until you reach the end of the row. Then keep adding rows following the same instructions as you used to add row 2.
Looking for patterns in Basic Right Angle Weave
Basic Right Angle Weave has a pattern and a rhythm. You may struggle to see it at first. So, if that is the case, just follow the diagrams carefully. Then, as you practise more, you will start to feel the rhythm.
If you have added a unit working in a clockwise direction, the next unit you add will be worked in an anticlockwise direction. Then the following unit will work clockwise and so on. This means that on every other unit you will need to exit from the side of the unit you have just added (option 1 thread path). On the alternate units you will need to exit from the top bead from the row below (option 2 thread path).
Keep adding new rows to your strip until you are really happy that you understand what you’re doing. When you feel confident using the two colours, first try a few rows using a single colour and see if you can still work out the thread paths. If you feel happy with this, then try using smaller beads. Once this also feels comfortable, you should have a good understanding of basic Right Angle Weave.
Projects using basic Right Angle Weave
You can get a long way just practising the sample. But if you are ready to take the next step and try a project, I have some basic Right Angle Weave tutorials that I recommend.
I designed the bow bracelet as a way of teaching basic Right Angle Weave in classes. So, for the first part of the bracelet, you will make a long strip using two colours of beads.
You then get to try a strip with just one colour. Plus, learn some simple shaping. So, this is a brilliant project to try now. You can find the pattern here>>
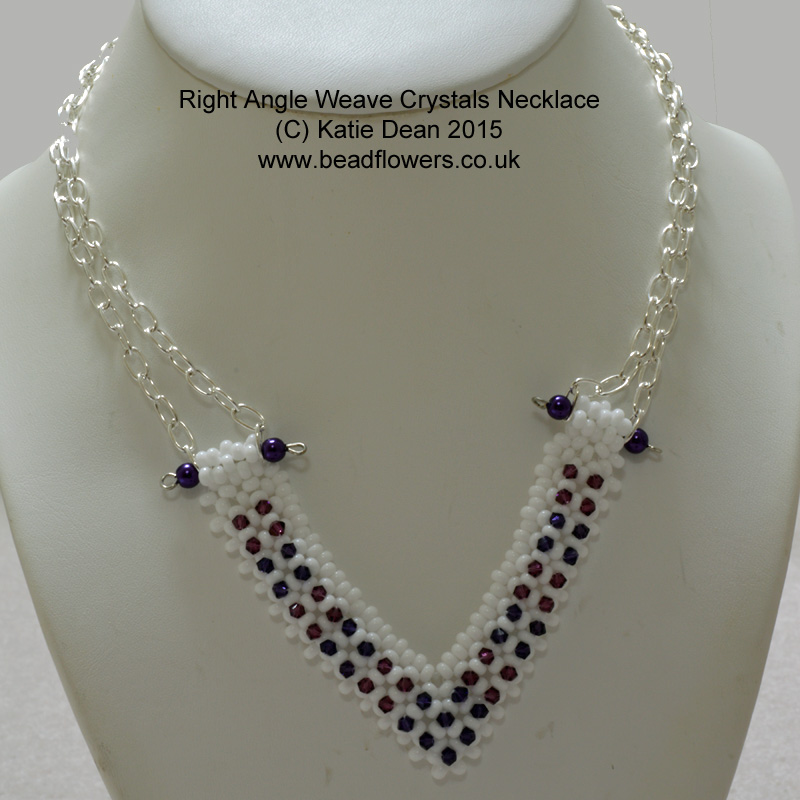
 Then, this necklace uses basic Right Angle Weave to create a v-shaped base. Add some simple embellishment to complete the design. So, this is a good next step for you. Grab the pattern here>>
 You can also find a whole lot more basic Right Angle Weave projects at this link>>
Next Steps
Once you feel satisfied with basic Right Angle Weave, you can come back here and start learning some variations. If you’re struggling to get your head around this technique, you might find it easier to work with two needles. So, look out for the blog on that method!
If you would like a PDF copy of these instructions that you can print out and keep, then follow this link>>
You are also ready to move on to other variations of RAW. So, remember to keep checking back for more lessons. And if you found this helpful, please share it with your beading friends.


